
How to Install Deck Lighting
Updated: Feb. 15, 2023Low-voltage systems make lighting a deck both safer and easier.

- Time
- Complexity
- Cost
- Multiple Days
- Beginner
- $101–250
Step 1: Draw up a lighting plan
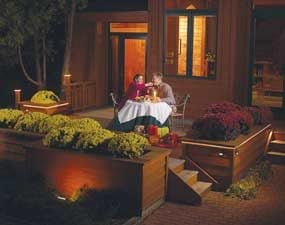
If the night is calling you, pull up a lounge chair and enjoy it from your back yard. Your deck can be the setting for many relaxing evenings. The key is to add lighting that casts a nice glow over sitting areas, highlights features and illuminates steps and walks.
Low-voltage systems do this well and they’re safe and easy to work with. Unlike with standard household voltage, the transformer that powers them simply plugs into a receptacle. While there are ready-made low voltage deck lighting kits available, in this article we’ll show you how to plan a system for your deck and how to install the transformer and fixtures.
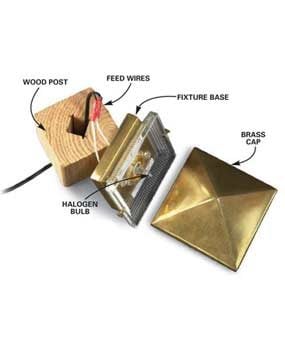
There are several types of low-voltage fixtures, each designed for special uses (lead photo). To decide on which light fixtures to use where, first draw a rough plan of your deck (Fig. A). On the plan, note at least the following key features: stairs, sitting and congregating areas, nice features such as railings and plantings and traffic paths. Also note the location of nearby receptacles that can be used to plug in your transformer.
Take your deck plan to a lighting showroom to select specific fixtures to light each feature. Ask a salesperson to help. Mark the selected fixtures on the plan. Note that a single fixture can sometimes handle several tasks. Next position the transformer on the drawing next to an existing receptacle. If no receptacle is nearby, you’ll have to install one. A receptacle controlled by an inside switch is the most convenient setup.
Draw lines to connect the fixtures to the transformer. Minimize the amount of wire you’ll need by connecting multiple fixtures to a single circuit wire. (This may affect the size wire you need. See “Sizing Circuit Cables. ”) Next, add up the total wattage for all the fixtures (see “Sizing the Transformer. ”). Select a transformer size that provides at least 25 percent excess capacity. Also decide what features you want with the transformer.
Figure A: Lighting plan
Mark the light fixture locations on your deck plan. Locate the transformer next to an electrical receptacle (if necessary, add one). Draw routing lines for the wiring circuits. For our deck, the post lights (green) highlight the main entrance to the house and light the path to the driveway. The step lights (blue) add safety by lighting stairways. The rope lights (red) highlight the planter boxes and add ambient light. The floodlights (orange) highlight the plants and add to the look from the street.
Note: You can download Figure A and enlarge it in the Additional Information section below.
Step 2: Connect to a power source
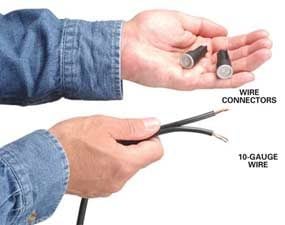
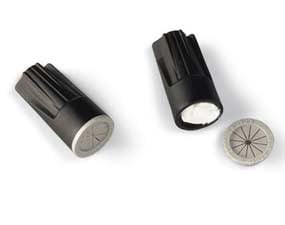
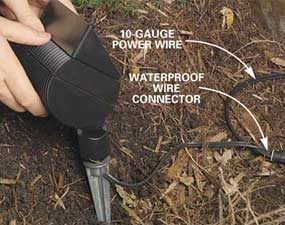
Low-voltage cable and connectors
Waterproof wire connectors are ideal for exterior low-voltage wiring. Strip 3/4 in. of insulation from each wire end. Hold all the ends flush together and twist on a connector. You can get waterproof connectors at home centers, electrical supply houses and irrigation supply houses.
First, run the wiring. Each circuit requires a cable that is made up of a pair of wires. Calculate the total length of cable needed and buy it as one piece. Plan on cutting specific lengths on the job. See “Sizing circuit cables. ”
Always try to route wires out of sight. You don’t have to worry about safety. Low-voltage wiring isn’t dangerous. Run the cables under the decking. If a cable must be visible, staple it into a corner or on the least conspicuous surface.
Use insulated staples to fasten the cables to wood members at 2-ft. intervals. The low-voltage wire and the waterproof wire connectors must be buried 6 in. deep into the ground.
Sizing the Transformer and Cables
Size the Transformer
Add the wattage of each fixture to determine the total load. Our deck:
| 4 step lights x 12 watts | 48 watts | ||
| 3 post lights x 20 watts | 60 watts | ||
| 60 ft. of rope light x 5.45 watts per ft. | 327 watts | ||
| 2 floodlights x 20 watts | 40 watts | ||
| Total | 475 watts | ||
| Add 25 percent excess: | |||
| 475 x 1.25 | 594 watts | Transformer size: at least | 594 watts |
The Power Center: Optional transformer features:
- Timer switch, which automatically turns the lights on and off at preset times.
- Photo eye, which turns the lights on at dusk and off at dawn.
- Individually switched circuits, which allow different groups of lights (scenes) to be independently controlled.
Size Circuit Cables
This allows for connecting fixtures with a maximum total of 150 watts.
| Length of Cable | Wire Size |
| 0 to 50 ft. | 12-gauge |
| 50 to 100 ft. | Use 10-gauge |
| 100-plus ft. | Use 8-gauge |
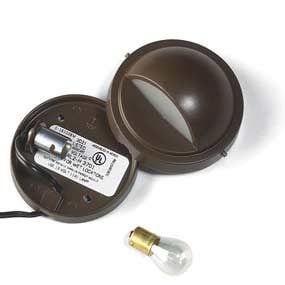
Step 3: Install stair lighting

Stair lighting effect
Stair lights are unobtrusive, yet they cast enough light to make the stairs safe at night.
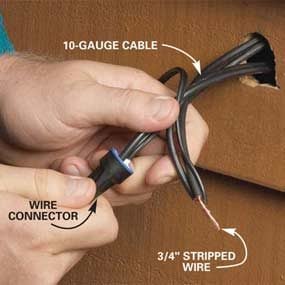
Photo 1: Wire the fixture
Bore a 1-1/2 in. hole from the front side and pull a loop of the cable through. Cut the cable and rejoin the ends along with the light fixture leads with waterproof wire connectors.
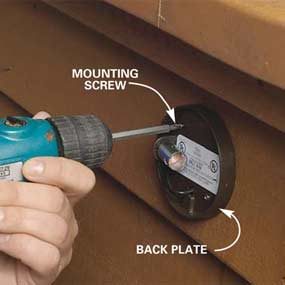
Most stair lights have to be connected through the back. Drill a hole through the planter wall behind the fixture and feed the wires through (Photo 1).
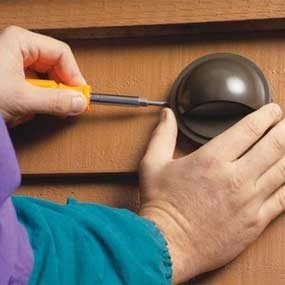
Connect the wires with waterproof wire connectors and push the wires back into the hole. Fasten the back plate to the siding (Photo 2) and then install the cover (Photo 3).
Step 4: Mount a post light
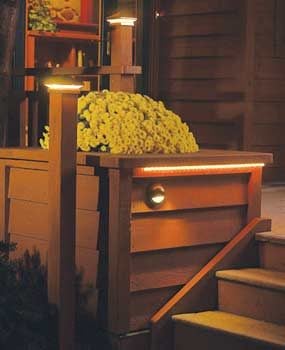
Low voltage deck post lights: Post light effects
Post lights highlight the size and shape of the deck and offer general illumination.
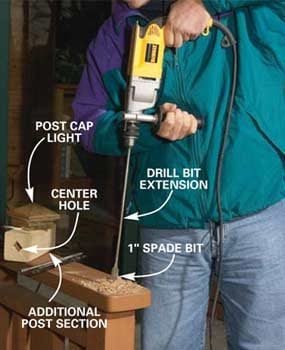
Photo 4: Bore a 1-in. hole
To begin installing low voltage deck post lights, first bore a 1-in. hole down the center of the rail post. Drill deep enough to get below the second horizontal rail.
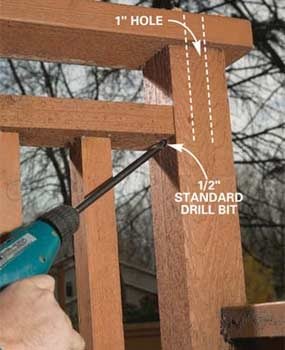
Photo 5: Drill an intercept hole
Drill a 1/2-in. hole from below the rail. Angle up to intercept the 1-in. hole bored in Photo 4.
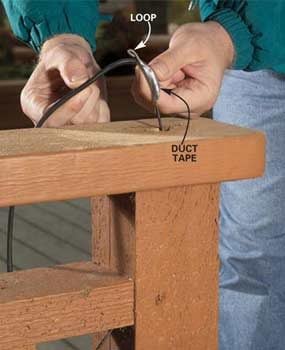
Photo 6: Feed in the cable
Feed a heavy wire or electrician’s fish tape through the holes in the post. Tape the circuit cable to the wire and pull it back through the holes. Connect the cable to the post cap light’s feed wires with twist connectors.
The wires for the post cap lights come from below. Again, try to find a hidden route. In our case, we drilled partially through the length of the existing rail post (Photos 4 – 6). After feeding the wire through the rail post, we drilled through the center of an additional post section (Photo 4) and screwed it to the top rail (Photo 7).
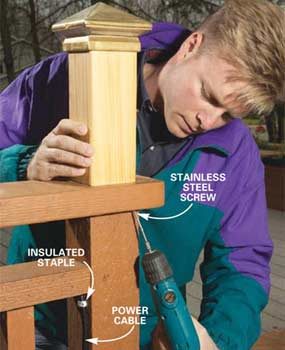
Photo 8: New technique for low voltage deck post lights
For the new low voltage deck post lights, we first cut them in half lengthwise with a circular saw, then cut a groove for the wire and reglued the halves together with urethane glue. Feed the circuit wires through the post before connecting the fixture (Photo 8). Connect them to the fixture wires with the wire connectors, and push the wire back into the post. Screw the post light to the top of the post.
Dig a hole 18 to 24 in. deep with a posthole digger to set the post. Adjust the length of the post to the hole’s depth, and drop the post into the hole. Partially fill the hole with dirt, plumb the post with a carpenter’s level and tamp the dirt around the post. Continue adding dirt, checking for plumb and tamping until the hole is completely filled. Cover the circuit wires with 6 in. of dirt.
Step 5: Install rope lighting

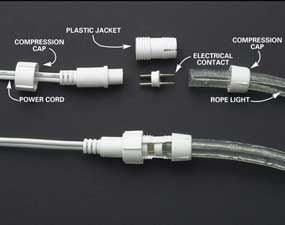
Photo 9: Rope light connections
Connect the special power cord to the rope lights on one end and to the power cable on the other.
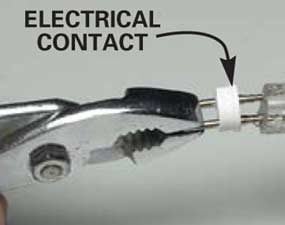
Insert the contact pins
Connect the power cord to the end of the rope light by inserting the contact pins with pliers. Then assemble the rest of the connector.
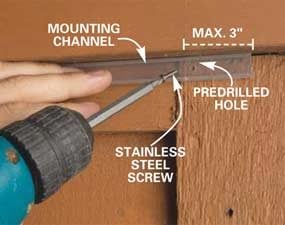
Photo 10: Mount the track
Drive 3/4-in. No. 4 stainless steel screws through predrilled holes in the mounting track. Space the screws 2 ft. apart. Fasten the track within 3 in. of its ends.

Rope lighting is unique. It’s a flexible, solid plastic rod with a series of tiny bulbs embedded in it. Calculate the total length needed, add 10 percent and buy one long piece (it’s available in 250-ft. rolls) and cut it on the job.
Attach a power connector to one end of the rope lighting (Photo 9). The cord on the power connector then attaches to the circuit wire with twist connectors. You can connect multiple pieces of rope light with straight and 90-degree connectors, but it’s quite flexible and we were able to bend it around 90-degree corners without the 90-degree connector.
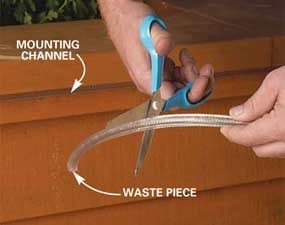
While you can install the rope with clips that mount every foot or so, the best system is a plastic rope light track. Cut the track to length and then mount it with nails or screws. We found that pre-drilling the back of the track and fastening with 3/4-in. corrosion-resistant screws worked best (Photo 10). Round up a helper and stretch the rope light along the installed track, then cut it to length (Photo 11) at one of the cutting marks. Start with the end with the connected power cord and push it into the track, working to the other end (Photo 12).
Step 6: Connect the floodlights
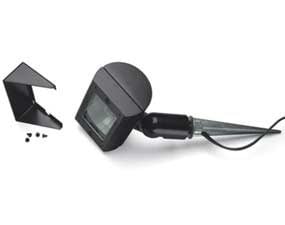
Floodlights provide a wash that highlights features. Be careful not to direct the light into people’s eyes when they’re on the deck. Some floodlights come with a hood to reduce glare. A ground stake attached to the bottom of the fixture makes installation a snap (Photo 13). Bury the wire 6 in. deep.
Additional Information
Required Tools for this Project
Have the necessary tools for this DIY project lined up before you start—you’ll save time and frustration.
- 4-in-1 screwdriver
- Circular saw
- Drill/driver - cordless
- Hammer
- Pliers
- Wire stripper/cutter
Drill bits, ½-in., 1-in.; Drill bit extension; 1-1/2-in. hole saw
You will also need a shovel
Required Materials for this Project
Avoid last-minute shopping trips by having all your materials ready ahead of time. Here’s a list.
- Cable
- Cable staples
- Low-voltage lighting fixtures
- Transformer
- Waterproof wire connectors
