
How to Hang Drywall: Use a Lift
Updated: Feb. 05, 2024Hang drywall alone with the right tools and techniques.
See easier ways to hang and handle drywall (aka Sheetrock). We have 10 tips that save time and strain, whether you're working alone or with a crew.
- Time
- Complexity
- Cost
- Multiple Days
- Intermediate
- $101–250
Rent a drywall lift for ceiling work

If you have to drywall a ceiling, don’t hesitate to rent a lift. It’s well worth the rental fee and is by far the best way to get a ceiling up without back strain. These five tools will making hanging drywall a lot easier.
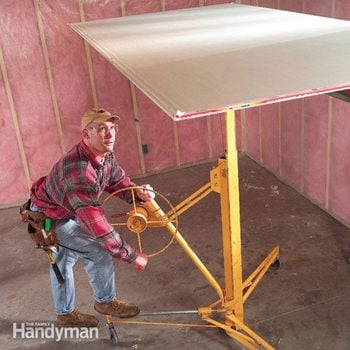
Drywall lifts break down into three parts and fit easily into a midsize car. After you reassemble it, release the catch on the wheel and crank it up and down a few times to make sure it’s working smoothly. Then lock the lift and hoist one end of the drywall sheet up to the support hook—finish side down. Now lift the other end of the sheet up and slide it onto the second hook as shown. Lift slowly and smoothly—abrupt or jerky handling can pop the front edge of the drywall off the hook.
Tip the sheet so it’s horizontal and lock it down. Then wheel the lift into approximate position. Lifts are stable and maneuverable, so you can fine-tune the placement when you raise the drywall. Then crank it tight. You may need to get up on a ladder to nudge the sheet into place. Put in at least eight screws before lowering the lift.
Lifts work for walls, too
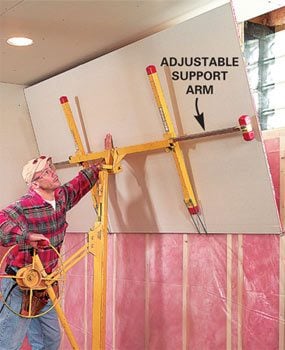
A lift works on upper wall sheets just as well as it does on ceilings. After loading the drywall, push the lift to the wall, position the sheet, tip the top edge against the wall and crank it snugly against the ceiling.
Make cutouts in place
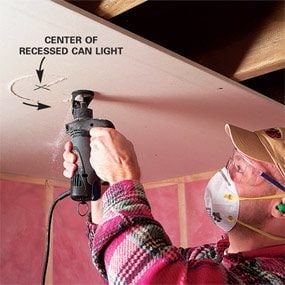
Cutouts for lights and outlets are much faster and easier to make with the drywall in place, saving the trouble of taking the sheet down and recutting it if a precut hole doesn’t quite fit. Use a special cutout tool with a drywall bit, available at hardware and home centers. First, make sure to push electrical wires at least an inch back into the boxes, out of the way of the cutout bit. Next, measure and mark the approximate center points of the electrical boxes on the drywall, before you put it up. Crank the sheet up, and put in just enough screws to hold it in place, keeping the screws at least 12 in. from the cutout. Then punch the drywall cutout tool through the center mark and run it out to the edge until the bit hits the side of the box. Ease the bit up and over the edge to the outside of the can or box and slowly cut counterclockwise around it as shown. Drive nearby screws after the cutout is finished.
Panel rollers make big jobs small
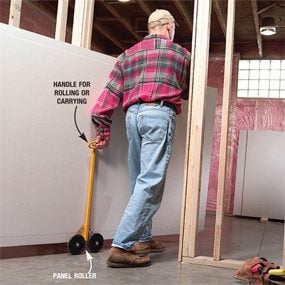
Have a few dozen sheets to move? Here’s the next best thing to having somebody carry the drywall for you: a heavy-duty panel roller that carries up to two sheets at a time (or anything else that’s flat and heavy). Roll drywall almost effortlessly through the house, using one hand to control the roller and the other to balance the sheet and steer around corners. The wheels tilt and roll over thresholds, and for bigger obstacles, just grasp the handle and lift the drywall. You can even tuck a sheet under your arm, a very simple and comfortable carrying position. This lifter doesn’t work on a full flight of stairs. Panel rollers are available at drywall and tool suppliers.
Ease the strain with a panel lifter
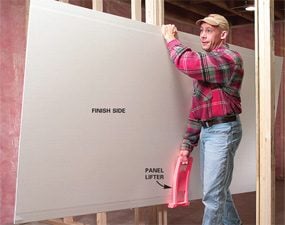
Take the strain off your arms and upper body and make navigating tight spots easier with a plastic panel lifter, available at home centers. Just hook the panel lifter around the bottom of the sheet at the center point, tip the sheet up and lift, leaving your lifting arm fully extended as if you were carrying a suitcase. Use your other arm to balance the sheet, keeping the drywall close to horizontal. You’ll be amazed—you can move drywall with half the effort. But it doesn’t work on full flights of stairs. Get a helper for that.
Preset nails (and use your head)
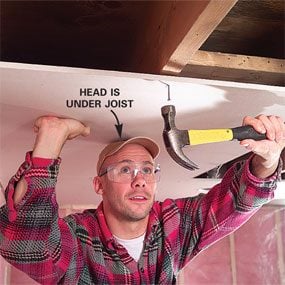
When you need to hold a piece up in place without the lift, preset a half-dozen drywall nails around the edges at joist or stud locations before you lift the sheet. Hoist it up, support it tightly against the ceiling joists with a hand and your head (a sponge under the hat helps), then drive in the nails to hold the piece in place. Fasten it off with screws.
Customize the lift for angled pieces
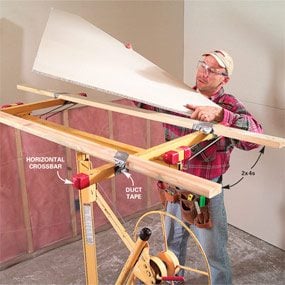
Modify the lift to hold small or irregular pieces by taping a pair of 2x4s perpendicular to the crossbars as temporary supports. The hooks won’t catch, so lock the crossbars down into the horizontal position.
Lever; don’t lift
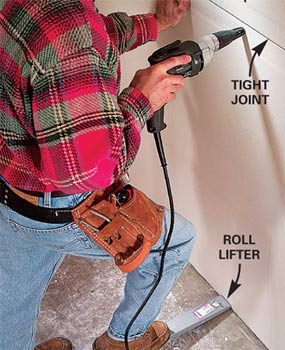
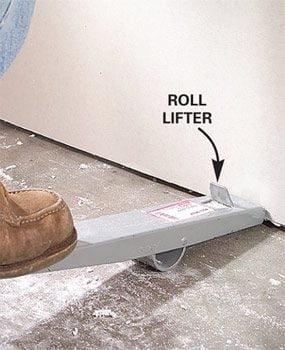
Rather than straining to hold lower sheets up off the floor, lever them up snug against the upper sheet with a pry bar and a block of wood or a roll lifter (available at home centers).
Add nailers instead of recutting

You’ve wrestled a heavy sheet up, put in half the screws and just noticed that you slightly miscut the sheet. Before you go through the hassle of taking the sheet down and recutting, try these possible fixes:
- Tack a 2×4 to the side of the joist as a nailer for the next sheet.
- Create a floating seam by screwing the unsupported end to a 1×4 that you slide on top of it. Let the 1×4 overlap the end about 1-1/2 in. Then screw the next sheet to the 1×4 as well. Cut the 1×4 longer than the piece you’re seaming so that adjoining sheets will help support it.
Measure tight but cut loose
Putting drywall up and then taking it down to shave an edge that won’t fit is a waste of energy. Instead, subtract 1/4 in. from your measurements to make up for rough cuts and wavy walls. It’s easier to fill slight gaps with joint compound than to struggle with a tight fit.
Required Tools for this Project
Have the necessary tools for this DIY project lined up before you start—you’ll save time and frustration.
- Chalk line
- Drywall saw
- Hammer
- Safety glasses
- Screw gun
- T-square
- Tool belt
- Utility knife
Required Materials for this Project
Avoid last-minute shopping trips by having all your materials ready ahead of time. Here’s a list.
- Drywall nails
- Drywall screws
- Drywall sheets
