How to Cut Drywall for an Opening
Updated: Jul. 28, 2023Cut out drywall holes for electrical outlets with a drywall saw.

- Time
- Complexity
- Cost
- A full day
- Beginner
- Varies
Cutting accurate holes
One of the most frustrating and time-consuming parts of hanging drywall is cutting all those holes for electrical boxes and lights. Cut them too small and you have to take the piece down and recut it. Cut them too big and you’ve got a bigger taping job on your hands, or you wind up throwing away the sheet and starting over.
Here we’ll show you how to cut electrical box openings in drywall that fit perfectly the first time—without broken corners and especially without being too big. Oversized holes are a hassle to fix and look tacky with those big plate covers. If you do make a mistake, check out our remedies for getting you out of a jam.
Recessed lights
Cutting openings for recessed lights can be tricky because you have to measure over your head and then transfer the numbers to a sheet that’s sitting on the floor. It’s so easy to get confused and lay out the openings from the wrong edge and wind up with holes cut in the wrong place. Then you’ve got a 55-lb.piece of trash on your hands.
When you’re staring at the sheet trying to figure out which end or side to measure from, pantomime swinging the sheet up into place instead of doing the mental gymnastics. Then mark on the sheet the side and end to pull your tape measure from. You’ll never go wrong.
You can cut openings for recessed lights by laying them out as we show and then drawing a circle with a compass and simply cutting the openings with am electric drywall saw. But if you have several recessed light openings to cut out, invest in a circle cutter. It works like a compass and cuts large circles fast and accurately.
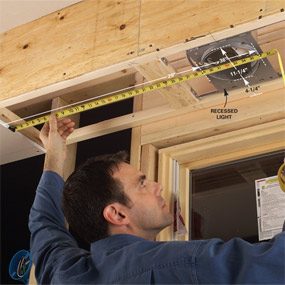
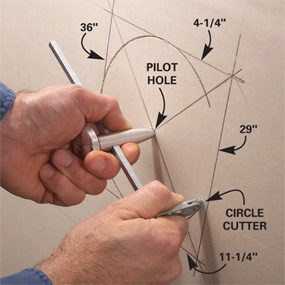
Start by measuring the front and back and left and right sides of the fixture (Photo 1), then transfer those measurements to the drywall and draw a box to outline the hole. Draw lines from opposite corners to find the exact center (Photo 2).
Next tap a small nail through the center point to mark the other side of the drywall. Set the circle cutter to cut about 1/8 in. larger than the fixture, stick the center point in the middle and rotate the cutter while forcing the wheel into the drywall surface. The key is to cut through the paper. It may take a couple of rotations. Then repeat on the other side of the drywall and knock out the plug.
Round boxes
Measure and lay out the boxes exactly as you did for the recessed lights . A drywall square (Photo 1) comes in handy for marking box positions. Get one at a home center. Draw the vertical lines first, then make horizontal lines by setting your pencil at the correct distance on the square and sliding the square along the finished edge.
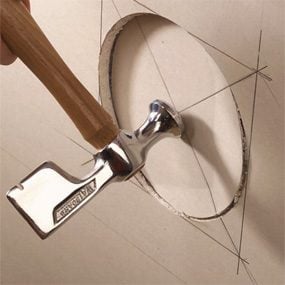
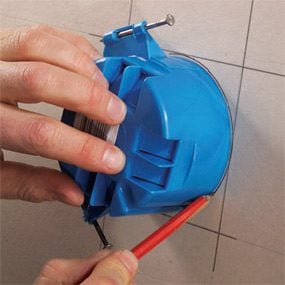
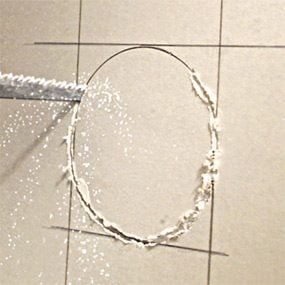
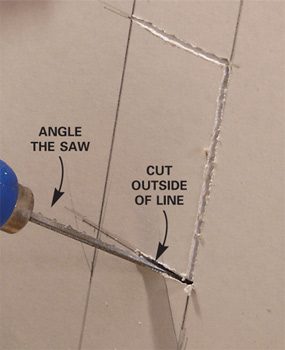
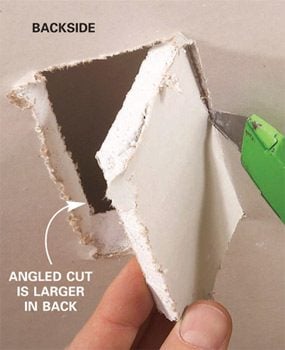
Instead of using a circle cutter, trace the round hole with an extra box (Photo 2). If you don’t have a box or a compass, sketch the curve freehand. You’ll be surprised how accurate you can make it. Then cut the hole with a drywall saw (Photo 3). It’s best to slightly angle the saw so the opening in the back is larger than in the front. That way the box will slip into the opening easier.
If you cut along the outside of the lines, the box should fit. But don’t assume the holes will slip perfectly over the boxes. Hang the sheet with a few screws that are placed well away from the opening. Then gently push the opening over the edge of the box until the sheet rests flat against the studs. If you ram home screws near a box without careful fitting, chances are you’ll bust out a few edges around the box. (See “Oops!”)
Avoid busted edges like the plague! To fix them, you have to cut away all loose paper and broken drywall and fill the gap with setting compound. Then you have to apply tape and several coats of regular taping compound. Work carefully to avoid the hassle!
Rectangular or square boxes
You’d think that cutting in rectangular boxes would be much easier than cutting in round ones. But they’re actually a little trickier. If the hole is a bit off, you’re much more likely to blow out an entire side. (See “Oops!”)
Accuracy is especially critical if you have to cut several box holes in the same sheet. Also keep in mind that the electrical code allows only up to a 1/8-in. gap around electrical boxes, so you can’t cut the holes extra large. You have to fill larger gaps with setting compound. And if the gap gets too large, you’ll have to tape it as well because the outlet cover plate won’t hide it. (I’ve seen it many times!)
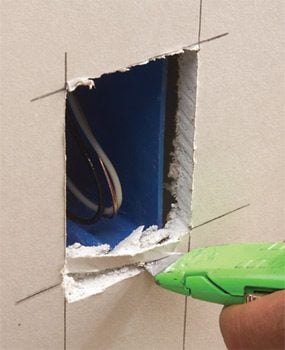
To assure accuracy in measuring, keep the tape measure level for horizontal distances and plumb for vertical distances. Even holding the tape at a slight angle will cause slight errors in measurements that will cause problems later. Photos 1 – 3 show the hole cutting technique. When you’re sawing the hole, cut at a slight angle to make the back of the opening larger (Photo 1).
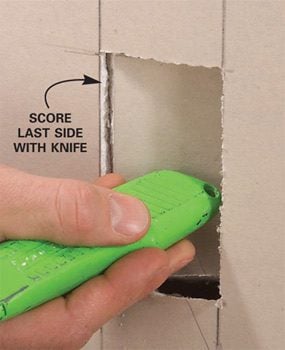
The opening will be easier to slip over the box and you’ll be less likely to break out corners. Also, score and break the fourth side with your utility knife. It’s cleaner and easier than sawing, and you’re less likely to damage the hole edges.
Hang the sheet with just enough screws to hold it in place, keeping the screws well away from electrical boxes. Then gently push the drywall into place around each box. If the opening doesn’t slip past the box, use a utility knife to carve away the sides until the drywall fits (Photo 4). Then finish screwing off the drywall sheet.
Oops!
If the hole isn’t cut perfectly and you run screws through the drywall into the framing near boxes, the edges of the electrical box may break out the surrounding drywall.
Required Tools for this Project
Have the necessary tools for this DIY project lined up before you start—you’ll save time and frustration.
- Drywall saw
- Hammer
- Rasp
- Screw gun
- Straightedge
- T-square
- Tape measure
- Utility knife
Required Materials for this Project
Avoid last-minute shopping trips by having all your materials ready ahead of time. Here’s a list.
- Drywall
