How to Replace a Patio Door
Updated: Jan. 30, 2024
A new, efficient patio door stops drafts, saves energy and eliminates leaks. Learn how to do your own sliding glass door replacement.
A full day
Intermediate
$101–250
Introduction
If you've been putting up with a drafty patio door that sticks, fogs up or leaks during a heavy rain, it's time to consider a new, energy-efficient replacement. While a high-quality door isn't cheap, it'll cut down on drafts, require almost no maintenance, glide smoothly and latch securely. Best of all, you'll save $300-plus if you install a sliding glass door replacement yourself.Tools Required
- 4 ft. level
- 4-in-1 screwdriver
- Clamps
- Drill/driver - cordless
- Finish nail gun
- Hammer
- Miter saw
- Pry bar
- Reciprocating saw
- Table saw
- Tape measure
- Utility knife
Materials Required
- Flexible flashing
- New sliding door
- PVC cement
- PVC sill pan
- Silicone caulk
- Wood shims
Project step-by-step (14)
Step 1
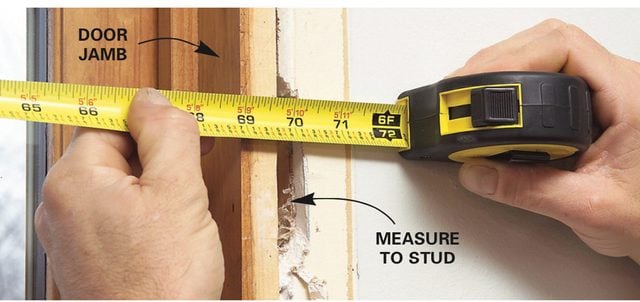
Measure the Opening Before You Buy
- Pry the interior trim free.
- Chip away drywall to expose framing.
- Pull off the interior trim around the old door and measure the “rough opening” width (distance between studs) and height (floor to beam).
- Pro tip: Make sure you measure to the framing right next to the old door jamb. You may have to cut away overhanging drywall to get at it.
- To check the height, make sure you’re measuring to the subfloor.
- That is, measure to the wood or concrete that the doorsill actually rests on and not a secondary layer of particleboard or plywood (underlayment).
- Select a new sliding glass door that fits your rough opening.
- Pro tip: Once you get your door home, you’ll save a lot of time if you finish any exposed wood surfaces on the door before beginning the installation.
Step 2
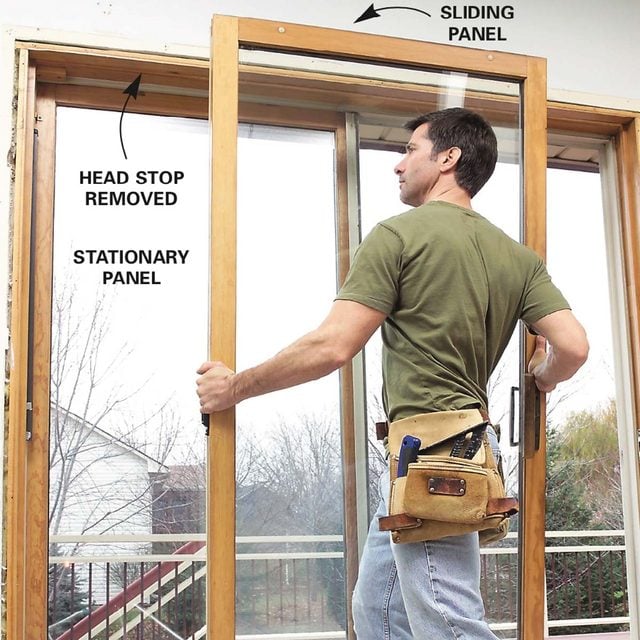
Remove Old Sliding Glass Door From Frame
- Latch the door, then unscrew and remove the inside head stop.
- Unlatch the door, tip the top of the sliding panel inward and lift it free of the track.
Step 3
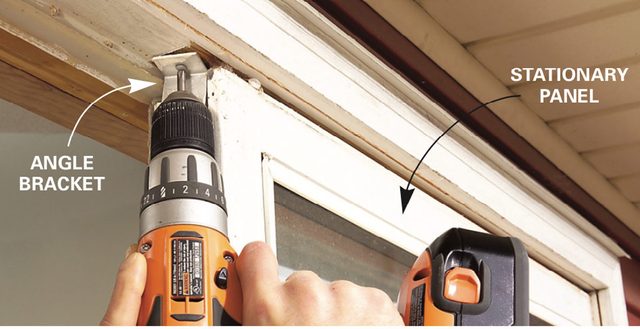
Remove Angle Brackets
- Unscrew and remove any angle brackets at the top and bottom of the stationary panel.
Step 4
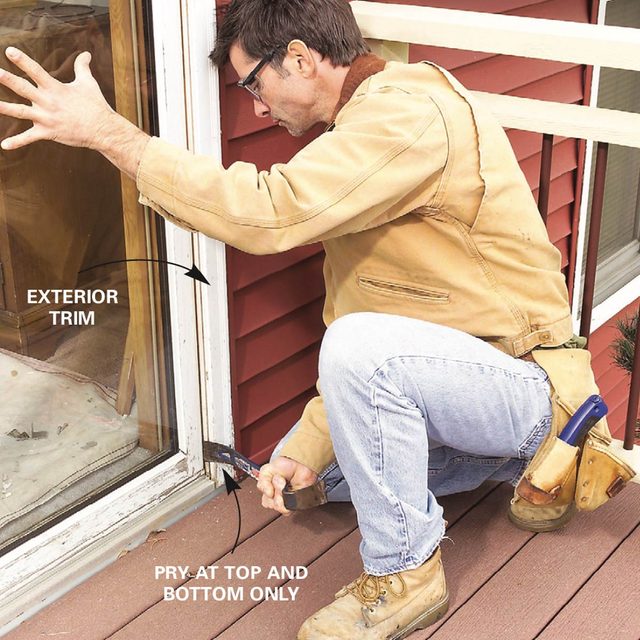
Remove the Stationary Panel
- Pry the stationary panel free of the frame at the top and bottom, slitting caulk or paint as necessary with a utility knife.
- Tip it inward and lift it free.
Step 5
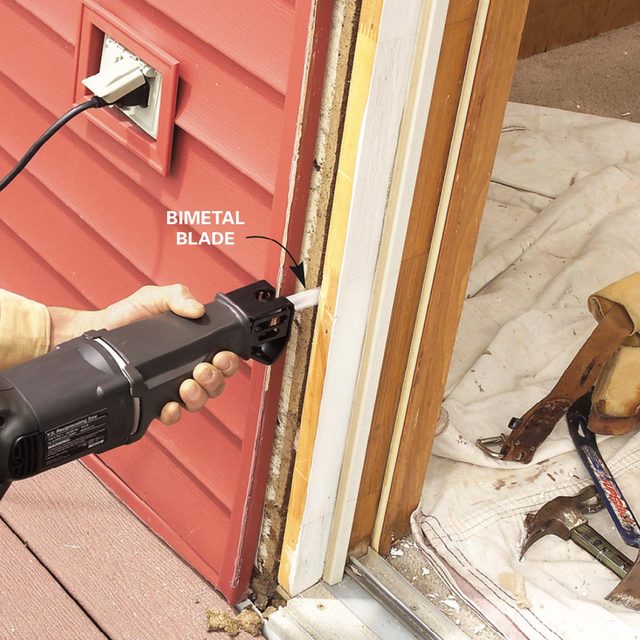
Remove the Old Sliding Door Frame
- Pry off the exterior trim.
- Use a reciprocating saw with a longer bimetal blade to cut between the framing and the door jamb.
- You will cut through the insulation, fasteners and shims.
- With the head and side jambs cut free, tip the frame from the top to the outside.
- Pro tip: Most likely, the threshold will be glued to the floor with beads of sealant, and it may take substantial prying with a flat bar to free it.
- Once the frame is out of the opening, cut it into chunks for disposal.
Step 6
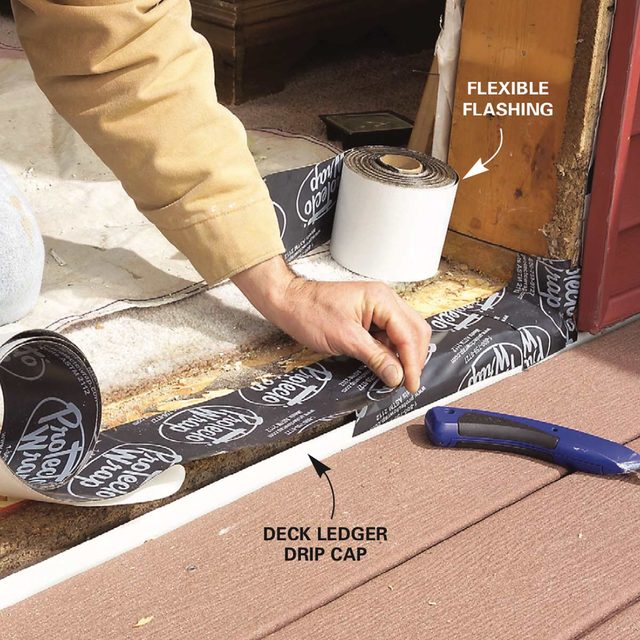
Apply Flexible Leakproof Flashing
- Begin flashing at the bottom.
- Apply flexible flashing directly under the doorsill and two inches up the sides.
- Flexible flashing comes in 4- to 6-in.-wide rolls and has a sticky side so it adheres to the underlying surfaces.
- It’s imperative that the flashing laps well over any deck flashing or weather barrier below the door.
- You may have to overlap two rows to get the necessary coverage.
Step 7
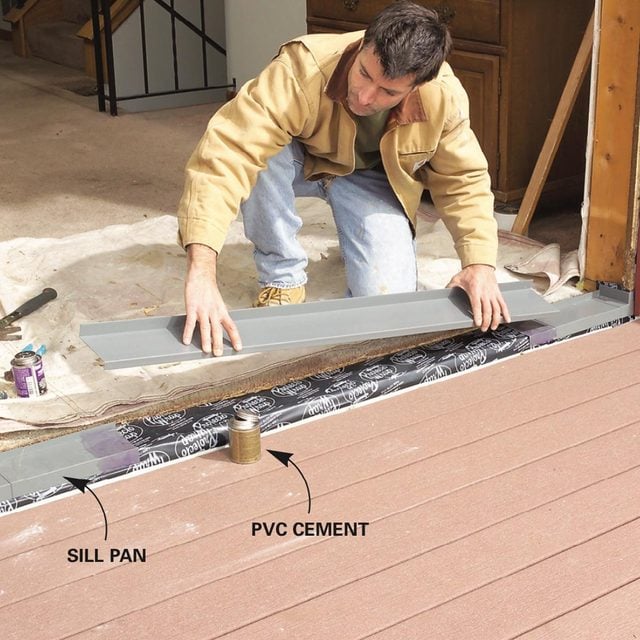
Install Sill Pan
- Pros will usually rest the new doorsill (caulked) directly on the flashing, but for further protection in wet locations (rain will splash against the door bottom from all angles), add a “sill pan” as well.
- Clean the joint overlaps with PVC cleaner, then lay the parts in place and weld the seams with PVC cement.
- Before you begin flashing, check the floor for level. In rare situations, the floor under the door will be out of level.
- Sweep the floor free of debris and check it with a straight board and a 4-ft. level.
- Pro tip: If it’s within 1/4 in. of level over the 6-ft. opening, let it be; the door should still slide smoothly. But correct larger variations with two long, tapered shims placed directly under the sill (use treated wood on concrete).
- Fill any voids with polyurethane caulk to keep out drafts. Then proceed with the flashing.
Step 8
New Door Flashing Details
The key to making your sliding door leakproof is to carefully follow the proper flashing techniques.
- The basic principle is to continually keep water flowing downward to the exterior. In most cases, you can follow the details we show here for flashing the sill. The side details will vary depending on the new door frame details and the exterior siding on your home.
- Most doors have plastic nailing flanges (“fins”) that you lay over some type of house wrap. Extend the house wrap if necessary.
- Then lay adhesive-backed flexible flashing over the flange/house wrap joint to seal it.
- Finish the sides by nailing on the side trim and caulking the gaps.
- The top details vary slightly. If you need a trim piece at the top, slide a metal drip cap under the house wrap and nail the trim directly below it.
- If you don’t need an extra trim piece, slide the nailing flange under the house wrap, seal it with flexible flashing, and lay the house wrap over it, sealing the corners with small sections of flexible flashing.
- The top details vary slightly. If you need a trim piece at the top, slide a metal drip cap under the house wrap and nail the trim directly below it.

Step 9
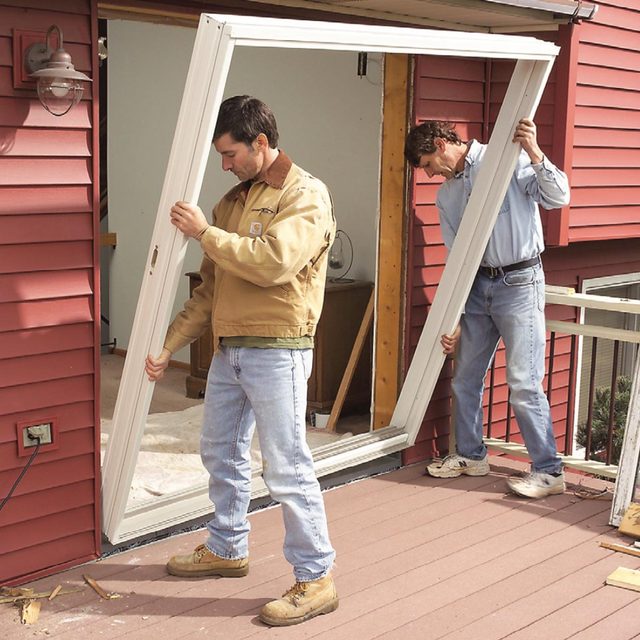
Caulk and Install the New Sliding Door Frame
- Assemble the frame following the manufacturer’s instructions.
- If you have a “knockdown” (not preassembled) door frame, assemble it on the deck, garage floor or other flat surface.
- “Dry-fit” the assembled door frame in the opening to make sure everything fits.
- Apply two beads of silicone caulk along the length of the threshold and tip the frame into the opening.
Step 10
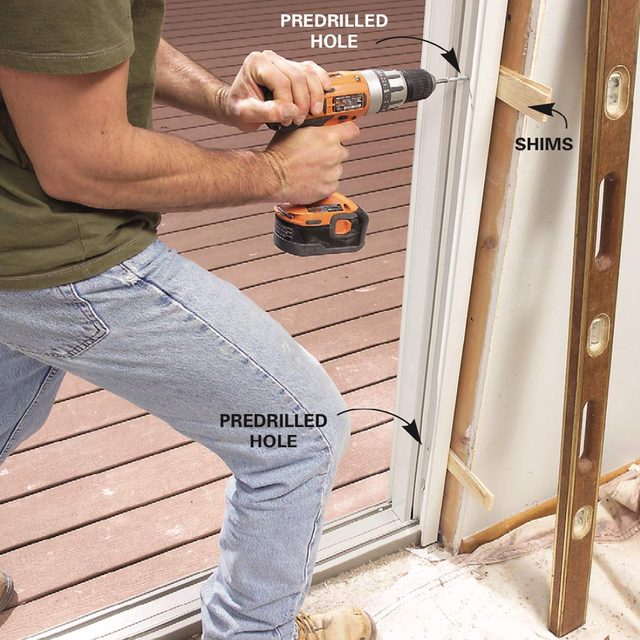
Square and Fasten the Frame
- Center the frame in the opening and screw it into place, using a level and shims to square it.
- Check the frame for square and make final adjustments when you install the stationary panel.
Step 11
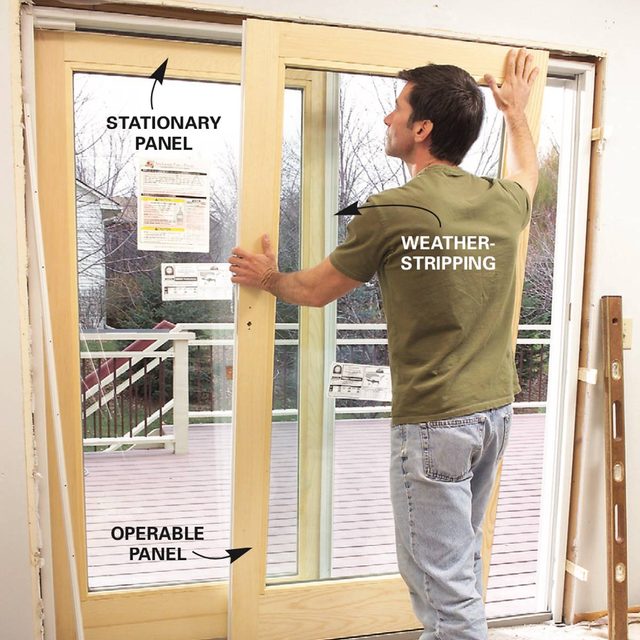
Tip in the Glass Panels
- Tip the stationary panel into the opening, push it against the door frame and install any angle brackets to anchor it.
- Tip the operable panel into place and screw the inside head stop to the top of the door frame.
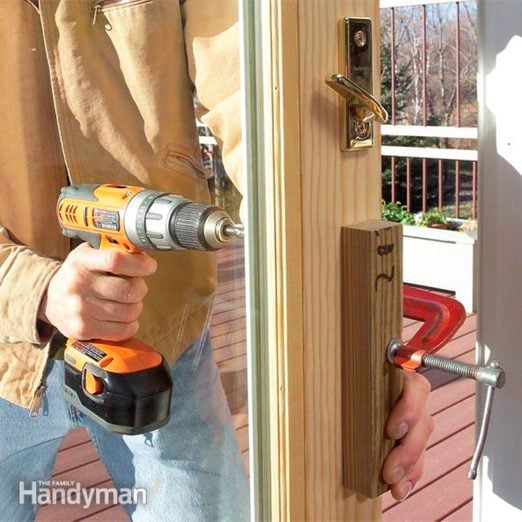
Step 12
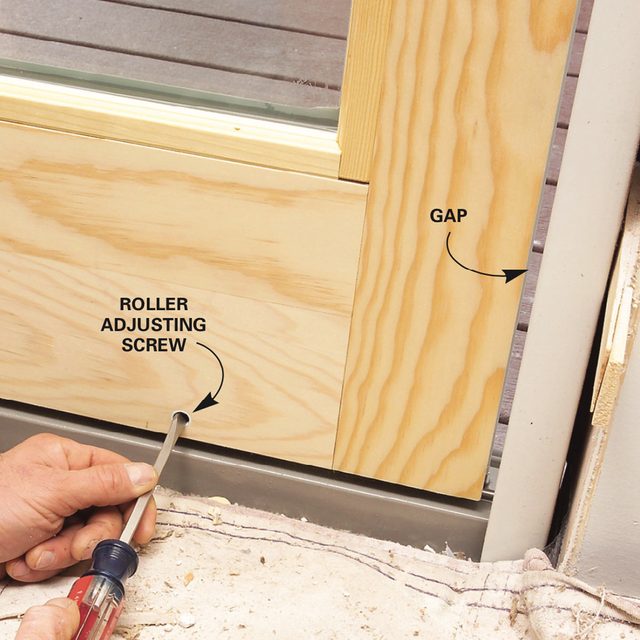
Adjust the Door
- Slide the door slightly open and adjust the roller heights until the gap between the jamb and the panel is consistent.
- Installing your new slider is usually the easiest part of the job.
- Finish up by installing the handle and the locking hardware.
Step 13
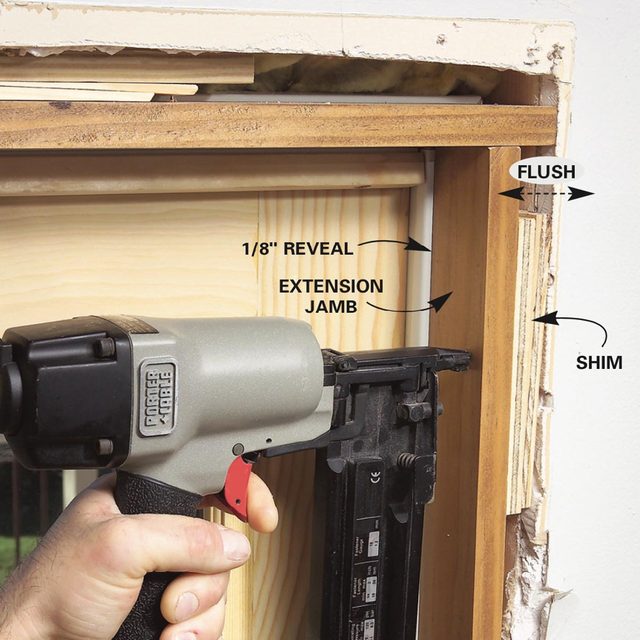
Finish Up on the Inside
- Standard slider doorjamb depths are designed to fit standard 4-9/16-in. or 6-9/16-in. thick walls (2×4 or 2×6 studs plus 1/2-in. drywall and sheathing).
- If your walls are thicker, you’ll have to add extension jambs.
- Cut the top piece to fit first, then shim it and nail it in place.
- Then install the side extension jambs.
- Leave an even 1/8-in. reveal (backset) between the extension jamb and the doorjamb.
- Insulate around the frame with fiberglass packed tightly against the exterior sheathing and more loosely near the drywall.
- Note: Foam insulation is more difficult to use because even minimal expanding types can bow in jambs and affect weatherproofing or door operation.
- Add interior trim around the door, leaving another 1/8-in. backset between the trim and the extension jambs.
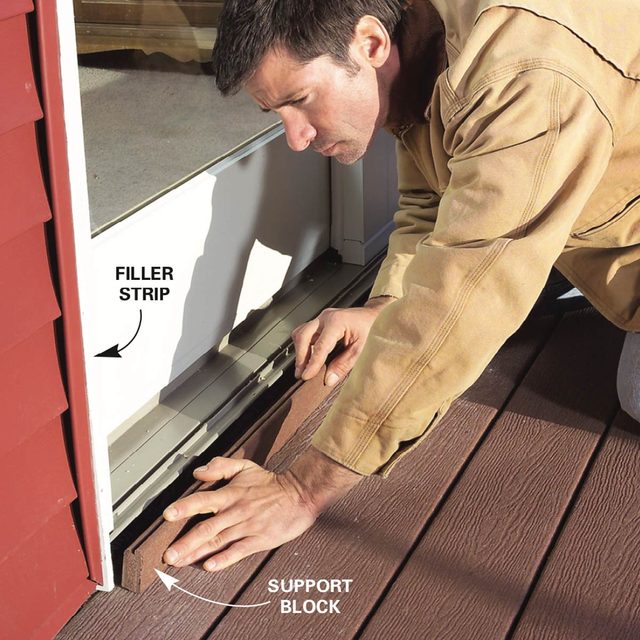
Step 14
Finish Up on the Outside
- Cut filler strips to fit between the door frame and the siding with a 1/8-in. gap on both sides, then fill the gaps with silicone caulk.
- Cut a threshold support block to fit between the deck and the siding, then slip it into place and nail it.
- Pro tip: You’ll frequently be installing a door that’s smaller than the one you removed. This will leave a wider gap that you’ll have to fill with exterior trim.
- Match the new trim to the existing as much as possible.
- Whatever trim you choose, rip the trim slightly narrow so you leave 1/8-in. gaps on both sides.
- Seal these gaps with a high-quality acrylic or silicone caulk.
- Finish up your installation by screwing or nailing a 3/4- to 1-in.-thick piece of cedar, treated wood or composite material directly under the overhanging lip of the threshold to support it.
- Some sliding door manufacturers offer a pre-made aluminum support strip as an alternative.