
How to Use Epoxy on Wood for Repairs
Updated: May 26, 2023
How to fix rotted wood with durable epoxy.
Multiple Days
Intermediate
$51–100
Introduction
Epoxy is the perfect material to make permanent repairs of rotting window sills, door jambs and exterior molding that are difficult to remove and expensive to replace. Epoxy is easy to handle too. You mix it like cookie dough, mold it like modeling clay and, when it hardens, you carve and sand it just like wood. It sticks like crazy and is formulated to flex and move with the wood, so it won't crack and fall out like some exterior wood fillers.Tools Required
- Chemical resistant
- Drill bit set
- Drill/driver - cordless
- File
- Gloves
- Hammer
- Paintbrush
- Putty knife
- Rasp
- Wood chisel
Materials Required
- Alkyd primer
- Epoxy
- Quality acrylic paint
- Sandpaper
- Small (8 oz.) squeeze bottle
- Wood consolidant
Overview: Epoxy Basics and Where to Get It
In this article, we’ll show you how to mix, apply and shape epoxy wood filler to create a long-lasting repair on damaged or rotted wood. We’re using a system of both liquid and putty-like epoxy made specifically for wood repair. The procedure we’re demonstrating is for cosmetic repairs. If a structural (weight bearing) member has been weakened by rot, you have to use other methods or in some cases special types of epoxy.
Once you learn a few tricks for mixing and applying the epoxy, you’ll find it’s as easy to use as Play-Doh. Most repairs will take only a few hours, using tools you probably already own. You’ll need a hammer and chisel, a drill, and wood rasps and files, depending on your repair. Other materials and supplies are listed in the story.
You will find many brands of epoxy. The exact mixing and application procedures vary a bit depending upon the manufacturer. Follow the manufacturer’s instructions carefully. The brand we’re using has a two-step system, which consists of two types of epoxy, a syrupy liquid consolidant and a putty-like wood paste filler. The liquid consolidant soaks into the wood fibers and hardens to form a solid base for the outdoor wood filler. As with any other epoxy, both the consolidant and the best exterior wood filler consist of two parts, the resin (part A) and the hardener (part B). Mixing the two parts according to the manufacturer’s instructions starts a chemical reaction that causes the epoxy to harden.
Project step-by-step (10)
Investigate the Extent of the Rot
The first step in any repair is to find and stop the cause of the rot. Our column base had two problems. First, the column base was sitting directly on concrete where it could absorb moisture. We replaced the rotted base with a new one of rot-resistant redwood and placed a layer of galvanized sheet metal between the base and concrete to keep it from absorbing moisture.
The second problem we had was that the layer of paint meant to protect the wood was chipped and cracked, allowing water to soak in and rot the wood. Once it’s been repaired, this type of decay is easy to prevent by maintaining the paint job. Other causes of rotting wood, like leaking gutters or missing or damaged metal flashing materials, may be more complicated.
If you’re not sure what’s causing the rot or how to repair it, call a building contractor or housing inspector for help. Even after you’ve corrected the problem, make sure you allow the wood plenty of time to dry throughout. This may take a week or longer. Otherwise, trapped moisture may cause additional rot or prevent the epoxy from bonding properly.
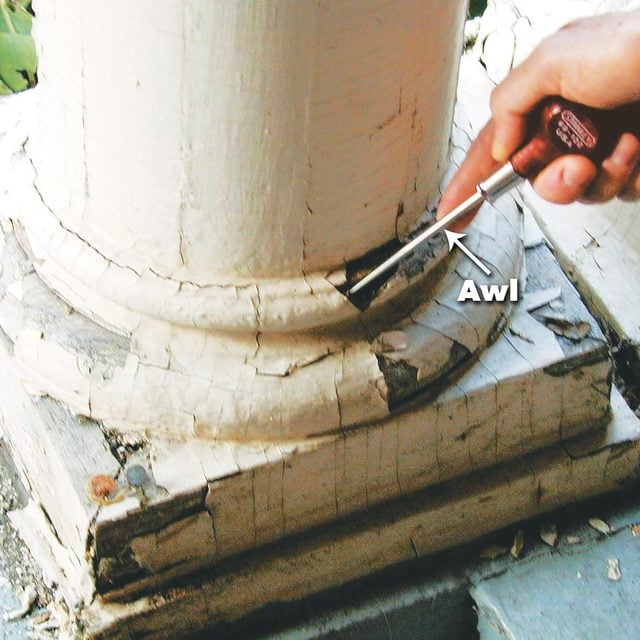
To begin, probe the area surrounding the damaged wood with an awl or screwdriver to determine the extent of the rot. Soft, easily penetrated wood that is rotten or beginning to decay should either be removed or reinforced with epoxy consolidant. Have rotted exterior trim? Here’s how to fix it yourself.
Remove All Rotted Wood
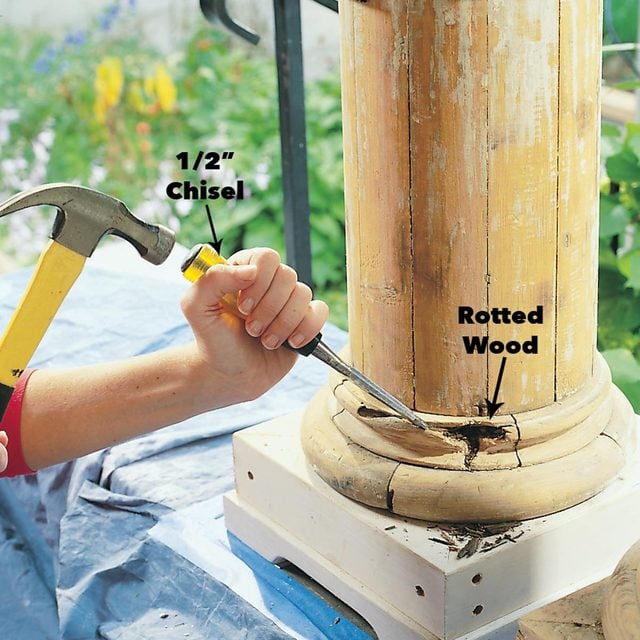
After you’ve located and corrected the cause of the rotted wood, start the repair by stripping off the old paint and gouging out all the decayed wood. Old paint may contain lead. If so, use lead-safe paint removal techniques. Gouge out all the rotted wood using a paint scraper, chisel or old screwdriver. Work back to solid wood if possible. Drill a series of 1/4-in. holes spaced about 1 in. apart to allow epoxy consolidant to soak into any water-damaged wood surrounding the repair. On vertical surfaces, slope the holes slightly downward to form pockets for the consolidant. Drill the holes as deep as possible without going all the way through the wood. The holes allow moisture to escape and later act as reservoirs for the consolidant as it soaks into the wood. If you accidentally drill all the way through the wood, plug the bottom of the hole with oil clay or painter’s putty to prevent the consolidant from running out. Do you have a rotted wood fence post in your yard? You can fix that yourself, too, we’ll show you how.
Apply the Liquid Wood Epoxy Consolidant

Mix the two parts of liquid wood epoxy consolidant according to the manufacturer’s directions. Then squeeze the consolidant into the 1/4-in. holes and onto the wood in the repair area. Work it into the wood with a small disposable brush. Continue this process until the wood is saturated.
Next, construct a loose-fitting plastic tent over the repair to protect it from rain and let it dry at least a week before proceeding. Uncover the repair on dry, sunny days to speed up the drying process.
When using epoxy solvents, work outdoors in a well-ventilated area, or wear an OSHA-approved organic Vapor respirator with fresh cartridges.
Mix the Epoxy
Mixing the exterior wood filler:
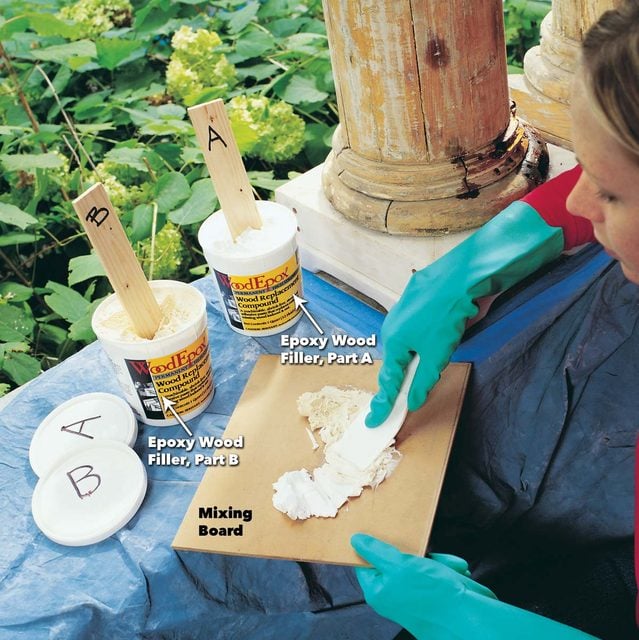
You don’t have to wait for the consolidant to harden completely before filling with the epoxy wood filler. To begin, scoop equal golf ball–sized pieces of parts “A” and “B” of the epoxy best exterior wood filler onto a scrap of hardboard or plywood. Mix the two parts with a stiff putty knife for two to three minutes until they are completely blended. Label the lids and scooping sticks to avoid accidentally mixing parts A and B.
Best working conditions for exterior wood filler:
At 70 degrees F, you’ll have about 30 minutes before the epoxy starts to harden. The epoxy is formulated to allow enough working time under normal conditions, but the temperature is the key factor. Heat accelerates the reaction; cold slows it down. Use this to your advantage. Work in the shade and keep the epoxy materials cool (about 70 degrees F) when you’re mixing and applying the epoxy. Then if you want to speed up the hardening process, use a hair dryer or a spotlight to warm up the epoxy repair.
Work quickly with clear epoxy wood filler.
Epoxy’s behavior is predictable, if not always desirable. If you inadvertently put cap A on container B, it will glue itself on. Label all the lids and mixing sticks to avoid confusing them and starting an unwanted reaction. Also, always use clean containers and mixing boards. Contaminating newly mixed epoxy with partially hardened epoxy can accelerate the reaction, leaving you less time to work.
Fill the Wood Cavity with Exterior Wood Filler
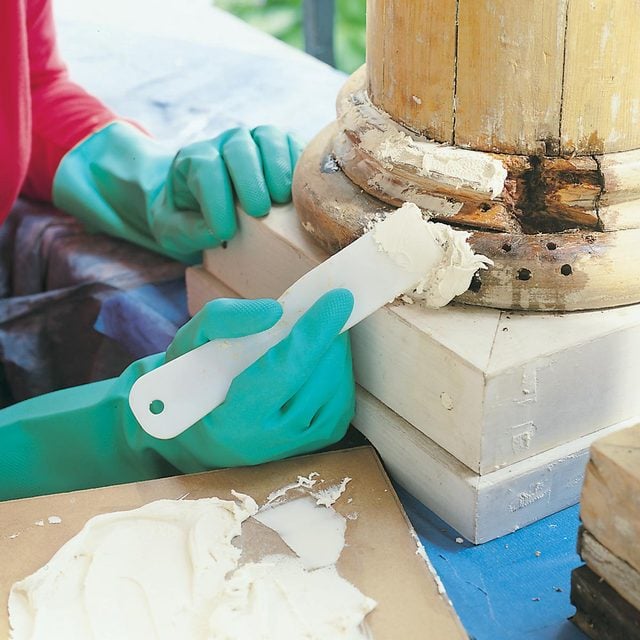
Press the putty-like wood rot epoxy filler into the repair area with a putty knife. Press hard to fill all voids and ensure a good bond.
TIP: Don’t waste wood rot epoxy when you’re making large or deep repairs. Cut or carve blocks of wood to fill most of the cavity. Then use epoxy paste to glue the block in before covering it with additional paste filler. Use the same kind of wood for the repair and line up the grain in the same direction.
Overfill the Area with Epoxy
Shape the epoxy with your fingers. Wear chemical-resistant rubber gloves. Overfill the repair to ensure enough extra for shaping.
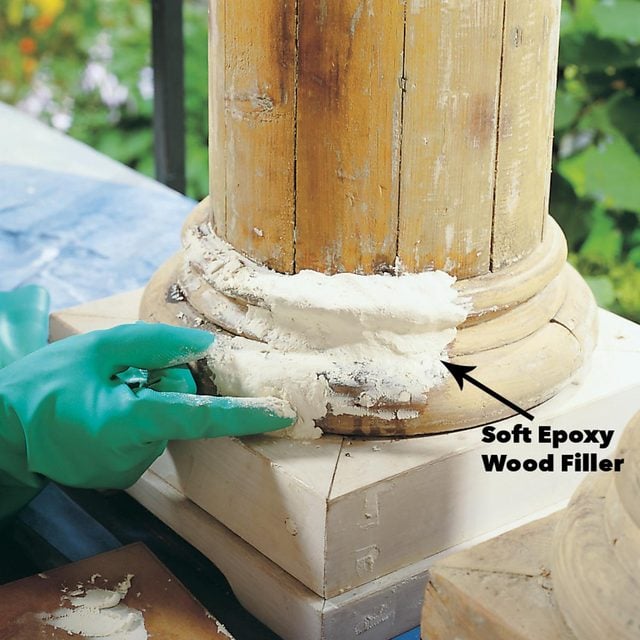
Roughly Shape the Profile
Pat and press the soft epoxy filler to the approximate shape with your fingers and with a scrap of wood, adding filler as needed. Don’t try to get the shape perfect, and make sure to leave enough material to match the surrounding profiles. On warm days, the epoxy will be firm enough to start shaping in about three to four hours. In cool weather, allow the patch to harden overnight.
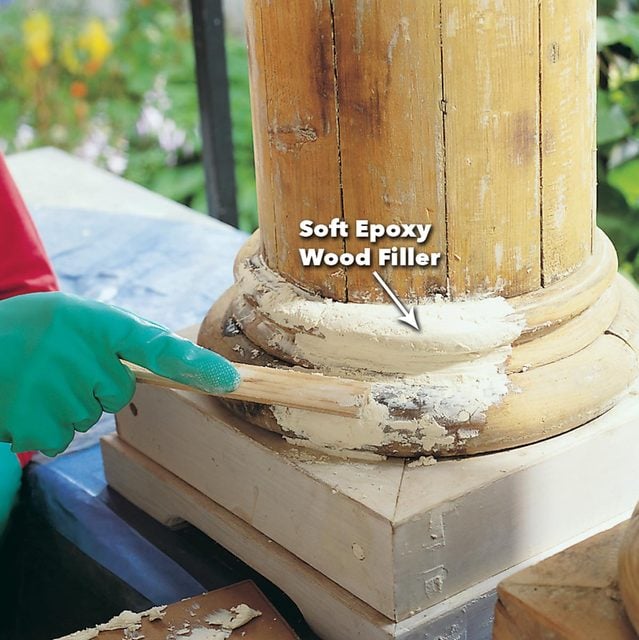
Cut the Exact Shape with a File

How to tell when the wood repair epoxy is ready to file:
When you can’t dent the epoxy with your fingernail, it’s hard enough to start filing. Once it hardens, epoxy is easy to shape and sand with standard woodworking tools. Start by roughing out the basic contour with a Surform plane or coarse rasp.
File with the shape of the wood.
Follow the shape of the surrounding wood. Use a Surform plane or coarse rasp to remove large amounts of material and roughly shape the repair. When you’ve ground off the major humps and the shape is beginning to emerge, start working on the details. Depending on the profile you’re re-creating, you may need flat, round or half-round wood files or rasps, or wrap 80-grit sandpaper around a dowel or fold it around a stick and use this to grind out the shape. Use the profile of the surrounding wood to guide your tools as you gradually file away the epoxy. Don’t worry if you file away too much epoxy or didn’t use enough to begin with. Many repairs require a second application. Dust off the repair and mix and add more filler.
Retouching the outdoor wood filler:
To make a thinner filling material that’s easier to apply, first mix a small amount of consolidant. Then mix a small batch of filler and add some of the consolidant to the filler to reach the desired consistency. If you’re in a hurry to sand again after you touch up the repair, heat the new filler with a hair dryer to speed the hardening process. Protected with a good paint job, your epoxy repair will probably outlast the surrounding wood.
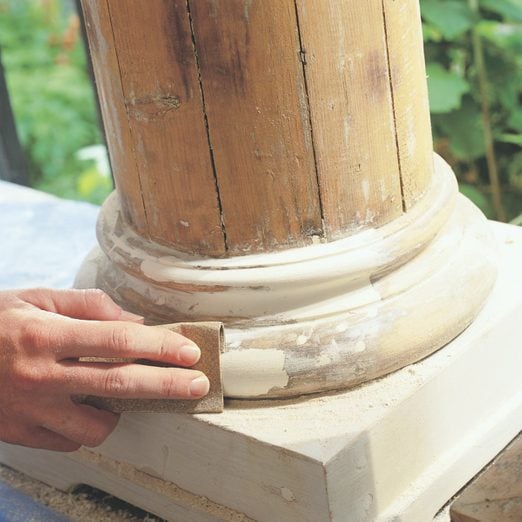
Fine Tune and Smooth with Sandpaper
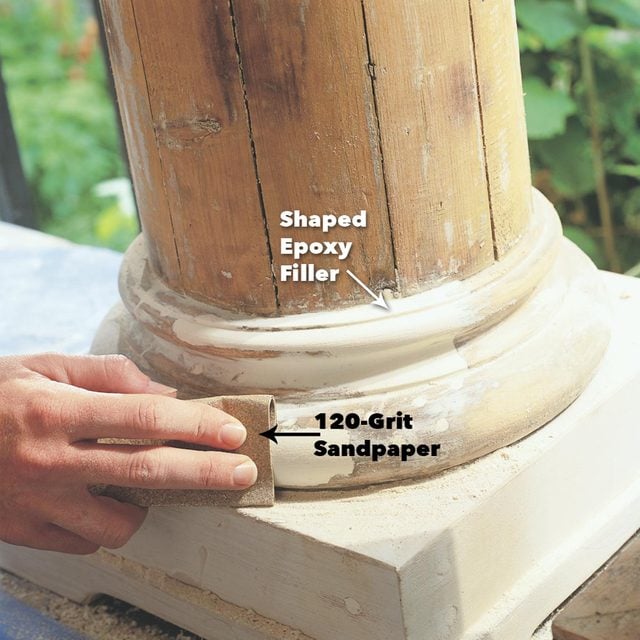
Smooth and fine-tune the epoxy repair with 80-grit sandpaper. When the shape is accurate, sand the repair and surrounding wood with 80-grit sandpaper, and finally with 120-grit sandpaper. Wear a dust mask and eye protection when you’re sanding. Vacuum the dust from the repair.
TIP: When you do the final sanding, make sure to rough up the surface of any hardened consolidant that may be coating the surrounding wood. Otherwise, the paint may not stick.
Finish with Paint

Seal the repair with alkyd primer and two coats of top-quality acrylic paint over the epoxy and surrounding bare wood. Finally, seal the joints between separate parts with polyurethane caulk before applying the final coats of finish. Inspect the repaired area at least once a year and recaulk or repaint as necessary. Plus: Did you know you can use epoxy resin to seal the feet on your outdoor wood furniture? Here’s how.