
Walking Path Upgrade
Updated: May 24, 2017
My old DIY was long overdue for an upgrade.
Ten years ago, I installed a pathway from my house to my shop using concrete stepping-stones that looked like log cutouts. I never did like the way it turned out, and it was a monster pain to keep the grass trimmed around the pavers. I finally decided to replace those pavers with a proper walkway. I thought I would try out the Quikrete WalkMaker system.
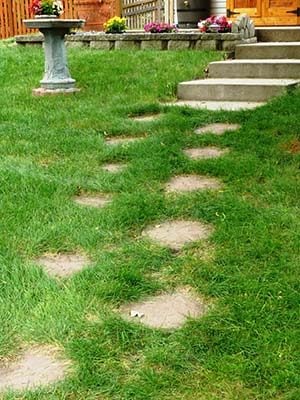
Before
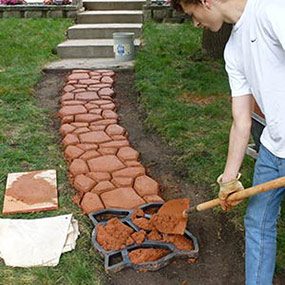
The WalkMaker is a reusable concrete form designed to create walkways and patios. The form is about 2 x 2 ft. and is available in stone, block and brick patterns. The country stone was the best fit for my walkway. I also chose to dye the concrete a terra cotta color using a Quikrete liquid coloring agent.
During
I started by pulling up the old stepping-stones as well as the sod in between them. Because the concrete in the form conforms to the terrain, the ground needs to be relatively smooth but not perfect, as it does when you lay pavers. The system was simple to use: Mix a bag of concrete, lay down the form, fill it up, smooth it, pull it off, and move on to the next one.
Working the concrete into the form wasn’t hard, but it helped to have a method. After filling the forms with a shovel, I used a gauging trowel to push the concrete into the form. I whacked the form with a mallet several times to fill the lower voids. I then cleared away the concrete from the plastic that separated the stones. The form has a lip to form the top rounded edge of the stones, so my next step was to tuck the concrete under those edges. I cleared away the excess concrete and smoothed the tops before pulling off the form.
By the time I was done filling one form, the edges on previous stones were ready to be touched up, a task I also accomplished with my gauging trowel. The drying time varies with heat and humidity; your drying time may be different. The whole process was easy enough that even my teenage son got in on the action…for about 10 minutes.
As an ex-contractor, I’m lucky enough to own a small cement mixer. The mixer made this a one-person job because I could work on the form while the next bag of concrete was mixing. No mixer? Get a helper, because you’ll want someone mixing at all times. That’s really half the battle, and the tools and wheelbarrows start getting encrusted in concrete if you don’t keep things moving. Smaller electric mixers like mine rent for under $50 a day.
I started near the house and worked my way to the shop, but if you had a long pathway, two forms and a bunch of helpers, you could start in the middle of a walkway and head both directions. My path had a gentle curve that required twisting the forms a bit and reconfiguring a few stones once the concrete was cured. Square patios and 90-degree turns are really easy to accomplish with the WalkMaker.
I followed Quikrete’s recommendation and made the walkway from its Crack Resistant Concrete Mix. After a few days, I filled in between the stones with dry Quikrete Sand/Topping mix, and then wet it down with a hose. That really held everything in place nicely. Quikrete’s instructional video on how to make a concrete walkway was helpful.
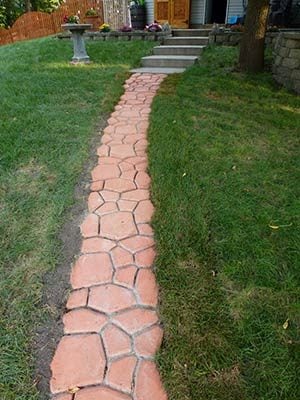
After
I finished 20 ft. of walkway in one full Saturday, along with another couple hours repairing the surrounding sod on the following day. I spent about $125 on materials including $16 for the WalkMaker form. I’m not going to say that my back wasn’t sore when I was done, but I was thrilled with the final results. Now I just need to get my kid to plant some hedges on both sides of the path…like that’s going to happen!
— Mark Petersen, Contributing Editor