
How to Install Joist Hangers
Updated: Mar. 07, 2024
Simple steps for building decks and floors that'll last a lifetime.

A full day
Beginner
Less than $20
Introduction
If you install them properly, joist hangers will keep your decks and floors strong as wood dries, twists, shrinks and ages. We'll show you a four-step method for installing joist hangers that will ensure that your floor or deck stays flat and strong. So the next time you hold a square dance or weight-lifting contest on your deck, you'll rest easier knowing you used joist hangers and installed them the right way.Tools Required
- Hammer
Materials Required
- 1-1/2-in. galvanized joist hanger nails
- 10d galvanized nails
- 16d galvanized nails
- Joist hangers
Select the Best Beam Hanger for the Job
Figure A: Standard joist hanger

This standard 2×8 joist hanger will keep your joists solidly and permanently connected. The double shear hanger in Photo 4 is another common type. Selecting the correct joist hangers and hanging (or “setting”) them is pretty straightforward. We’ll show you a four-step method for installing joist hangers that will ensure that your floor or deck stays flat and strong—and meets the requirements of your building inspector and the joist hanger manufacturer.
Joist hangers come in many sizes to support different dimensional sizes of lumber and I-joists. The beam hangers you’ll find at home centers typically have a galvanized coating and will work indoors and out. Most homeowners will use the common face-mounting type (Fig. A), but specialized hangers are available for unusual situations, such as building in a corrosive salt-air environment or joists that run at an angle.
The performance specifications for each type of beam hanger are carefully engineered and tested to meet the approval of local building codes. For the performance they deliver and their installation speed, joist hangers are a bargain. Joist hangers are sold according to the size of joists or beams they fit and their load capacity. Home centers and lumberyards typically stock the most common hangers and can order the oddball types and sizes. They also distribute simple and informative brochures that tell you which beam hanger to buy for which use (like for building a small deck). For bigger projects, pick up a free joist hanger product catalog that lists each manufacturer’s hanger types and their uses and load ratings. These catalogs list phone hotlines for engineering help. Manufacturers won’t design your project for you, but they’ll answer technical questions about specific joist hangers.
Project step-by-step (6)
Install hangers right—the first time: Toenail joists to the ledger
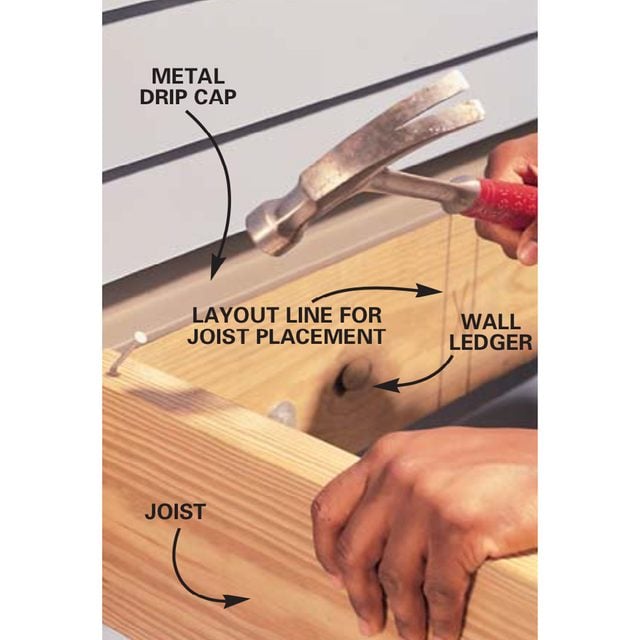
Toenail decking joists into position along the wall ledger using a galvanized 16d nail. Make sure the top of the joist is even with the top of the flashing on the wall ledger so that decking will go on evenly. For outdoor work, use hot-dipped galvanized nails; for indoors, use common (not sinker-type) nails. Start your nail before setting the joist in position, then hammer it in.
How to Choose Deck Hardware
Set the beam hanger
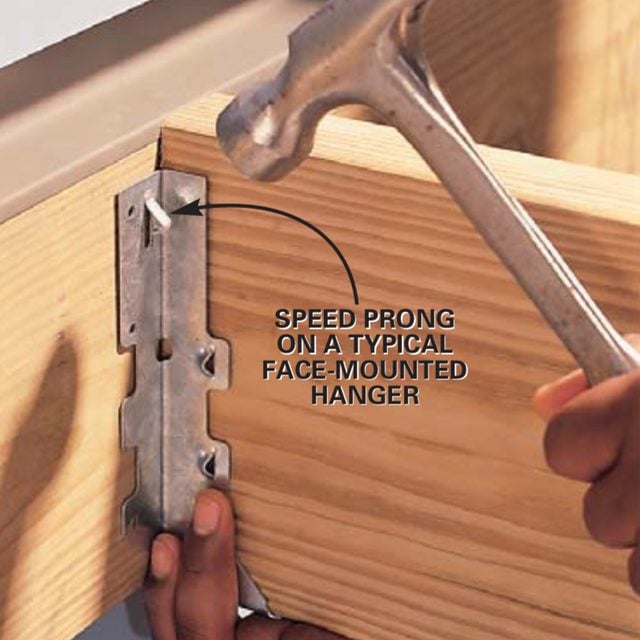
Squeeze the joist hanger tightly around the joist and drive the speed prongs into the ledger board to temporarily hold the joist in place. Make sure the joist is sitting squarely in the joist hanger without gaps alongside and under the joist.
Nail to the ledger first
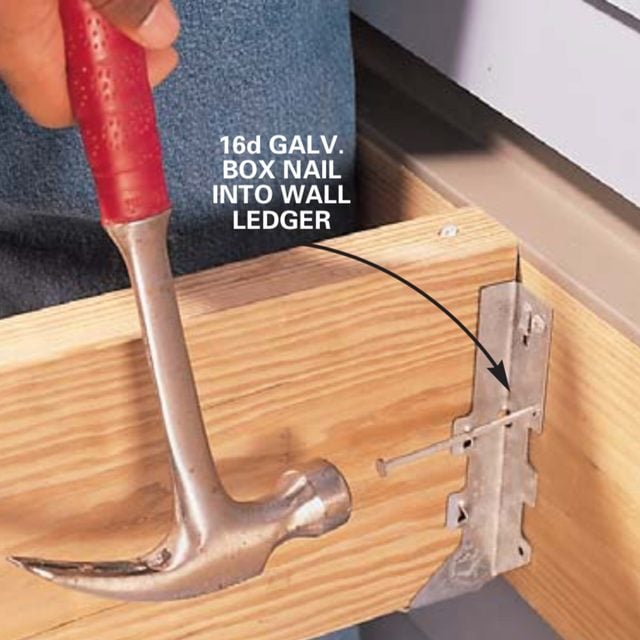
Fasten the joist hangers to wall ledgers outdoors using 16d galvanized nails. For the joist hanger to perform to its rated load capacity, fill all holes in the joist flanges with the nails specified by the beam hanger manufacturer.
Nail to the joist—double shear hanger
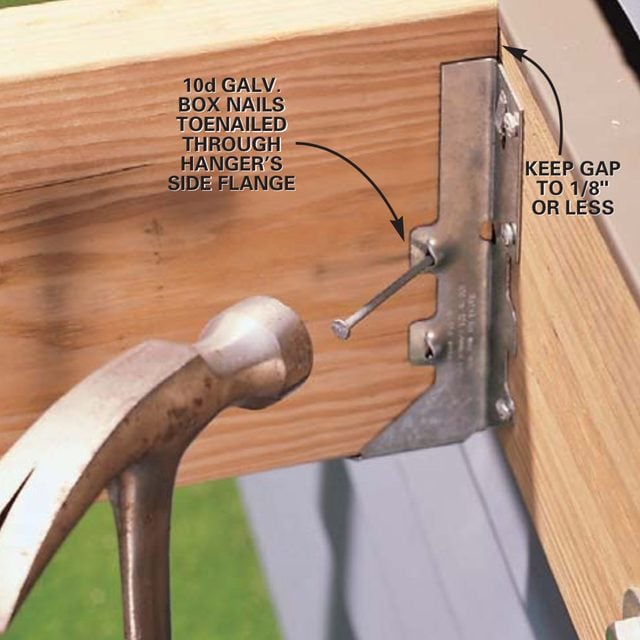
For double-shear joist hangers, toenail four galvanized 10d nails at a 45-degree angle through the beam hanger, the joist and into the ledger board.
Nail to the joist—standard hanger
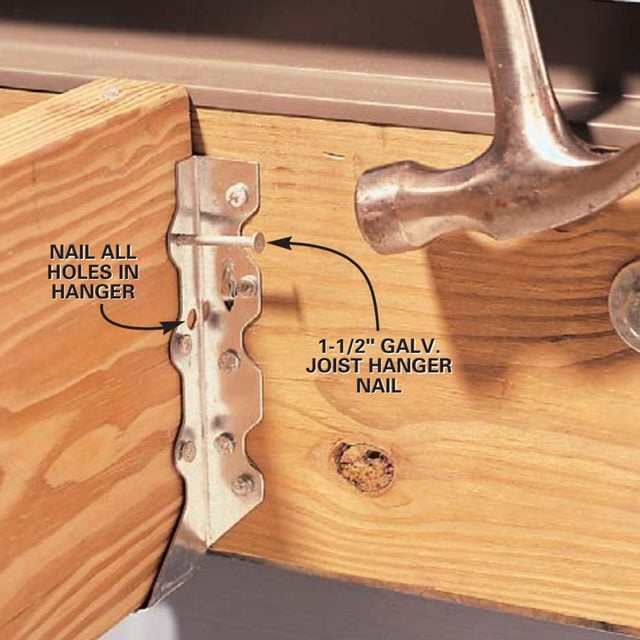
For standard joist hangers, secure the hanger to the joist using only 1-1/2 in. long galvanized joist hanger nails. Avoid longer nails that would poke through the joist and splay out the other side of the hanger. (To hammer inside tight joist spaces, use either short tapping strokes or hold the hammer sideways and strike the nail with the side of the hammer.)
When I worked construction, I would have lively discussions with carpenters who stubbornly held onto myths about proper joist hanger installation. Avoid installation mistakes by following the techniques shown in Photos 1 – 5:
- Install the largest hanger that fits the lumber. Never use a 2×6 hanger on 2×10 joist hangers. Avoid disaster by spending a couple of bucks more for the correct joist hanger.
- Fill all the holes in each joist hanger with the properly designated size nail. After you’ve hung 12 hangers on a wall ledger and your arm has turned to rubber, avoid the temptation to save your body by leaving some nail holes in each hanger unfilled.
- Don’t reuse joist hangers, and don’t modify them by cutting them shorter or bending their outside flanges (such as around the edge of the wall ledger and nailing into its end grain). Installing reused or modified joist hangers reduce their load capacity. Nailing into end grain will lessen the nail’s holding power by one-third.
Nails do matter. Using 3-1/2 in. long 16d nails to secure a hanger to a wall ledger gives you added strength. The long nails bite into the framing members behind the ledger for maximum holding power.
To obtain the full load-bearing capacity of a joist hanger, install the length and size of nail specified by the hanger manufacturer. For interior framing, that means using only the thicker 10d, 12d or 16d common nails (rather than skinnier sinker nails) to fasten a joist hanger’s face flange to wall ledgers, headers and beams. Outdoors use 16d double-dipped galvanized nails (or stainless steel when called for) for installing hangers. It’s true that hot-dipped galvanized box nails aren’t as thick as common nails, but they are the acknowledged choice for outdoor work.
Indoors or out, for standard-type single joist hangers, use only 1-1/2 in. joist hanger nails for nailing into the side of the joist (Photo 5); for double hangers, use 8d or 10d nails. For double shear single hangers (Photo 4), fasten the hanger to the joist(s) with longer 8d or 10d nails. This type of hanger requires fewer but longer nails for the side flanges. The nails penetrate into the wall ledger and therefore offer both better joist load capacity than standard-duty hangers and more protection against uplift forces caused by wind. So, what size screws for decking? The manufacturers agree: Never use galvanized deck screws or drywall screws to install joist hangers. Those screws don’t have the shank size and toughness to support joist loads.
Special Inverted Flange Hanger
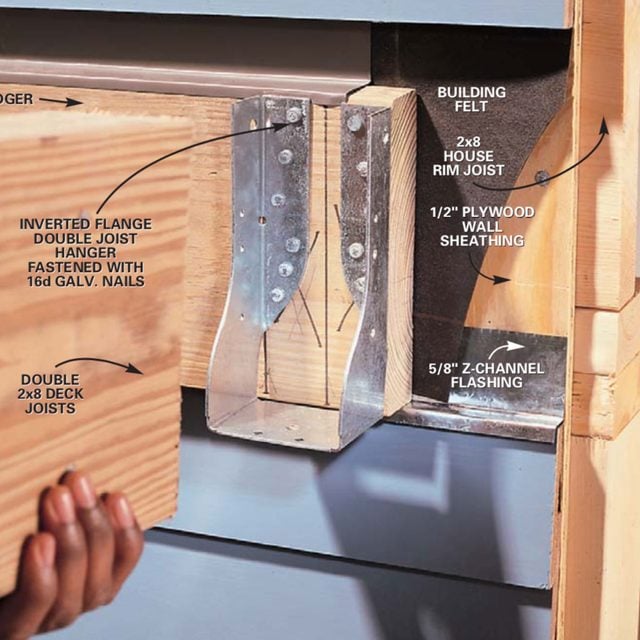
Use inverted flange single or double 2×8 joist hangers to install joists at the very end of a ledger board. To avoid splitting the outside edge of the wall ledger, predrill the holes for the 16d galvanized nails.