
Simple Window Trim and Door Trim Guide
Updated: Feb. 15, 2024
Window trim and door trim with old world elegance—it’s actually easier than standard trim.

A few hours
Advanced
$501-1000
Introduction
Tradition window and door trim looks more complicated than picture-framed trim, but it's actually simpler and more forgiving. It also hides uneven walls and jambs better.Tools Required
- Air compressor
- Air hose
- Brad nail gun
- Combination square
- Hearing protection
- Miter saw with at least a 40-tooth blade
- Orbital sander
- Pneumatic trim nailer and compressor
- Router
- Router table
- Router with a 1/4-in. roundover bit
- Safety glasses
- Table saw
- Tape measure
- Utility knife
Materials Required
- Base block for door trim
- Casing for window and door trim
- Crown molding
- Fillet molding
- Window apron
- Window stool
- Wood glue
Traditional vs. modern window trim
Meet the editor

During his 20-plus years as a remodeling contractor, Jeff Gorton specialized in old-house renovations. He installed classic trim like this on hundreds of doors and windows.
This traditional trim style for windows and doors may look like it requires old-school carpentry skills, but the truth is, it’s easier to install than contemporary door and window trim. Modern window trim—four pieces of casing that “picture frame” a door or window—requires wide miter cuts, which look sloppy if they’re not perfect. Traditional window and door trim is more forgiving. While it also requires miter cuts, they’re shorter and less visible. And the most prominent joints are assembled with simple square cuts.
If you’re nervous about installing the mitered crown molding that tops off the window molding and door trim, check out “Make Your Own Moldings” below for window trim ideas, where we show you how to make a simple router-shaped version that doesn’t require any miters. We’ll walk you through the steps and give you some tips and pointers for cutting and installing the window moldings to create this classic trim style.
Project step-by-step (15)
Prepare the jambs: Marking a reveal
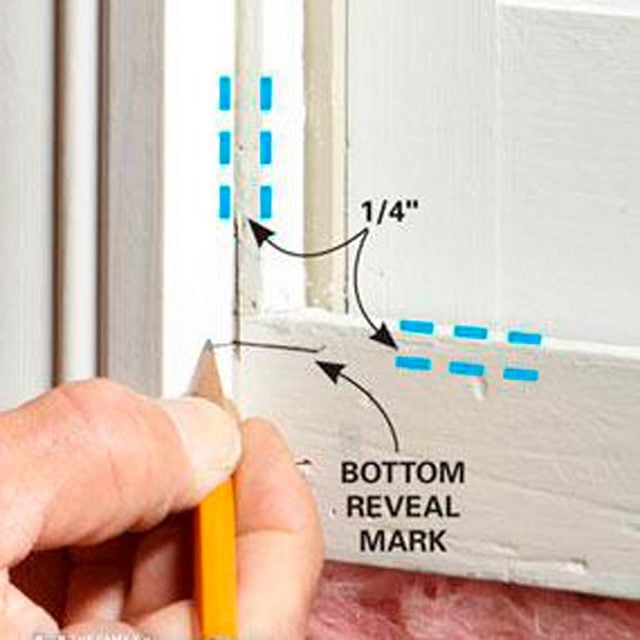
The standard reveal for window molding and door trim is 1/4-in., but this can be adjusted a little if needed. A combination square works well for marking reveals.
The first step in any trim job is to prepare the jambs for trim. If you’re replacing trim, pry it off and remove the nails from the jamb. Then scrape or sand the face of the jamb to smooth out any paint or finish that’s built up. Finally, mark the reveal on the jambs to show where the edge of the trim goes. A combination square set to 1/4 in. works great for marking the reveals. But you can also use a compass to scribe the marks, or simply measure and mark the reveals.
If possible, set up your miter saw in the room where you’re installing the trim. Having the saw nearby will save you a ton of time. I like to rough-cut the casing and other window moldings to length, allowing a few extra inches, and label them to make sure I have all the material I need and won’t accidentally cut the wrong piece.
For tips on buying or making the moldings you’ll need, see “Traditional Molding” below.
Mark the trim, don’t measure: Mark the side casing
Cut one end of the casing square. Line up the cut end with the pencil mark indicating the 1/4-in. reveal and mark the opposite end for cutting. Cut and install both side casings, keeping them aligned with the reveal marks.
With the window crown molding and other parts cut to rough length, and the reveals marked on the jambs, the fastest and most accurate method for marking the trim for cutting is to simply hold the molding in place and mark it. It’s foolproof. You don’t have to measure, do math or remember any numbers.
Figure A: Window Trim Parts

Trim terminology can be confusing. Here’s a labeled window crown molding photo to show you the names of the window trim and door trim parts we used.
Install the window casings, stool and apron: Install the stool

Cut the stool so that it extends an inch past the casing on both ends. Then round the edges with a router or by sanding. Nail the stool to the side casings.
Glue in the returns to complete the apron. Avoid nailing problems by letting the glue do the work. Just hold the return in place for 60 seconds while the glue grabs.
The order of trim installation for windows (and door trim as well) varies a little depending on whether you’re working on old double-hung windows or newer-style windows. On older double-hung windows, the stool rests on the angled sill and butts into the lower sash. You have to notch the new window stool to fit, and nail it to the windowsill before you install the side casings. But on newer windows like the one shown here, the stool isn’t notched and doesn’t rest on the sill, so it’s a little trickier to nail. An easy way to attach this type of stool is to install the side casings first, and then nail the stool to them.
The stool should protrude past the casings by about an inch. To find the length of the stool, make a mark 1 in. beyond the casing on both sides. Then hold the stool up and transfer the marks. After the stool material is cut to length, round the edges and ends. Or if you want a little fancier stool, rout the edges with a more decorative bit. You can even buy a special stool-shaping bit, but you may have to order it.
Cut the mitered apron returns

Set the miter saw to 45 degrees and cut a return from the apron molding. Use a sacrificial board to prevent the small cutoff from flying through the gap in the fence. Set the miter saw to the opposite angle to cut the other return from the opposite end of the molding.
Finish the apron

With the side casings and stool in place, the next step is to install the apron under the stool. Start by cutting a 45-degree miter on each end. Mark for the long point of the miters by resting the apron on the stool and making marks where the outside edges of the casings intersect the apron material. Snug the mitered apron against the bottom of the stool and nail it to the framing under the window. Then cut returns and glue them in.
Photo 3 shows how I used a sacrificial piece of wood behind the apron material. Any flat scrap of wood will work. This sacrificial backer board prevents the skinny piece of molding you’re cutting off from getting caught by the blade and flung through the gap in the fence. Don’t attach the sacrificial board to the saw. Just hold it in place along with the molding you’re cutting. Then reposition it with each new cut so you’re always making a fresh cut through the sacrificial board.
Tips for Choosing, Buying and Making Your Own Traditional Molding
Shopping for trim
We found the wide casing and base blocks at the home center, along with the fancy casing we used as an apron. We had to go to the local lumberyard for the 2-1/4-in. crown molding. If your local home center or lumberyard doesn’t have what you want in stock, ask to see a molding book or chart that shows what styles are available to order for wind trim ideas.
Make your own moldings
You don’t have to buy moldings. With a little ingenuity and a few standard router bits, you can make your own door and window trim. Figure B shows an example of a cap molding for a head casing that we made by stacking two pieces of 3/4- in. oak. Shaping the edges of wood strips with a router and stacking them to make bigger moldings is a great technique for making your own moldings.

You can make window moldings with a handheld router, but it’s a lot easier and faster to mount your router in a router table. The Ryobi router table shown here (about $100) works well, but there are plenty of other options. For plans to make your own, see this DIY router table .

The photo shows how to use featherboards for safer and more accurate routing. You can make your own featherboards, or buy plastic ones like the ones in the photo for about $10 to $20 each.

The ends of the boards shown in Figure B are routed. This method eliminates the need for mitered returns, but it does expose end grain and means you have to cut the parts to length before you shape them. To rout the end of boards, use a shop-made push block like the one shown here. It serves two functions. First, it allows you to hold the board square to the fence. And second, the push block prevents splintering by providing a backer behind the board you’re routing.
Build the head casing assembly: Mark the crown molding for the end return

Hold a piece of crown molding against the 1×6 you’ll be using for the head casing and mark it for cutting. The final step for both the door and the window trim is building and installing the head casing assembly. It’s made up of three parts: the fillet, a 1×6 and the cap molding. Traditionally this cap molding was solid, but since a solid molding this large is hard to come by, we substituted 2-1/4-in. crown molding. If you have a router and want to avoid using crown molding, check out Figure B above for an attractive alternative.
Build a crown molding jig

Build a simple jig to hold the crown molding at the correct angle while you cut it. Position the molding upside down and set the saw to 45 degrees. Avoid cutting all the way through the jig.
Mark the front crown molding

Cut a miter on one end of the front crown molding. Line up the cut with one end of the head casing and mark the opposite end for cutting. Set the molding in your jig and cut the opposite miter.
Attach the molding to the head casing

Nail the crown molding to the 1×6. Then glue and nail in the end returns. Nail the fillet to the bottom of the 1×6 to complete the head or and window casing assembly. Start by setting the 1×6 on top of the side casings and marking it at the outside edge of each casing. Cut the 1×6 to length. Then cut the fillet 3/4 in. longer than the 1×6. Round over the edges and ends of the fillet to make a bullnose shape using a router and 1/4- in. round-over bit. Nail the fillet to the bottom of the 1×6.
Finish the head casing by wrapping the front and sides of the 1×6 with crown molding. photos 5 – 8 show how. Make a jig (Figure C) to hold the crown molding at the correct angle while you cut it. Remember to set the crown molding upside down in the jig. Mark and cut the short pieces of crown molding. Then cut a miter on one end of the long front piece and hold it in place on the 1×6 to mark the opposite end for the miter. Cut the second miter on the front piece.
Finish the window trim

Set the head casing on the side casings, making sure the fillet overhangs evenly on both ends. Then nail it to the wall framing. Check the fit by holding the short mitered ends in place against the front crown molding. If the miters are tight and everything fits, complete the head or and window casing by nailing the crown molding to the 1×6. Complete the window trim by nailing the head casing assembly to the framing above the window.
Figure C: Window Crown Molding Cutting Jig

This jig holds the crown molding at the correct angle in the miter saw, so it’s easy to make accurate miters every time. Glue two strips of scrap wood together at a right angle. Then set the crown molding upside down in the jig and mark the position of the stop. Glue the stop to the bottom and you’re ready to cut some moldings.
Finishing up
If you’re installing painted moldings like ours, see Trim Painting Tips for advice on how to finish your moldings with a flawless coat of paint. If you prefer natural wood, check out Finishing Wood Trim With Stain and Varnish.
A DIYer’s success story: Matt Timpany

“My DIY interests cover pretty much anything to do with my house. I will tackle almost any project just to see if I can do it.”
Solid cherry door trim

For the crowning touch, Matt installed solid cherry doors, and then trimmed them in this traditional style with poplar stained to match.
Matt Timpany finished a huge empty room in his basement into a home theater, pool room, game room and full bath.
Matt’s an avid, self-taught DIYer with 15 years of woodworking experience. For this 1,400-sq.-ft. basement remodel, he went a little outside his comfort zone and also tackled the wiring and plumbing, which he did successfully except for one plumbing mistake, which, in Matt’s words, led to some “training cost.” Between his dad job and his day job, this project took Matt two years and three months to finish.
Door and Window Trim are similar

Trimming a door is just like trimming a window, except you start out with base blocks at the floor, as shown here. The base blocks should be about 3/8 in. wider than the casings. Door and window trim them if necessary. The height of the base blocks should be about 1 in. greater than the height of the baseboard you’re planning to install. Check out this hack for installing a door on an uneven floor.