
How to Install Craftsman Window Trim and Craftsman Door Casing
Updated: Feb. 15, 2024
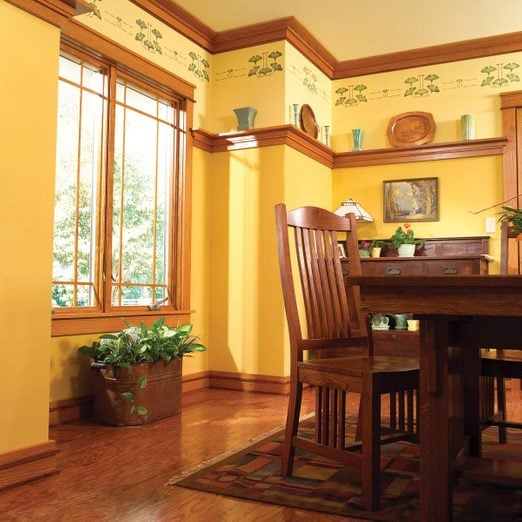
Stylish Arts-and-Crafts woodwork built up from simple oak boards
Multiple Days
Intermediate
$501-1000
Introduction
If you want to spruce up a dull room, or if you simply love the Craftsman style, roll up your sleeves. This article is for you. Simplicity is the hallmark of Craftsman-style trim. And that's what makes it the perfect trim project for every DIYer, even if you have limited carpentry experience. There are no fancy shapes or store-bought moldings—just square edged pieces of trim that are easy to make and assemble. Although each molding is simple, the combined effect gives the room a distinctive, handcrafted look.Tools Required
- 5/64-in. bit
- Air-powered finish nailer
- Caulk gun
- Clamps with a reach of at least 18 in.
- Drill/driver - cordless
- File
- Hammer
- Handsaw
- Hearing protection
- Miter saw
- Nail set
- Safety glasses
- Scribing tool
- Stud finder
- Table saw
- Tape measure
- Thickness planer
Materials Required
- 1-in.-thick oak in various widths and lengths
- 2-1/2-in. finish nails
- 2-in. finish nails
- Clear finish
- Construction adhesive
- Glue
- Masking tape
- Sandpaper
- Stain
- Wood putty
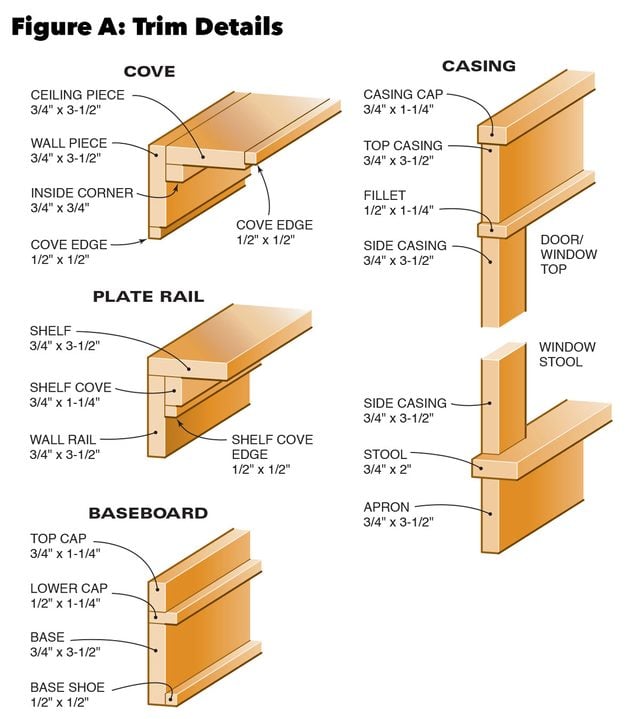
Trim Components
In this article, we’ll show you how to cut out and assemble the square-edged moldings to make the window and door trim, baseboard, cove and plate rail you see with Craftsman style. Craftsman trim and Craftsman door casing may look complex, but because it’s built up from multiple pieces, it’s actually quite easy to install. The 1/2-in. square moldings that run against the floor and along the edges of the cove bend easily to conform to irregular surfaces and hide gaps. In addition, most of the inside corner pieces simply butt together and don’t require miters or bevels. You’ll still have to work carefully to get nice-fitting joints, but the small size of the individual pieces makes them easier to cut and fit.
Project step-by-step (17)
Assemble the Tools and Select Materials
In addition to basic hand tools, you’ll need a table saw to rip the thin strips from larger boards and a miter saw to make crisp, clean cuts in the hardwood. We used a bench-top planer to remove saw marks and to reduce the thickness of the 3/4-in. stock to 1/2-in. for some of the trim pieces. If you don’t own a planer, hire the lumberyard or a local woodworker to plane these pieces for you. We recommend an air powered trim nailer, which not only speeds up the work but also makes it much easier to get tight-fitting joints. You can rent a nailer and compressor or buy a kit containing both at a fairly low cost.
We’re using ‘plain sawn’ red oak for this project rather than the more expensive ‘quarter sawn’ that was common for Craftsman trim. It’s readily available at home centers and most lumberyards. To simplify your planning, all the pieces are either 1x4s (3/4-in. x 3-1/2 in. actual size) or can be cut from 1x4s. The key to using plain sawn oak is to select the boards for similar appearance and attractive grain patterns. Straight-grained pieces usually look best and should be reserved for prominent locations. Use the less attractive wood for baseboards in areas that will be hidden by furniture. If you have a better selection of wider boards, 1x6s for example, buy these instead and rip them on the table saw to make your moldings.
Rip the Narrow Molding Strips
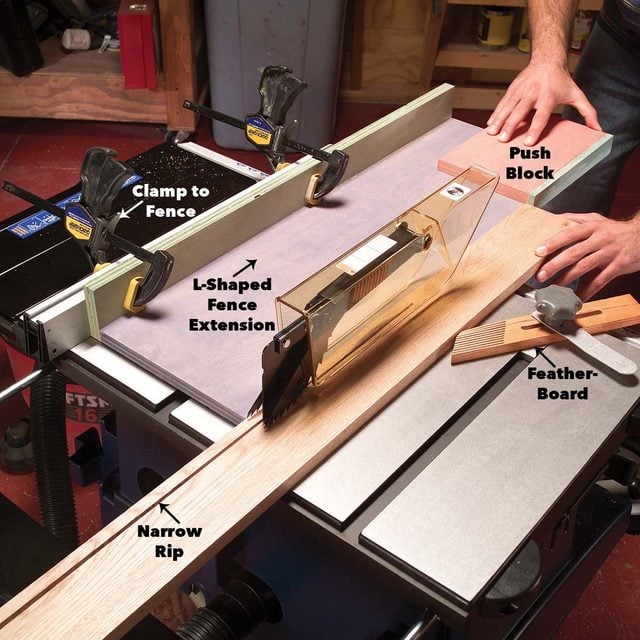
Start the project by measuring the doors, windows and walls of your room and calculate the quantities of each piece of trim you’ll need. Then rip all the narrow strips for the cove, base and casing to width on your table saw. Add 1/8 in. extra to the width to allow for planing. To rip thin strips safely without removing the blade guard, clamp an extension to your table saw fence and use a custom-made push block like the one shown above.
Plane the Strips
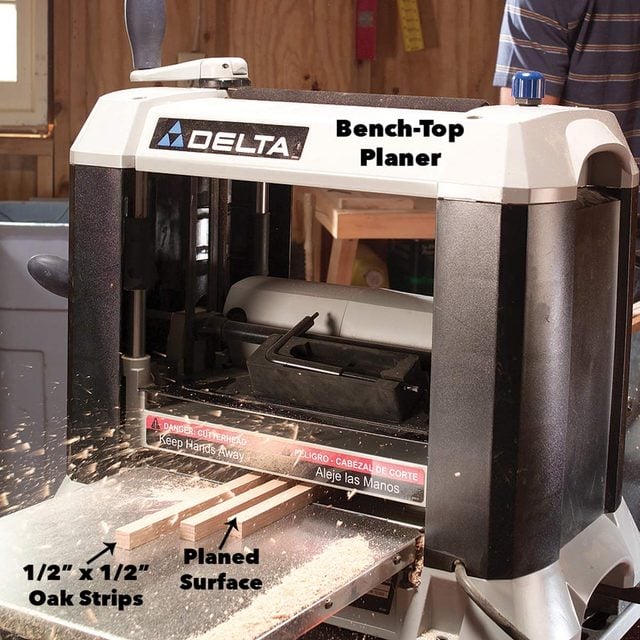
When all the pieces are ripped, run them through the planer to remove saw blade marks from the edges. Then separate the pieces that need to be reduced to 1/2 in. thick and plane them down. Run them through the planer about four or five times, removing no more than 1/16 in. with each pass until they measure ½ in. thick.
Install Window Stool and Apron
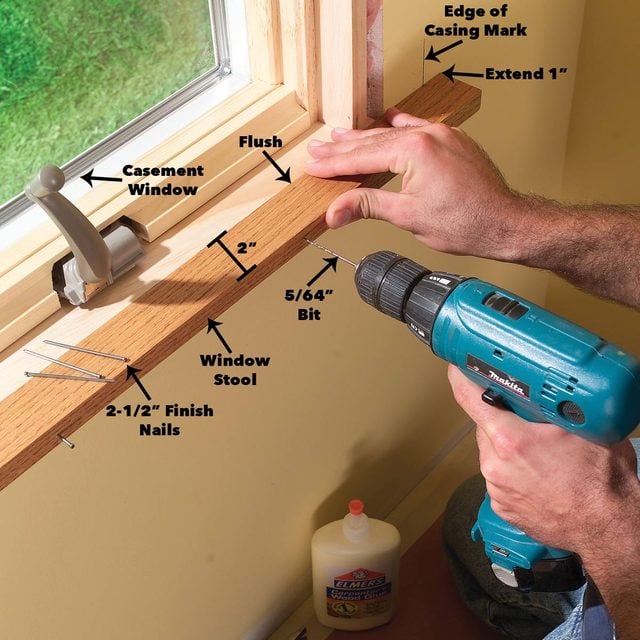
Trim the doors and windows first. On windows, install the stool first. We added a stool to a casement (crank-out) window by simply gluing and nailing it to the jamb. The stool on double-hung windows (windows where the sashes slide up and down) usually rests on top of the sill. You have to notch the ends to fit against the wall.
Measure between the jambs and add 9-3/8 in. to determine the length of the window stool (1 in. beyond the side casings). Then center it on the window and glue and nail it to the jamb. It’s difficult to get the stool and frame perfectly flush. Predrill the stool with a 5/64-in. bit and continue the hole 1/4 in. into the frame. Keep the frame and stool aligned while you drill.
Cut the 1×4 apron 2 in. shorter than the stool. Center it on the window and snug it up to the bottom of the stool before nailing it to the framing under the window. For a durable, tight-fitting trim job, especially when working with 3/4-in. trim, it’s essential to nail into the wall framing. Use a stud finder to locate the edges of studs and other framing around windows, doors and ceiling edges. When nailing through the drywall into the framing, use 2-1/2 in. finish nails. If you’re hand nailing, predrill the oak with a 5/64-in. bit.
Mark the Jambs
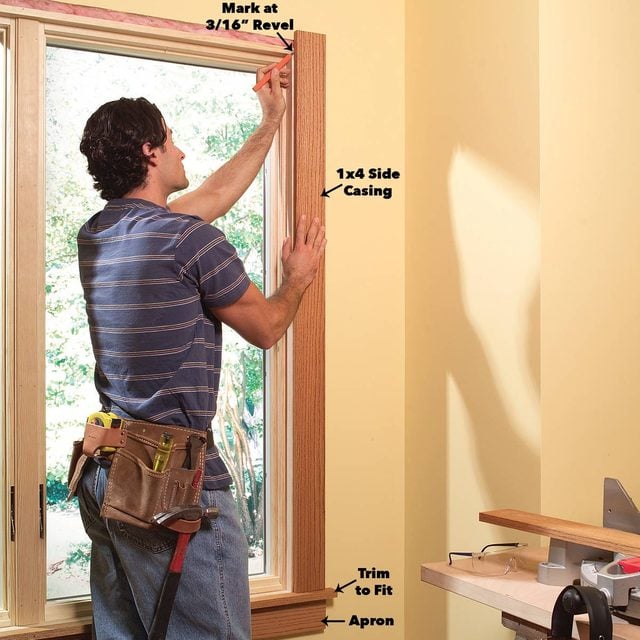
Mark and cut side door casings. Cut side casings about 1/2 in. too long and fit them to the sill. Be sure to trim the end that rests on the stool for a tight fit before marking the top. Mark the jambs to allow a 3/16-in. reveal. Drive 1-1/2 in. nails every 16 in. into the jambs along the inside edge and 2-1/2 in. nails through the outside edge into the wall framing.
Marking Close-Up
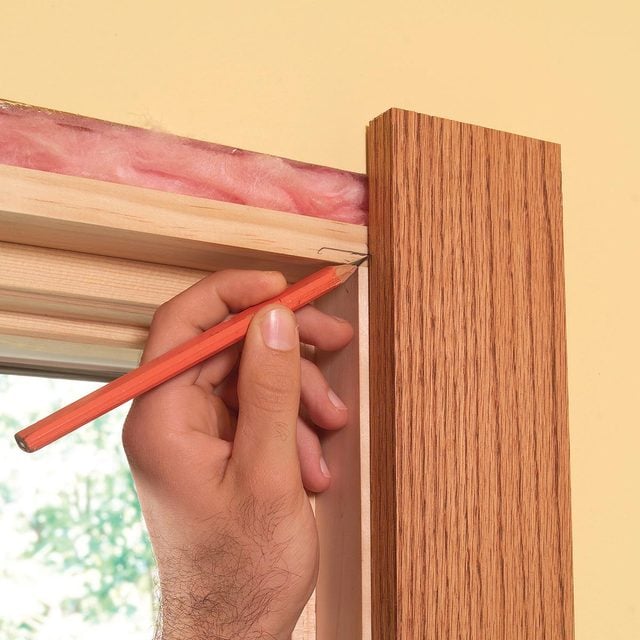
Make a series of light marks every 12 in. along the jambs, 3/16 in. in from the inside edge with a sharp pencil, to indicate the edge of the trim. Then mark and cut the top of the casings and tack them in place.
Attach the Cap and Fillet Pieces
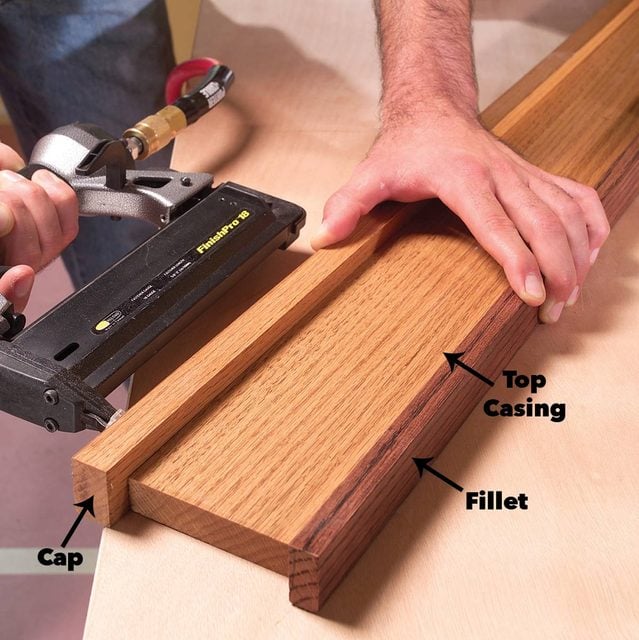
Measure to the outside edges of the side casings and cut the top casing to this length. Add 1 in. for the cap and fillet and nail these pieces to the top and bottom of the casing.
Install the Top Casing
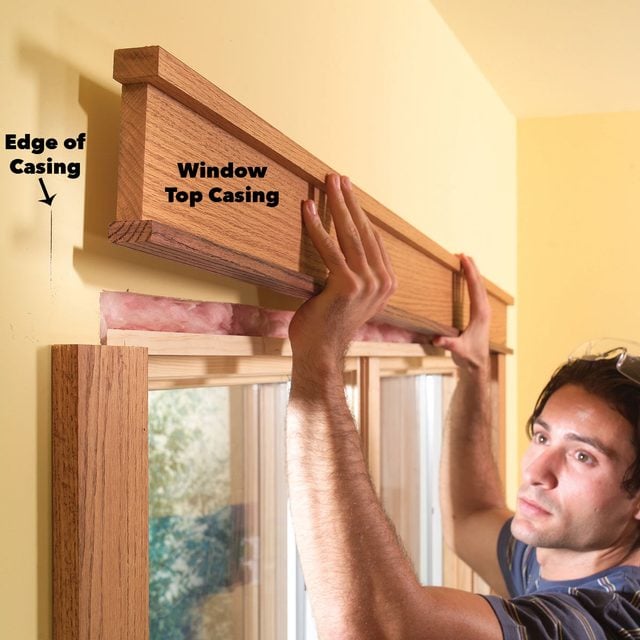
Complete the window by assembling the head jamb and nailing overtop. Center the completed assembly in place over the side casings. Don’t use a power nailer to attach the fillet to the jamb. Instead, drill 5/64-in. pilot holes through the top 1×4 of the fillet into the wall framing and drive 2-in. long finish nails by hand (the same technique you used to attach the stool). With the exception of the stool, trim out doors just like windows.
Install the Baseboard
The baseboard consists of a 1×4 with a two-piece cap and a square molding (base shoe) that covers gaps at the floor (Figure A). Before you start installing the base, locate the center of the wall studs with a stud finder or other method and mark their locations on the floor (mark on the paper used to protect the floor, or use strips of masking tape).
Run the first piece of base wall to wall. Then cut square ends on the adjoining pieces and butt them into the first piece. If there’s a gap at the butted joint, use a scribing tool to mark the base and then recut it along the scribed line. Miter the base to fit around outside corners.
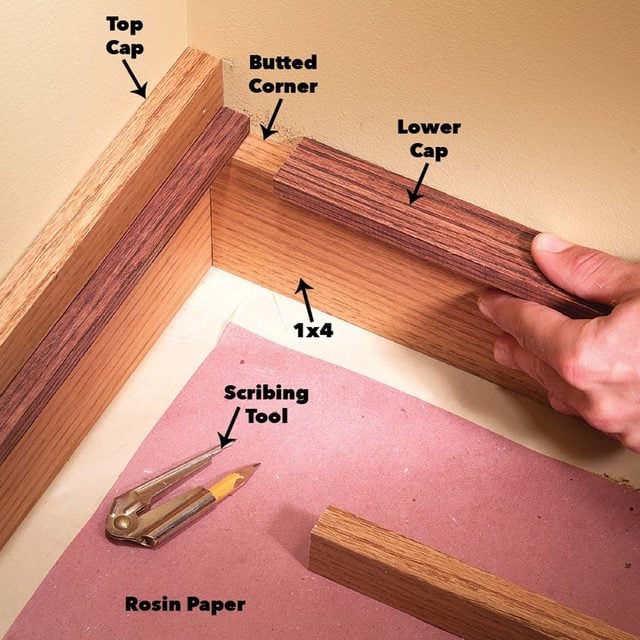
Cut boards a few inches too long and mark in place whenever possible. Then make your cut about 1/16 in. beyond the mark to allow for fine adjustments. Mark, cut and fit both sides of outside corners before nailing either piece to the wall. Nail the 1×4 to the wall studs, the lower cap to the 1×4 and the cap to the wall.
Notch the Lower Cap
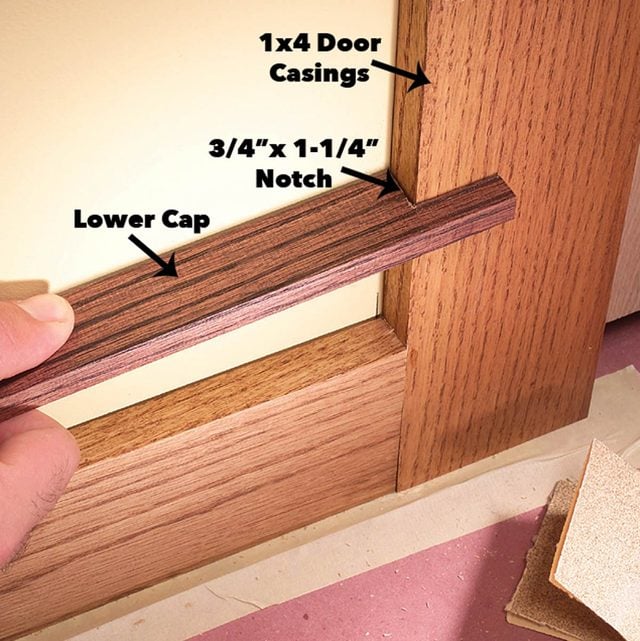
Nail the 1/2-in. x 1-1/4 in. lower cap down to the 1×4 base. The lower cap should overlap the casing by 1-1/4 in. Use a sharp handsaw to notch the lower cap to overlap door casings and file and sand to the lines. This is a highly visible joint, so work for a tight fit. Once again, butt inside corners and miter outside corners.
Complete Baseboard Installation
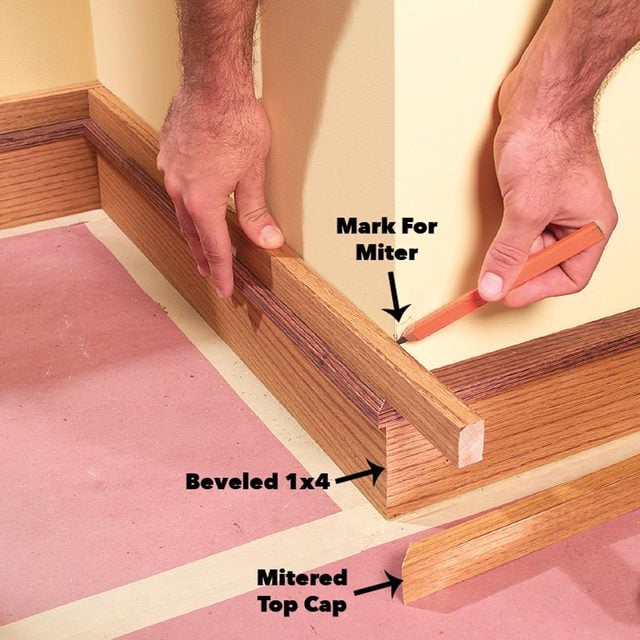
Hold outside corner pieces in place, mark and miter them. Cut and fit the top cap using the same technique as the 1×4 base. On floors without carpet, finish the baseboard by installing the square base shoe molding along the floor. Press the molding tight to the floor to cover gaps and nail it to the baseboard with 1-1/4-in. finish nails.
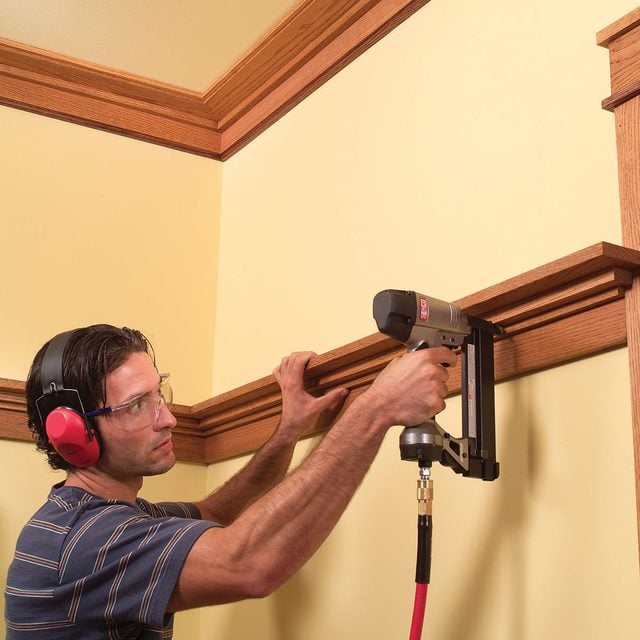
Install the Cove 1x4s
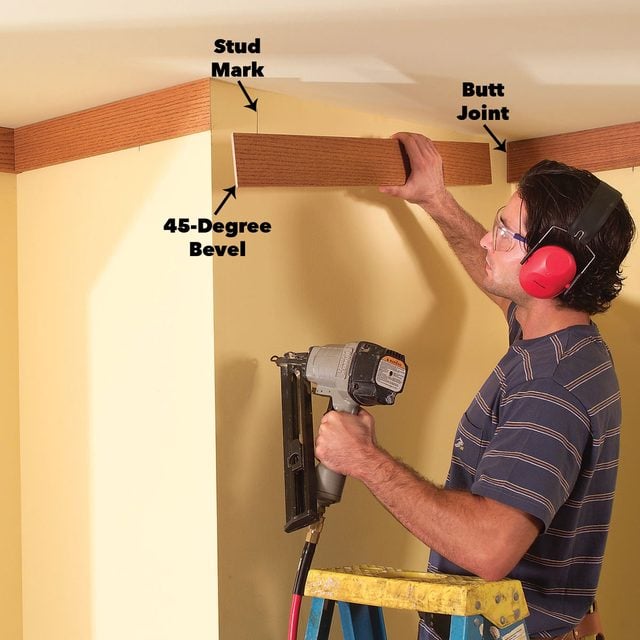
The cove molding consists of five pieces. Start by locating and marking the wall studs and ceiling framing members. If you put the marks about 4 in. from the wall and ceiling corner, they’ll be hidden by the trim. You probably won’t find any ceiling framing along two of the walls that run parallel to the ceiling joists.
Start the installation by installing the 1×4 against the wall. This is exactly like installing the baseboard, except you’ll need a ladder. Butt the 1x4s to the ceiling and nail them. Next, butt and scribe inside corners and miter outside corners. Walls are rarely perfectly square to each other, so for a perfect fit, you’ll probably have to adjust the angles a fraction of a degree.
Install the Ceiling Boards
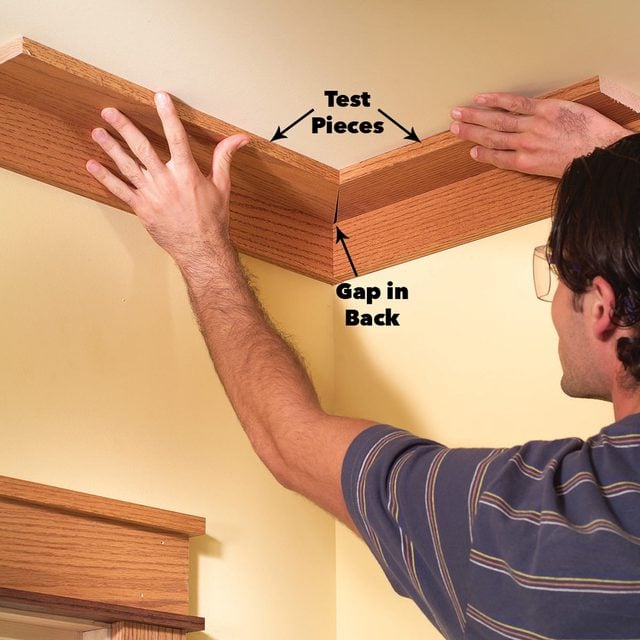
Use a pair of 2-ft.-long test boards to establish an accurate miter saw setting. Then cut and fit the ceiling boards and nail them to the ceiling framing.
Use Temporary Braces
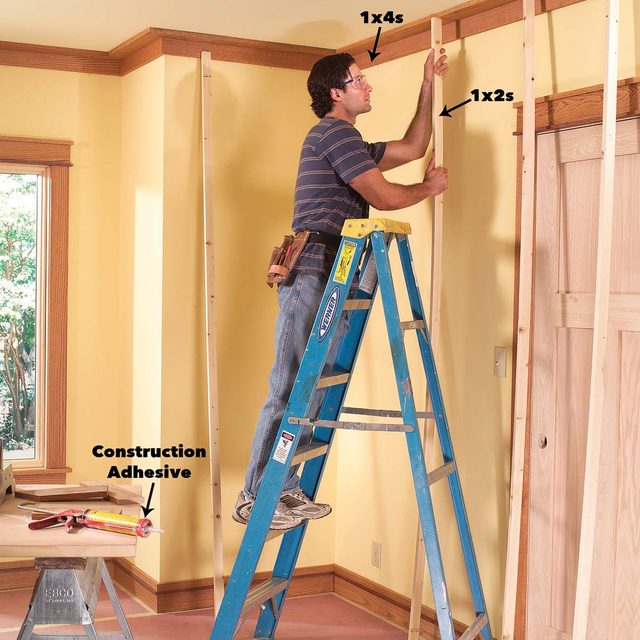
Along walls without ceiling framing, use construction adhesive and temporary braces to attach the boards.
Cover the Gaps
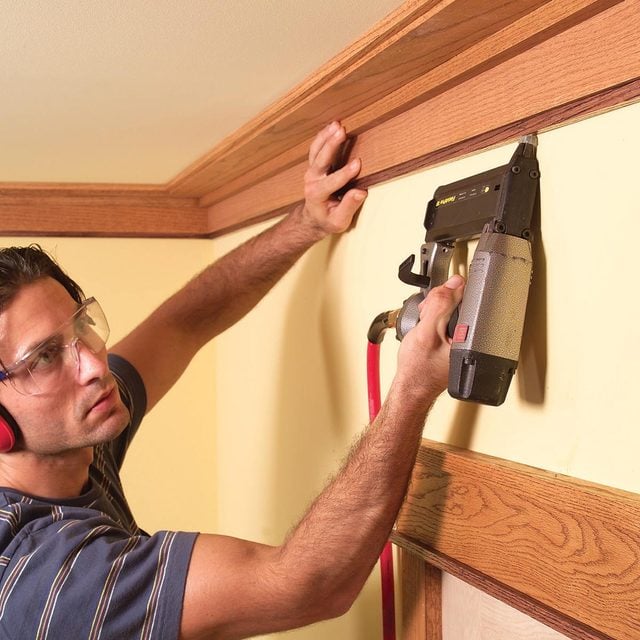
Complete the cove by nailing the three remaining square profile moldings to the 1x4s. Cover gaps by fitting and nailing the 3/4 x 3/4-in. piece and the 1/2 x 1/2-in. edge pieces. Butt the inside corners and miter outside corners.
Install the Plate Rail
We installed the plate rail 14 in. down from the top of the door head casing following the details in Figure A. Begin by marking this distance on the wall. Then measure down from the bottom of the cove molding and use this measurement to mark the height of the molding around the remainder of the room. A pencil mark every 4 ft. and at the corners is sufficient. This method is usually better than leveling because the rail will be parallel to the ceiling. Once again locate and mark the stud locations. Installation is similar to the base and cove. Nail up the rail first. Then notch the shelf to overlap door and window casings by 1-1/2 in. and nail it down into the 1×4. Use 1-1/2 in. brads or finish nails. Next cut the shelf cove and nail it to the rail. Overlap this piece 3/4 in. onto door and window casings. Complete the plate rail by nailing the shelf cove edge to the rail.
Apply the Finishing Touches

Sand the boards and trim pieces with 120-grit sandpaper followed by 180-grit and stain them before installation. We used Zar brand Provincial oil stain for most of the trim. For the darker-stained pieces, we used Zar Dark Mahogany. When all the moldings are installed, brush on a coat of sanding sealer. Then putty the nail holes with soft Color Putty. Mix two colors of putty to get a match if necessary. Lightly sand the surface with 220-grit sandpaper after the sealer dries. Vacuum off the dust and recoat with the polyurethane or varnish of your choice. Use the same brand of finish for the seal coat and the final coat.
Check out these trim basics-start to finish-plus a clever way to get those miters tight.
Additional Information