
Plumb Bobs and Levels: An Essential Guide
Updated: Feb. 20, 2023Build straight and true with less effort
Whether you're hanging a picture or framing a house, plumb and level is essential. These tips show how to use plumb bobs and levels for a wide variety of building and decorating tasks.
Lasers work great for long-distance leveling

There are many types of laser levels that simplify long distance leveling. The inexpensive version we’re showing is a small “torpedo” level with a built-in laser light. To learn how to use a level, turn on the laser light and adjust the level until the bubble is centered between the lines. The point of visible laser light will be level with a reference mark on the body of the level. More expensive laser levels have self-leveling mechanisms that eliminate the need to adjust the bubble.
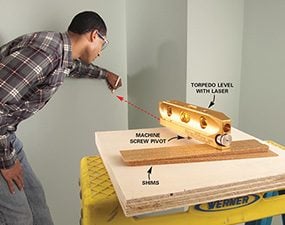
You can mount laser levels on a tripod, but if you don’t own a tripod, thread a 1/4-in. No. 20 machine screw into the hole on the bottom of the level, letting it protrude about 1/4 in. to serve as a pivot point. Set the level onto the pivot and use shims to center the bubble (photo below). Mark the wall at the dot of light and measure up or down to the desired height. Then swivel the laser on the pivot, level it, mark the wall again, and measure up or down the same distance. Snap a line between the points.
Build walls plumb with a plumb bob
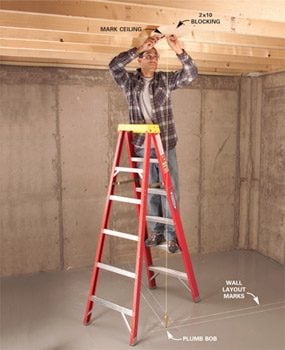
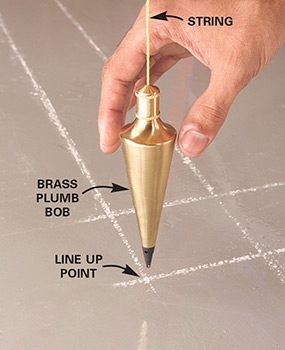
One of the quickest and easiest ways to plumb up or down from any given point is with a plumb bob (sold at hardware stores and home centers). So what is a plumb bob? We’re using a plumb bob to transfer layout marks from the floor to the ceiling. To learn how to use a level, suspend the plumb bob about 1/2 in. above the floor and center the point exactly over the intersecting lines. Then mark the location on the ceiling. The key to accuracy is to wait for the bob to stop swinging. To speed things up, ask a helper to steady the plumb bob while you adjust the position of the string. Plumb bobs have one major drawback: They don’t work in windy conditions.
Smartphone level
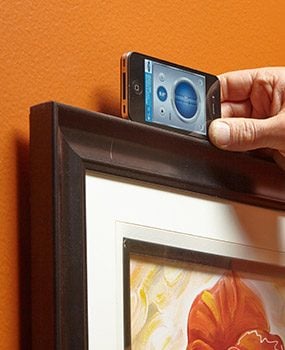
Quick readings
This is probably old news to you smartphone veterans out there, but for you newbies, here’s the tip. Your phone can work like a small level or plumb bob. You can download a level app, or your phone may already have a leveling app built into the operating system. You wouldn’t want to build an addition with a phone level, but it can come in handy for little leveling tasks around the house.
Slope pipes with a shim
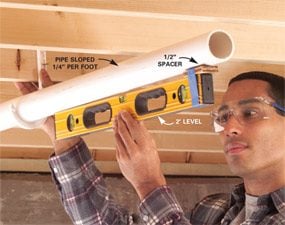
The next time you need to put a consistent slope on pipes, concrete formwork or landscaping projects, try this hint. Tape a shim to one end of your level to establish the desired slope—say, 1/4 in. per foot for a drain. Center the bubble and your project will be perfectly sloped. Calculate the thickness of the shim by multiplying the length of your level in feet by the desired slope (inches per foot). We wanted 1/4-in. per foot slope on this drainpipe, so for our 2-ft. level we needed a 1/2-in.-thick shim. If it’s more convenient to set the level on top of your project, tape the shim to the bottom instead.
Check the accuracy of your level
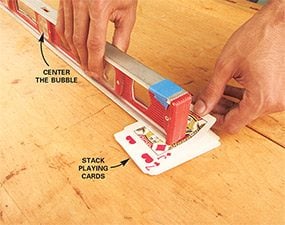
Level one side
Shim the end of your level with playing cards until the bubble is centered. (If the bubble is already centered, you won’t need any cards.) We’ve marked one end of the level with blue tape to distinguish it from the opposite end.
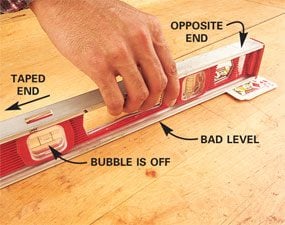
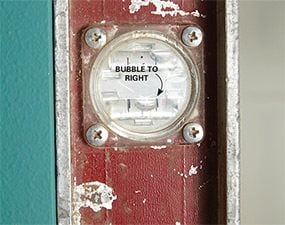
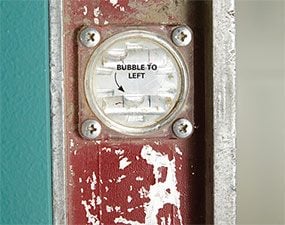
Who knows how it happens, but it seems like every level eventually gets a little “off.” In some cases, this small inaccuracy won’t matter. But if you’re doing finicky work like setting kitchen cabinets or installing doors and windows, you’ll want an accurate level. The photos show how to check your level. Expensive levels may be worth repairing. Call the manufacturer to find out if yours is repairable. When you’re buying a new level, use the same technique to check it for accuracy before leaving the store with it.
To check for accurate plumb vials, rest your level against a wall and note the location of the bubble between the lines. Then rotate the level 180 degrees, edge to edge, keeping the same end facing up. The bubble should be in the same spot. If not, your plumb vial is off. Levels like the one shown can be adjusted, but many levels can’t. In some cases, one set of vials will be good, and you can simply cross out the bad set with a permanent marker to avoid using it. Or toss a bad level and buy a new one.
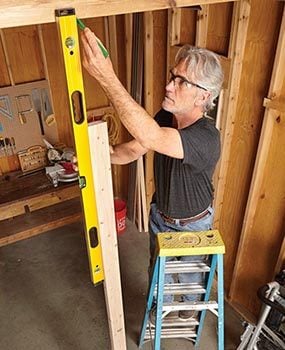
Block a straightedge for crooked walls
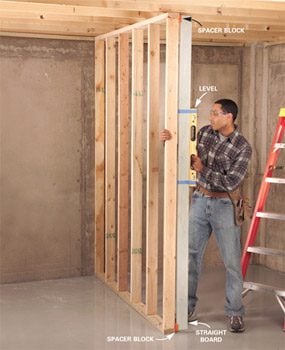
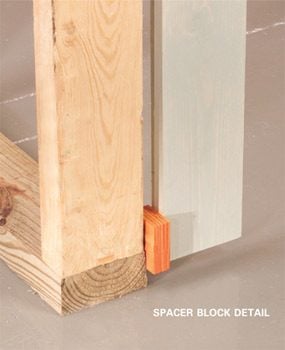
You could plumb a wall by simply setting your level against the stud, but it wouldn’t give you an accurate reading unless the stud was perfectly straight and smooth. The method shown spans irregularities in the stud and allows you to align the top and bottom plates exactly plumb with each other. Make sure the spacer blocks are the same thickness and that the board they’re attached to is perfectly straight. Check to make sure your setup is accurate by flipping it end for end. You should get the same reading on the level. If not, the straightedge may be crooked.
Level a row of pictures
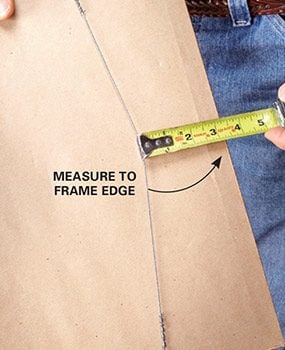
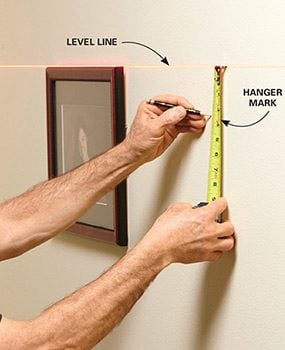
Getting a row of pictures to line up at the top can be tricky, especially if the hanging wires are different lengths. Here’s a tip from a professional picture hanger. Hook a tape measure to the wire and pull it tight (Photo 1). Measure to the top of the picture frame. On the wall, measure down from a level line and mark this distance at the centerline of your new picture location. Align the hook of the picture hanger with the mark and nail it to the wall (Photo 2). Repeat this process for all of the pictures, and their tops will be perfectly aligned.
Poor man’s laser level
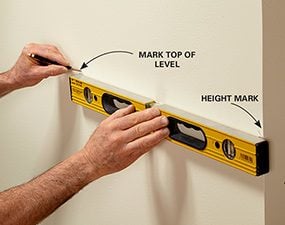
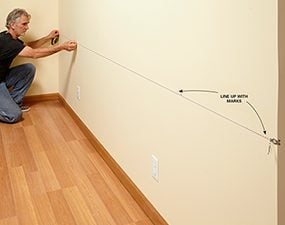
If you need to make a long, level line (or a plumb line) and don’t own a laser, try this method. Mark the desired height of your line on the wall. Hold your plumbers level at the mark and adjust it until the bubble is centered. Then make a mark at the opposite end of the level (Photo 1). Extend the line by stretching a chalk line and aligning it with both marks (Photo 2). If you’re working indoors, use dust-off marking chalk, which is easy to erase. Stretch the chalk line and snap it to create a perfectly level line across the wall.
Pre-level door jambs
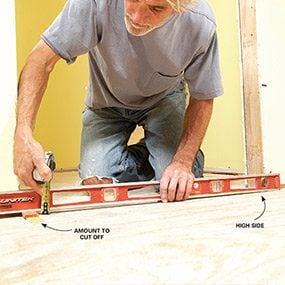
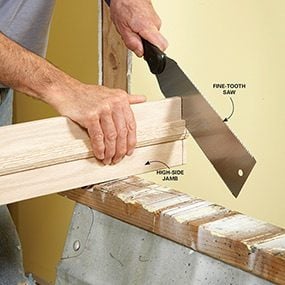
If your floors are going to be carpeted, you don’t have to worry about a gap under one of the doorjamb sides. In fact, most trim installers raise the doors so they don’t drag on the carpet. This is done by resting the jambs on 3/8-in.-thick shims, or temporary scraps of trim. That raises the whole door so it completely clears the carpet. But if the jambs have to fit tight to tile, wood or vinyl floors, you’ll have to cut them to fit an out-of-level floor. The two photos show how.
Get your first row of tile perfectly level
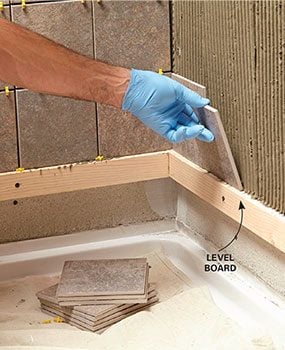
Attach a level board
Tubs and shower bases aren’t always level, so starting your first row of tile against them could throw off your whole job. Instead, make level marks on the wall, line up the ends of a straight board with the marks and screw the board to the wall. Rest the first row of tile on the board for a perfectly level tile job. The distance from the top of the shower or tub to the top of the board should be less than the width of a tile. That way you can custom-cut the tiles to accommodate an out-of-level tub or shower and keep consistent grout lines.
Fix crooked switches and outlets
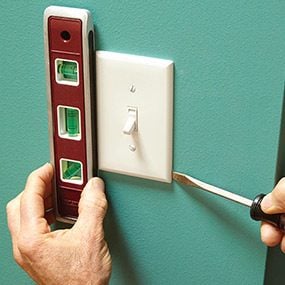
Plumb with a screwdriver
Here’s a handy tip from one of our electrical consultants. The screws that attach an outlet or a switch to the box go in a slot that allows the device to be adjusted. But you don’t always have to remove the cover plate to fix crooked switches or outlets. Instead, try pushing a flat-blade screwdriver against the cover plate. Use a screwdriver with a sharp blade. A rounded-over blade will just slip off. You may have to push from more than one corner to fix really crooked devices.
Easy appliance leveling
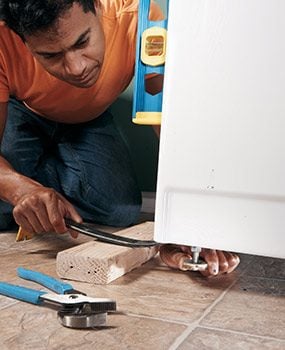
Plumb with a magnetic level
Here’s a two-part tip for leveling appliances. First, use a magnetic level to free up both hands. Most torpedo levels have a built-in magnet and work great for appliance leveling. The second part of the tip is to lift the front of the appliance with a pry bar to take pressure off the leveling feet. It’s much easier to turn the feet when they’re off the ground.
Extend your level
Human transit
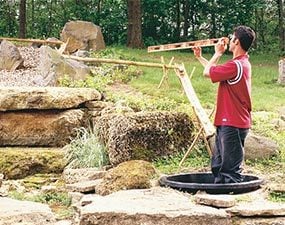
A trick for quick estimates
The elevation you’re trying to measure won’t usually be the exact distance from your feet to the level, so you’ll have to do some math. You might be squatting, sitting down or standing. Whichever, figure out the distance from your eye to the ground and that’s the height to the point you’re sighting. In this case, we’re checking the elevation to the top of the fountain to help us size the pump.
This tip won’t work for leveling house footings, but it’s great for approximating exterior grade changes as well as other long-distance leveling that doesn’t need to be exact, just close. Hold a level at eye height and center the bubble. Sight along the top of the level to the point you want to check. The distance from your feet to the level is the height of the point you’re looking at.
Required Tools for this Project
Have the necessary tools for this DIY project lined up before you start—you’ll save time and frustration.
- Chalk line
- Cordless drill
- Level
- Stepladder
You’ll also need a laser level, a torpedo level, a magnetic level and a plumb bob.
Required Materials for this Project
Avoid last-minute shopping trips by having all your materials ready ahead of time. Here’s a list.
- Masking tape
- Playing cards
- Shims
- Spacer blocks
- Straight boards
