
How To Install a Bathroom Roof Vent

Updated: Apr. 05, 2024
Bathroom exhaust fans need a vent. Here's how to install a vent cap on the roof and connect it to your fan.

4 hours
Intermediate
Varies
Introduction
If you can safely go onto your roof to install a roof vent for a bathroom exhaust fan, at least you won't have to be up there very long. I've installed a few roof vents, most recently when adding a fan to a new bathroom in my own house. On that day, I spent about two hours on the roof and a couple more in the attic doing the ductwork.
Codes generally require an exhaust fan in the bathroom, but some building departments allow you to skip it if the bathroom has enough open window space. It's usually a good idea to install a fan anyway. It keeps the bathroom dry and odor-free on days when you need to keep the windows closed.
To work efficiently, a bathroom exhaust fan needs to move air at a rate of one cubic foot per minute (cfm) for every square foot of bathroom floor area. Our 7-ft. by 9-ft. bathroom needed a 63 cfm fan at a minimum, but we decided to upgrade to 80 cfm to be on the safe side.
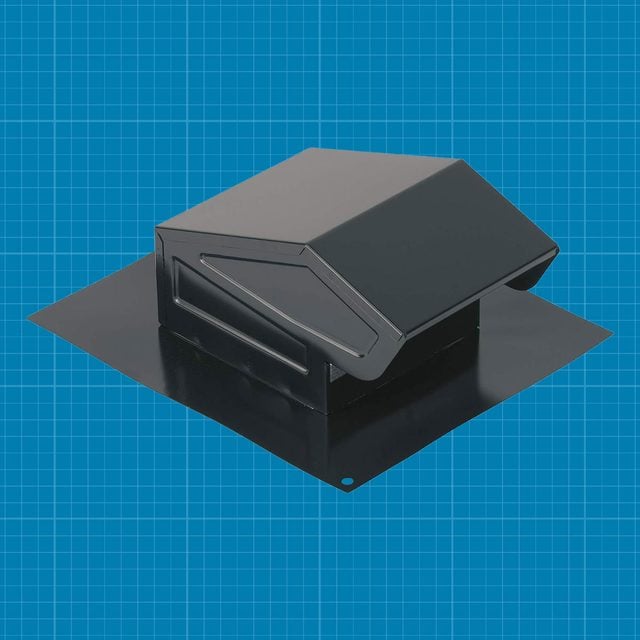
The vent is basically the outlet for the air circulated by the fan, and a number of styles are available. We get a lot of wind, so I opted for a low-profile, rectangular galvanized steel model with downward-pointing outlets to keep out rain, and grids over the outlets to keep out pests.
I could have installed it on a sidewall, but because it's a straight shot from the roof to the fan location — in the middle of the bathroom ceiling to maximize airflow — I opted for that instead. If the bathroom was bigger and had a bathtub, we might have needed two fans — one over the shower and one over the tub. But because it's small, one fan was plenty.
Going onto your roof should be avoided unless you have the proper safety equipment and the roof is dry.
Tools Required
- 1-inch spade bit
- Caulk gun
- Drill/driver
- Flat bar
- Reciprocal saw or jigsaw
- Tape measure
- Wax crayon
Materials Required
- 1-1/4-inch machine screws
- 1-inch roofing nails
- Long wood screw
- Rigid or flexible duct pipe
- Roofing cement
Project step-by-step (7)
Purchase the vent
Purchase the exhaust fan (if you don’t already have one) and a roof vent.
Roof vents can be dome-shaped, square (like the one shown here.), rectangular or chimney-shaped. They all have a cap over the exhaust opening, but not all come with a grid to protect the opening from unwanted incursions. We have a serious rodent problem, so we definitely wanted mesh to keep them out.
The most important parameter is the diameter of the duct that extends through the roof. It needs to match the diameter of the duct extending from the fan. Three- and four-inch ducts are common. While some vents can be adapted for both diameters, others can’t, so be sure to check.
Choose a location
Go inside the attic and choose a spot for the vent as close as possible to the fan. Also, the duct from the fan to the vent should be as straight as you can make it, but one or two 90-degree bends are usually allowable. Check the manual that came with your fan for information specific to your model.
Once you’ve decided on the location, drive a long screw or nail through the underside of the roof so you’ll know where to cut the hole for the vent.
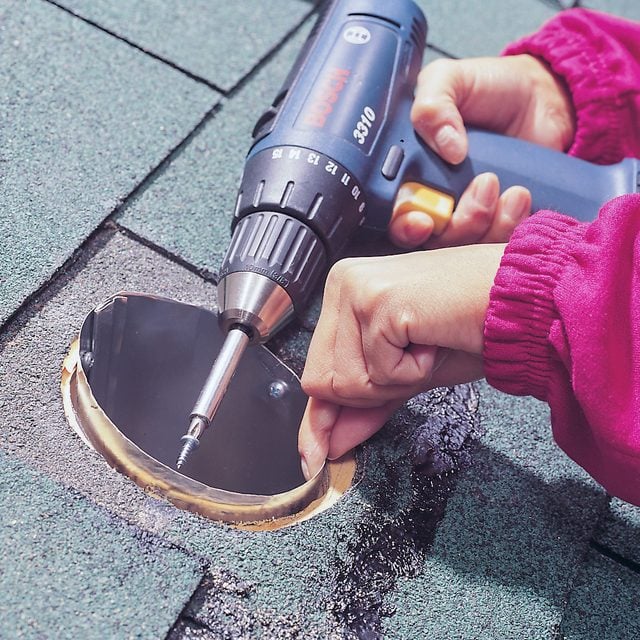
Cut the hole
Go on the roof and find the screw or nail. Center the vent pipe over it and, with a wax crayon, trace around the pipe onto the roofing.
Drill a pilot hole on the outline with a one-inch spade bit, then cut around the outline with a reciprocal saw or jigsaw. Remove the cutout, shingles and all.
Some vent caps come with an attached duct, while on others the duct detaches. If you have a detachable duct, anchor it in the hole, leaving the rim about 3/4-in. above the roofline. Secure it in place with 1-1/4-in. machine screws.
Position the vent cap
Measure out a square slightly larger than the base of the vent cap, the part that sits flat on the roof. Use a flat pry bar (sometimes called a Wonder bar) to gently pry up the shingles around the hole in this area, so you can slide the base underneath them.
If the base extends farther than the next course of shingles above the vent hole, pry those up as well, so you can slide the base all the way and center it on the opening. Don’t worry about the shingles below the hole — the base sits on top of those.
Install the vent without cement to make sure everything fits before proceeding.
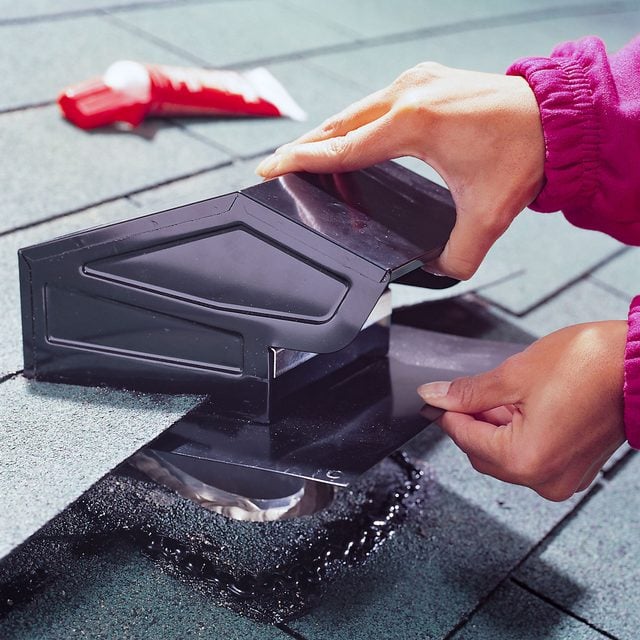
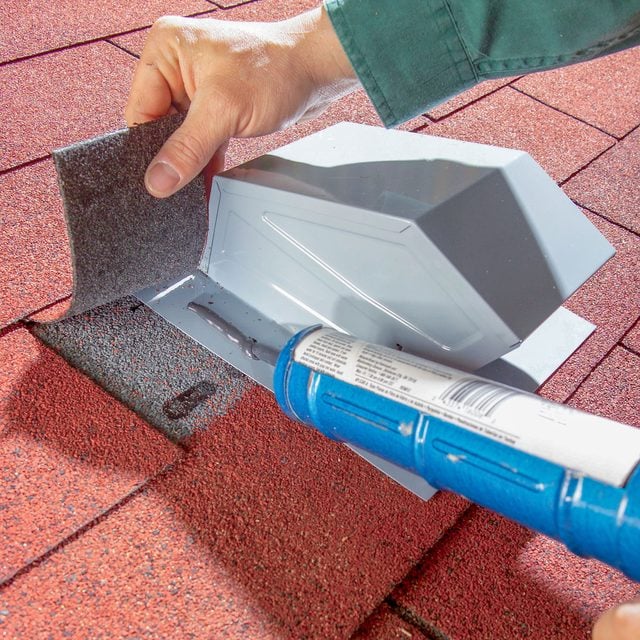
Install and seal the cap
After dry fitting, remove the vent cap from the hole. Turn it over and, with a caulk gun, spread a generous bead of roofing cement around the base. Set the base back in position and drive a one-inch roofing nail through each hole in the baseplate.
Spread roofing cement on the roof on both sides of the base and on the base itself, then lower the shingles you lifted and press them into the cement. If you had to lift shingles above the vent, spread roofing cement underneath them as well. Finish by sealing any exposed nails with roofing cement.
Pro tip: It’s best to do this project on a warm day. Roofing tar can be stiff and difficult to manage when it’s cold out.
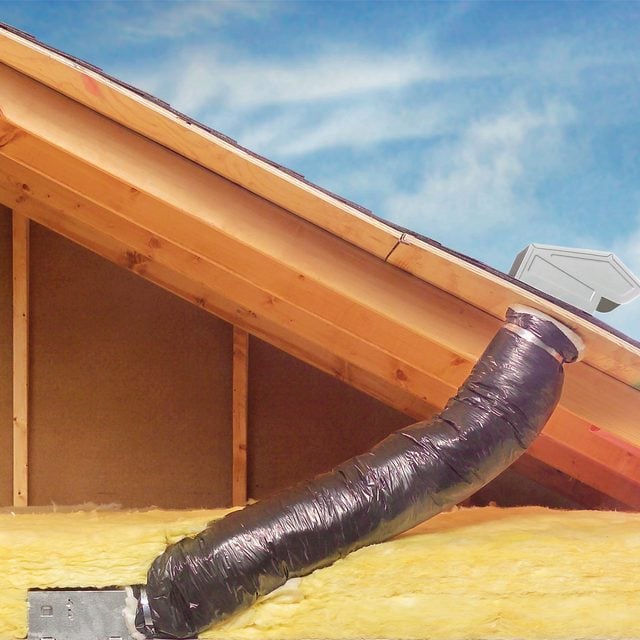
Connect the fan to the vent
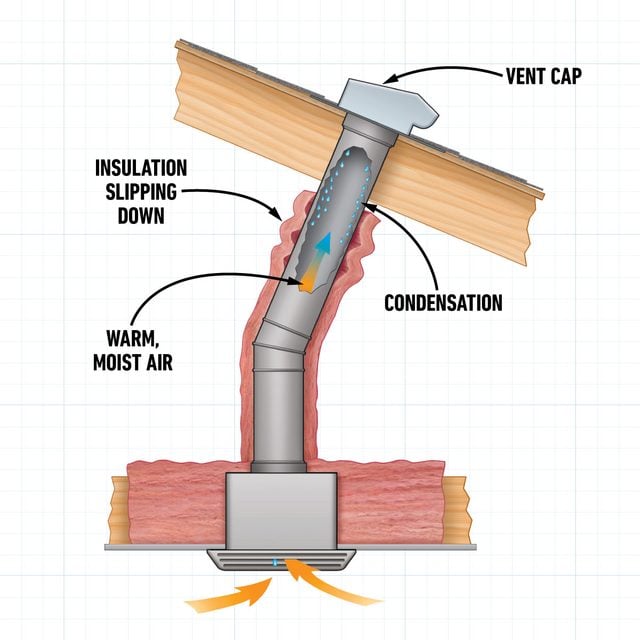
Go back into the attic to install the duct pipe. The best exhaust fan venting is through smooth, rigid ducts with taped and screwed joints. But when that isn’t possible, metallic flexible duct also works.
Although it isn’t always possible in attic crawl spaces, you should always insulate the duct to prevent condensation problems. If you have any horizontal runs, slope them gently back toward the fan to allow condensation to drip out.
FAQs
What happens if a bathroom is not vented?
Then steam and humid air have nowhere to go. They end up damaging drywall and woodwork, providing places for mold to grow.
Do bathrooms need to be vented through the roof?
Not necessarily. If the bathroom is in a lower floor or the basement, it’s easier to vent the fan through a side wall. In such cases, a wall-mount fan usually makes more sense than a ceiling-mount.
Can bathroom exhaust be vented through the soffit?
Yes, if attic space is limited.
Can you also use a roof vent for kitchen exhaust?
No. Kitchen range hoods come with specific venting requirements because they must expel grease and smoke. They have large-diameter ducts and need their own vents.
It’s also a bad idea to use an existing roof vent for bathroom exhaust. You’ll partially block the vent with the duct pipe, reducing the flow of cooling air through your attic. Moreover, during cold winters, you’ll blow warm, moist air from the bathroom onto the cold roof vent and plywood, causing ice to form and potentially creating an ice dam.
Do roof vents need caps?
Generally, yes. But if you can place the vent where it’s protected from rain and small animals, you could leave the opening exposed, provided the vent pipe rises above the roof by the amount recommended by your local building department.
Do ductless bathroom fans work as well?
No. Ductless fans pull air through a system of filters and release it back into the room. They can purify the air, but don’t remove moisture. Use only in bathrooms with plenty of window ventilation.
How often should you clean your bathroom vent fan?
Assuming you use your exhaust fan daily, letting it run for 10 to 20 minutes after each shower to clear the air, you should clean it every six months to keep it dust- and mold-free. If you use the fan only occasionally, an annual cleaning may be all it needs.
Originally Published: April 24, 2019