
How to Change Coolant
Updated: Jun. 05, 2023Let our auto repair expert save you big bucks and show you how to change your own coolant.
How to Change Coolant Overview
In the old days (generally before 2000), changing your vehicle’s coolant was simple. That procedure is shown in Step 2, below. After 2000, cars got more complex and many DIYers got intimidated by the precise filling and “air-bleeding” procedures required to eliminate engine air pockets. But don’t worry, it’s easier than it looks. All it takes to get back in the game is a one-time $83 investment in an air-powered refilling tool. The details follow in Step 3.
Either way, you can change your coolant yourself in about an hour. But before you do anything, check your owner’s manual for the recommended procedures and coolant for your car.
Draining and refilling coolant in older cars
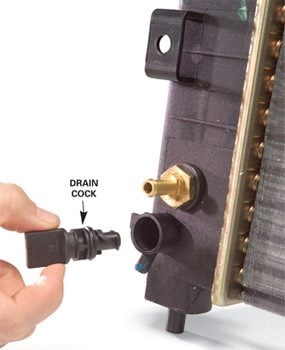
Photo 1: How to drain a radiator: Open drain cock
Open the drain cock by unscrewing, twisting a quarter turn, or twisting and pulling. (The various styles are shown in the next photo.)
If you’re way past due for a coolant change and your cooling system is corroded, you should take your car in for a professional flush. The same is true if you’ve mixed different types of coolant in your radiator. But if you’re on schedule for a coolant change and your coolant is free of brown, gunky corrosion (extract a little coolant with a baster to examine it), you can skip the flush procedure and perform a simple drain and refill operation yourself and save money. Here’s how:
Start by buying the type of coolant listed in your owner’s manual. If your manual calls for an “extended life” coolant that isn’t available at the auto parts store, buy it from the dealer. Don’t buy a “universal” coolant. Using the wrong coolant can cause premature component failure and void your warranty.
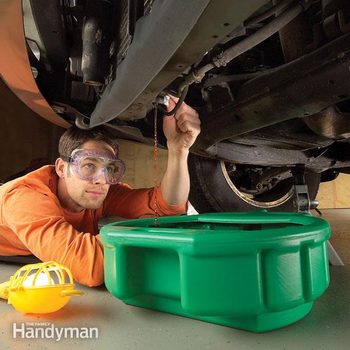
Raise and safely support the front end of your car on jack stands. Place a large drain pan under the radiator and remove the radiator cap. If your radiator doesn’t have a cap, remove the pressure cap from the coolant tank. Then open the drain cock and drain the radiator.
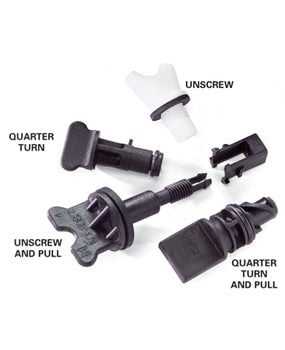
Drain cocks come in several different styles—screw threads, quarter-turn twist, and quarter turn and pull. Plastic drain cocks become brittle with age and can break easily, especially if you try to unscrew a quarter-turn twist style. So, buy a replacement drain cock at the auto parts store before you begin the job (they only cost a few dollars; return it if you don’t need it).
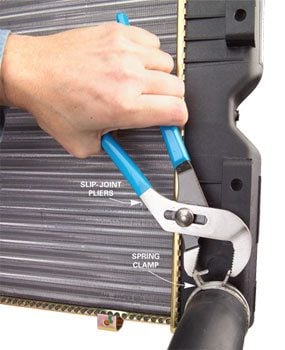
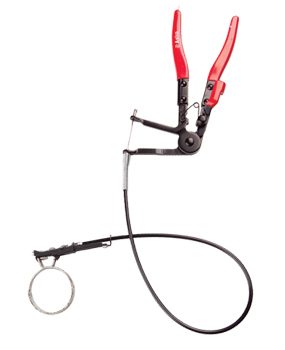
Then remove the lower radiator hose clamp and hose from the engine to drain the rest of the coolant. Use a slip-joint pliers to remove spring-style clamps. If you have trouble accessing or releasing the clamps with a pliers, buy a hose clamp pliers (see photo). Reconnect and clamp the radiator hose and reinstall the drain cock after draining.
How to Put Coolant in a Car
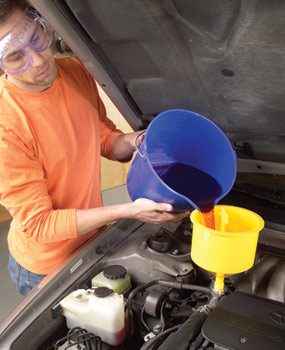
Follow the coolant manufacturer’s directions for diluting concentrated coolant. Mix the coolant and water thoroughly in a clean bucket. To prevent mineral deposits on internal engine and radiator surfaces, always use distilled water—never tap water. Leave the car raised while you refill the radiator to reduce the possibility of air pockets forming in the engine.
Slowly fill the radiator or coolant tank with fresh coolant until the coolant is 1 in. below the neck of the radiator or a few inches below the full mark on the coolant tank. Start the engine and let it run. After the engine warms, you’ll see the coolant level quickly drop in the radiator/coolant tank. That means the thermostat has opened and it’s time to add more coolant to bring the level to the top of the radiator, or to the “HOT” mark on the coolant tank. Check your owner’s manual or service manual to see if your car requires a special air bleeding procedure. Check for leaks, shut off the engine, install the cap, lower the car and go for a spin.
CAUTION!
Used coolant is toxic waste. Pour it into a screw-cap plastic container and drop it off at a recycling center. Sweet-tasting coolant is irresistible to pets—and poisonous. Just a small amount can be deadly. So soak up any spills with paper towels or rags immediately if you have pets wandering around.
Draining and refilling coolant in newer cars
Changing your coolant yourself, including buying the air-powered refill tool, will save about $50 on your very first coolant change, and about $100 on each one after that. This procedure works for any cooling system that’s not contaminated with rust or oil. We’ll show you how to check yours and then how to change the coolant.
Here’s what you need to change coolant:
- New coolant (2 gallons)
- Air-powered refill tool (about $85)
- Air compressor
- Hose removal tool (about $4 from auto parts store or online)
- Shop manual to locate block drain plugs
- Drain pan
- Absorbent paper towels
- Wrenches and screwdrivers
Start by checking the condition of your coolant when the engine is cool. Remove the radiator or coolant reservoir cap and examine the coolant color. If it looks rusty (don’t confuse orange coolant with rust), has crud or oil floating on the top, or looks like chocolate milk, call it quits and take it to a pro. You have problems that this procedure won’t solve.
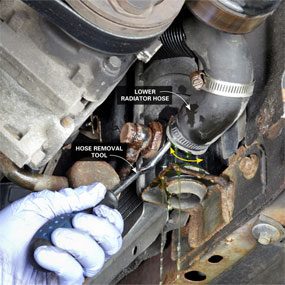
If the coolant looks clean, start the job by jacking up the vehicle and supporting it with jack stands. Next, place a large drain pan under the radiator. Loosen the lower radiator hose clamp with pliers (springtype clamp) or screwdriver (worm-drive clamp) and remove the hose (Photo 1). If the hose won’t budge, use a hose removal tool (one choice is Tool Aid No. SGT13860 available through our affiliation with amazon.com) to break it loose (Photo 1). Let the radiator and water pump drain completely. Then reattach the lower radiator hose and clamp.
Next, locate and remove the block drain plugs (they’re in a different spot on every engine, so refer to a repair manual for the location of yours). Reinstall the block drain plugs and move on to the refilling step.
Refilling car with fresh coolant:
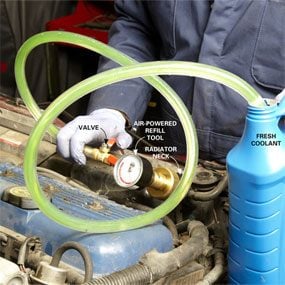
Insert the air tool (we used the UVIEW 550500 AirLift II Economy Cooling System Refiller; available through our affiliation with amazon.com) into the radiator neck or overflow bottle. Connect the exhaust hose and compressed air line and route the open end of the tool’s exhaust hose into an empty gallon jug or pail. Then open the valve and let the vacuum rise until the needle reaches the edge of the red zone on the gauge. Then fill with coolant (Photo 2). The vacuum sucks out any air pockets as it refills the system. When it’s full, just reinstall the radiator or overflow tank caps, remove the jack stands, and go for a spin.
Buying the Right Coolant
Most DIYers buy coolant at the auto parts store because the label says it’s “universal,” meaning it works in all cars. The carmakers disagree. Over the past several years, they’ve issued service bulletins warning that “universal” coolants are often incompatible with the newer metal alloys and gaskets and seals used in their vehicles. The carmakers aren’t saying that just to increase sales of their proprietary coolants. They’re seeing real (and expensive) damage caused by these coolants.
If you use the wrong coolant, you won’t see the damage for a few years. But when you do, it’ll cost you a bundle. So heed the manufacturer’s warnings and buy coolant right from the dealer. It’ll cost about $6 more per gallon (most vehicles only need 2 gallons), but the peace of mind is worth it.
Replace the thermostat and radiator cap when you change the coolant
The thermostat is the single most important component in your vehicle’s cooling system because it regulates engine temperature. Yet most owners don’t replace it when they change their coolant. That’s a mistake: A failed thermostat is the second most common cause of engine overheating and engine failure (a failed radiator fan is No. 1). And a worn radiator cap (sometimes it’s on the overflow tank) can also contribute to engine overheating. Both parts are inexpensive (about $12 each at any auto parts store) and are cheap insurance against overheating.
A radiator cap is a snap to change (see photo). It’s just a matter of unscrewing it and replacing it with a new one. Changing a thermostat yourself takes less than an hour (unless it’s buried). To find out how to replace yours, see How to Replace a Thermostat. But if yours is inaccessible, pay a shop to replace it.
Required Tools for this How to Add Coolant Project
Have the necessary tools for this DIY project lined up before you start—you’ll save time and frustration.
- 4-in-1 screwdriver
- Adjustable wrench
- Air compressor
- Air hose
- Rags
- Safety glasses
- Slip joint pliers
- Socket/ratchet set
Required Materials for this How to Add Coolant Project
Avoid last-minute shopping trips by having all your materials ready ahead of time. Here’s a list.
- Antifreeze
- Distilled water
- Drain cock
- Paper towels
- Screw-cap plastic container for recycling coolant
