
How to Cut Curves in Wood
Updated: Oct. 23, 2023Expert tips for marking, cutting and fine-tuning curves
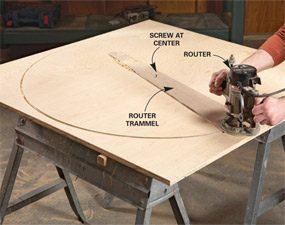
Cut precise curves with a router trammel
Whether you’re building a frame for an arched opening, making curved brackets or fashioning arch-top casing, marking and cutting curves is part of the process. In this article, we’ll show you several techniques and tips for marking, cutting and fine-tuning curves. Some methods are best suited for rough curves. Others are refined enough for furniture making. Choose the technique that works best for the project at hand.
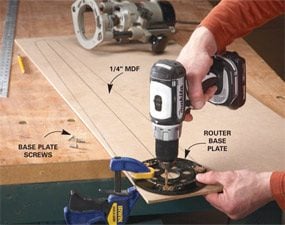
This simple router trammel is easy to build and allows you to cut a perfect circle. For circles up to 6 ft. across, use a piece of 1/4-in. plywood, MDF or hardboard that’s about 4 ft. long and at least as wide as your router base. Start by removing the base plate from your router and clamping it to one end of the trammel material. If you want your trammel to be stylish, trace around a coffee cup to make a nice-looking rounded end. Then draw tangent lines connecting the circles and cut the sides. If you don’t care about looks, simply make a long rectangular trammel.
Trace around the base plate and use the mounting holes as a guide for drilling holes in the trammel (Photo 1). Cut out the trammel and drill a 1-1/2-in. hole in the center of the router end to clear the router bit. Countersink the mounting screw holes so the screw heads won’t tear up your workpiece. Attach the router to the trammel with the base plate screws.
Screw the trammel to the workpiece, centering it on the circle you want to cut out. Mount a straight plunge-cutting bit in your router and set the router bit to cut about 3/8 in. deep for the first pass. A plunge router works best, but if you don’t have one, hold the router above the wood and start it. Carefully plunge it into the wood and begin moving it counterclockwise around the circle (Photo 2). Complete the circle, then readjust the depth and make another pass until you cut all the way through.
Plastic wood template
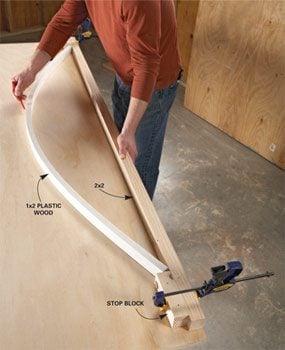
Often you can simply “eyeball” the best curve for the job by bending a piece of wood and using it as a template. But variations in wood grain can result in inconsistent curves. Here’s a tip to make this technique even better. Use plastic wood or a plastic molding instead. It bends very uniformly and yields near-perfect symmetrical curves. Azek, Fypon, Kleer and Versatex are several brands available at home centers. Choose a thickness that’ll bend to the curve you need. For gradual bends or wide curves, use 3/4-in.-thick material. For tighter bends (those with a smaller radius), use a 1/2-in. x 1-1/4-in. plastic stop molding or something similar. Support the ends of the plastic wood with blocks attached to a strip of wood. Adjust the position of the blocks to change the curve.
Draw large curves with a giant compass
Grab any narrow board or strip of plywood and drill a few holes—voilà, instant compass. Drill a pencil-size hole a few inches from the end of the board. Then drill a screw-size hole at the pivot point. The distance between them should be the radius of the curve, if you know what that measurement is. Otherwise, just use the trial-and-error method, drilling a series of pivot holes until you can swing the trammel and draw the right-size arch. It’s easy to draw parallel curves too. Just drill two pencil holes spaced the desired distance apart. Learn how to scribe for a perfect fit with a woodworking compass.
There’s no limit to the size of the arch you can draw. If your plan calls for a 10-ft. radius, find a long stick and use the floor as your workbench.
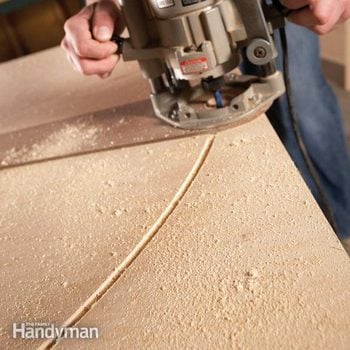
Get the Best Curves: Cut gradual curves with a circular saw
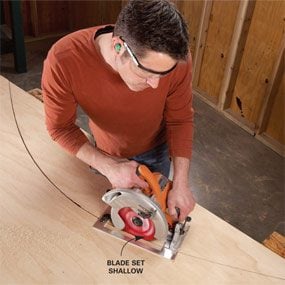
Circular saw technique
You don’t need a jigsaw to cut curves. When you’re forming gradual curves, you can speed things up by using a circular saw instead.
The first tool that comes to mind for cutting curves is a jigsaw, but if the curve is gradual, try a circular saw instead. It’s surprisingly quick and easy to cut a smooth curve with a circular saw. This method is for cutting rough curves. Don’t try to make furniture with this technique. The trick is to make sure the curve is gradual enough that the blade doesn’t bind. If you try this method and the blade binds or starts to heat up and smoke, switch to the jigsaw. The thinner the material you’re cutting, the sharper the curve can be. Set the blade depth so it barely projects through the bottom of the wood.
Stack and sand for matching parts

When you have several identical curved parts, the best way to sand them is to stack them and sand them all at once. You’ll save time and the parts will all match perfectly. The wider surface keeps you from rounding off edges. If the parts require a lot of sanding, a belt sander is a good choice. If you don’t have to remove much wood, try a random orbital sander. The key to success is to keep the sander moving at all times to avoid creating any flat spots. Check your progress by running your hand over the parts. Mark high spots with a pencil so you’ll know where more sanding is needed.
Use a pattern and a router for irregular curves
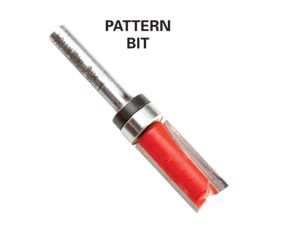
Photo 1: Make matching parts with a pattern
Trace out and rough-cut your part. Attach the pattern with hot-melt glue. Use a top-bearing pattern bit to follow the pattern and shape the part. Move the router counterclockwise around the pattern.
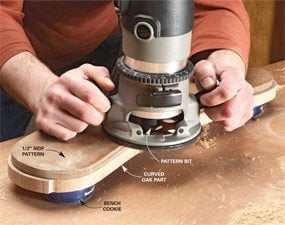
When your plan calls for cutting curved parts and you need to make two or more, first shape and sand a perfect full-size pattern from a piece of 1/2-in. medium-density fiberboard. Then use a router with a top-bearing pattern bit to cut out the parts.
Here are a few tips for routing with a pattern bit. First, use the pattern to mark the shape. Then remove excess material by cutting about 1/4 to 1/8 in. outside the lines with a jigsaw or a band saw. Elevate the workpiece to avoid cutting into your workbench. We used Bench Cookies (available at rockler.com). But hot-melt glue and scraps of wood are another option. If you’re cutting material that’s thicker than the pattern bit is deep, cut as deep as you can. Then remove the pattern and use the part as the pattern to complete the cut.
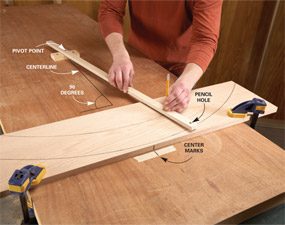
Mark an arch with two sticks
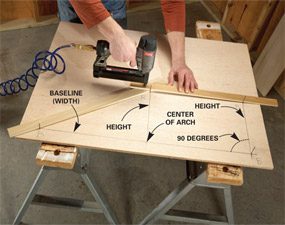
Photo 1: Arch drawing set-up
Set up for arch drawing with two sticks. Drive nails at the ends of the baseline and at the height of the arch. Lay one stick across two height nails and lay the other from the center height to the end of the baseline. Connect the sticks with short pins or hot-melt glue.
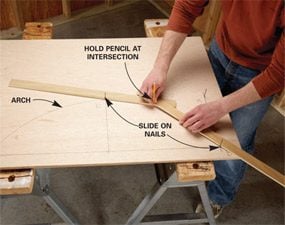
Here’s a quick way to draw an accurate curve if you know how wide and tall you want the arch to be. Let’s say you want to draw an arch that’s 3 ft. wide and 9 in. high. Drive two nails at the ends of the 3-ft. baseline. At the center of the baseline, draw a perpendicular line and make a mark 9 in. above the baseline. Drive a nail at the mark. At one end of the baseline, draw another perpendicular line and make another mark 9 in. above the baseline. Drive another nail at this mark. Photo 1 shows how to arrange and connect two sticks that you will use to draw the arch (Photo 2).
Required Tools for this Project
Have the necessary tools for this DIY project lined up before you start—you’ll save time and frustration.
- Brad nail gun
- Circular saw
- Clamps
- Cordless drill
- Drill bit set
- Orbital sander
- Pattern bit
- Plunge-cutting bit
- Router
Required Materials for this Project
Avoid last-minute shopping trips by having all your materials ready ahead of time. Here’s a list.
- 1/4 in. MDF
- Plastic wood
