
How to Build a DIY Wood Workbench: Super Simple $50 Bench
Updated: Jan. 03, 2024
An hour or less
Beginner
$51–100
Introduction
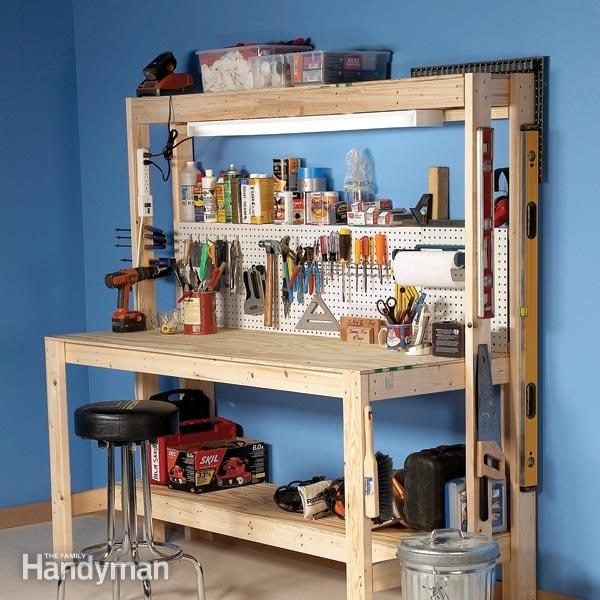
This workbench is simple enough and cheap enough that you can make it in a morning, and yet it's big enough for serious woodworking and hobby projects. Add pegboard, a bench vise and a few other accessories and you'll have a serious work center.Tools Required
- Circular saw
- Cordless drill
- Miter saw
- Safety glasses
- Straightedge
- Tape measure
Materials Required
- 1-5/8-in. drywall screws
- 2x4s
- 3-in. drywall screws
- 4 x 8 x 1/2-in. plywood
This sturdy 30-in. x 6-ft.-long DIY workbench is the ultimate in simplicity. It’s made from only fifteen 8-feet-long 2x4s and one sheet of 1/2-inch plywood, and it makes for a better tool workbench than you could buy for much more.
Learn how to build this workbench by following the cutting diagrams to cut the parts: Figure B to cut the plywood tops, then Figure C to cut all the framing. Use the lengths provided in the Cutting List. You can either screw the framing together with 3-inch screws or hand- or power-nail it together with 3-inch nails. Screw the plywood down with 1-5/8-inch screws.
To make these project plans even easier to follow, we tinted the parts that get added at each step. Keep reading to learn how to build this brilliant small work table with storage.
Project step-by-step (9)
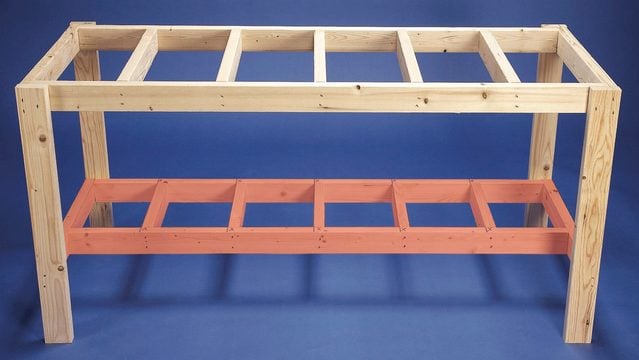
Assemble the Workbench Frames
- To begin building a workbench, assemble the DIY wood workbench frames for the workshop bench surface and lower shelf.

Attach the Legs
- Screw the legs to the work surface frame.

Attach Lower Frame
- Flip the workbench over and attach the lower shelf frame.
- Pro Tip: Use gallon paint cans to support the lower shelf frame when you’re attaching it to the main workbench legs.

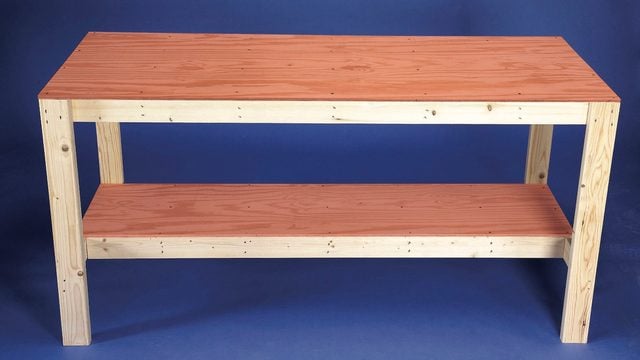
Attach the Work Surfaces
- Screw the plywood work surfaces to the frames.
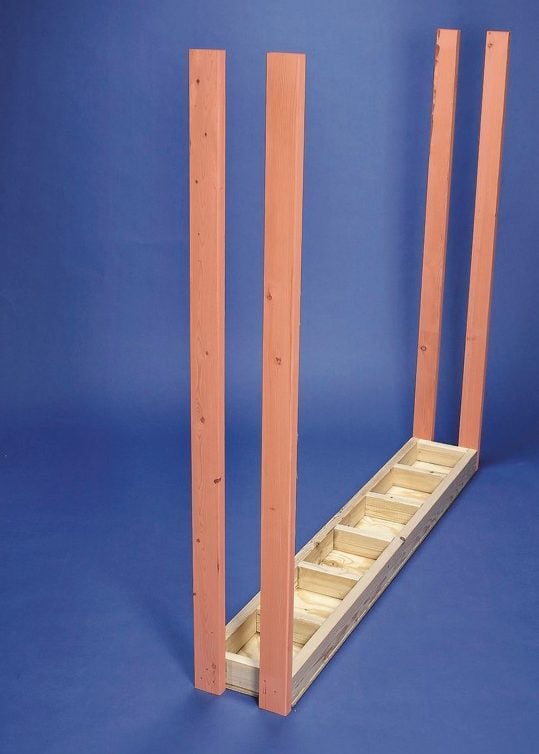
Build the Top Shelf Frame
- Assemble the top shelf frame per the instructions.

Finish the Top Shelf
- Add the plywood to finish the top shelf.

Add the Top Shelf Legs
- With the top shelf turned upside down, attach the top shelf legs.
Put it All Together
- Screw the top shelf legs to the workshop bench and add the backer boards.

Additional Accessories
- Add Lighting
- Note: Good light is mandatory for any workbench. Buy an inexpensive 4-foot shop light and screw it right to the underside of the top shelf.
- Add Power
- Note: Mount a power strip to one of the legs and you’ll have all the power you need.
- Pro Tip: Forget clumsy extension cords. You can also use the power strip to control the light.
- Note: Mount a power strip to one of the legs and you’ll have all the power you need.
- Add a Vise
- Note: Bolt a bench vise to one corner of the workbench.
- Pro Tip: A quality bench vise may cost as much as the workbench itself, but it will really complete your bench, and you’ll be amazed at how much use you get out of it.
- Note: Bolt a bench vise to one corner of the workbench.
