
Building Cabinets With Pocket Screws
Updated: Apr. 21, 2020Intimidated by cabinet work? Even a novice can make fine joints with pocket screws
- Time
- Complexity
- Cost
- Multiple Days
- Intermediate
- $101–250
Buy a good pocket screw jig
Pocket screw joints are best described as a screw version of toenailing, where boards are joined by angling a fastener through the edge of one into the other. The concept is simple, but the precisely engineered drill guide (the jig), drill bit and pocket screws are what make the system so easy and foolproof.
We purchased a standard kit that contained the Kreg jig shown, the special clamp and the stepped drill bit with a stop collar and square driver bit. Avoid the temptation to buy an inexpensive jig; you’ll never experience the real benefits of pocket screws if you’re frustrated by a poorly designed tool. Less-expensive jigs lack the self-aligning lip and built-in clamp found on this and other high-quality models. You can get higher-priced pocket hole jigs that have more elaborate clamping systems and built-in motors to speed up the operation, but the end result is essentially the same. This short tutorial will show you how to use a pocket screw jig.
The joinery system is incomplete without the specially designed pocket screws. These screws have a narrow shank with a thread-cutting tip to avoid splitting hardwoods, and a strong head with a square recess for slip-proof driving. The most common length is 1-1/4 in., the best size for joining 3/4-in.-thick material. Corrosion- resistant exterior screws, washer head screws for joining particleboard, and hi-lo thread screws for softwood are also available.
Pros and Cons of Pocket Screws
Pros:
Pocket screw joints have many advantages over more traditional joinery:
- You can assemble large frames without needing an arsenal of expensive clamps because the screws provide the clamping action while the glue dries.
- No fancy cutting is required; joints are simply butted together, saving time and reducing tool costs.
- The use of an alignment clamp during assembly ensures flush joints without any tricky measuring.
Cons:
Pocket screw joints aren’t perfect:
- Every joint leaves behind a long, oblong hole that looks bad when it’s prominent, like on cabinet doors. Luckily, you can order wood plugs in just about any species to fill these odd holes—you just glue them in and sand them flush. Dowels, biscuits or mortise-and-tenon joints would be a better choice if the backside of a joint will be highly visible.
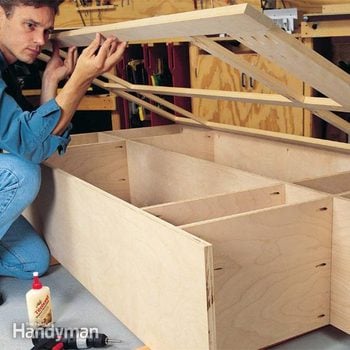
Building the coat locker
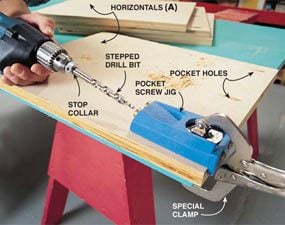
Photo 1: Butt-joint plywood panels
Clamp the pocket hole jig to the horizontal panel (A) and workbench. Follow the manufacturer’s instructions for setting the stop collar on the special bit to the correct depth. Insert the bit into the jig’s metal sleeve before you turn on the drill. Start the drill so the bit is turning at full speed. Then bore the clearance and pilot hole in one step by pushing the bit into the workpiece until the stop collar contacts the metal sleeve. Bore three holes on both ends of the eight horizontal panels.
The coat locker we built is constructed of 3/4-in. birch plywood with 3/4-in. solid-birch boards for the face frame, drawer sides and front, baseboard and top edge. The back and drawer bottoms are 1/4-in. birch plywood. We purchased the plywood and boards from a local hardwood lumber supplier. This is usually the best source for good-quality hardwood boards, and you can have them cut to the right width and planed smooth on all four edges. You can also get your materials at home centers and full-service lumberyards.
Even though this coat locker is built with simple pocket screw joints, many of the parts must be cut to precise dimensions. Use a power miter saw to cut the face frame, edge band, drawer sides and moldings.
Cut out the plywood parts and drill pocket holes in the horizontal fixed shelves (A) and top and bottom pieces (also A). See Photo 1. For this project, the pocket holes will either be hidden from view or filled, so there’s no need to precisely locate the holes.
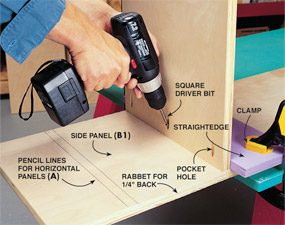
Join all of the horizontal panels (A) to the uprights (B1 and B2) with pocket screws, making sure to face the screw holes to the hidden or least conspicuous side (Photo 2). Check the cabinet box for square by measuring diagonally across the corners.
Since screws enter the center upright panel from opposite sides, be sure to offset the pocket holes so the screws don’t collide.
Now you can use the box as a pattern for cutting out and joining the face-frame parts.
Figure A: Coat Locker
A complete Cutting List, Materials List and Shopping List are available in Additional Information below.
Cut the frame and drawers
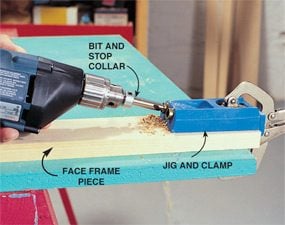
Photo 3: Drill the face frame
Clamp the jig to the end of a face frame board and bore holes for two pocket screws. Drill the opposite end, and all other face-frame parts that need pocket screw holes. Remember that only one half of each joint needs pocket screw holes. Drill parallel to the grain as shown.
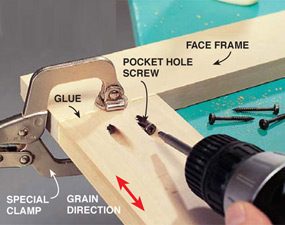
Photo 4: Glue the pieces
Spread wood glue on both pieces to be joined. Clamp the joint together to hold the faces flush, and drive in the 1-1/4-in. pocket screws. We used a special locking pliers-type clamp provided by the jig manufacturer.
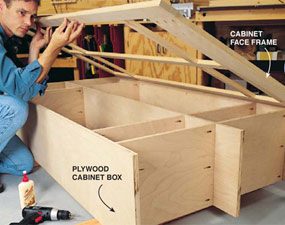
Photo 5: Attach the frame
Attach the face frame to the box. First bore pocket screw holes every 16 in. along the inside front edge of the box, placing them in concealed locations when possible. After checking the alignment of the frame to the box, spread an even layer of wood glue on the edge of the plywood and use a clamp to hold the frame in position while you attach it to the box with pocket screws. Remove excess glue with a damp rag. When the glue is dry, sand the outside edge of the face frame flush with the box, being careful not to sand through the thin veneer on the plywood.
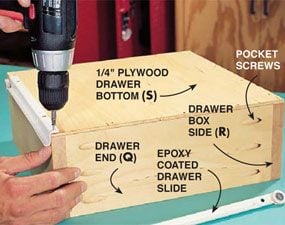
Photo 6: Build the drawer
Cut 1×6 boards to form a box that is 13 in. long and exactly 1 in. narrower than the drawer opening in the face frame. Bore pocket holes on the end drawer pieces (Q) as shown and screw the box together. Use a framing square to square up the drawer. Then nail on the 1/4-in. plywood bottom with 1-in. paneling nails. Attach the 12-in. epoxy-coated slides to the drawer with the screws provided, aligning the front (the end without the wheel) of the slide with the front of the drawer box.
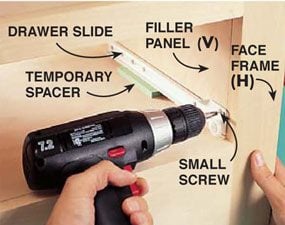
Photo 7: Attach drawer slides
Shim the sides of the drawer compartments flush to the face frame with scraps of plywood and shims ripped to the proper thickness. Then attach the other half of the drawer slides, holding the front edge of the slide even with the front edge of the face frame. (Check the manufacturer’s specifications for exact placement.) Use a spacer to hold the drawer slide parallel to the cabinet bottom while you screw it in.
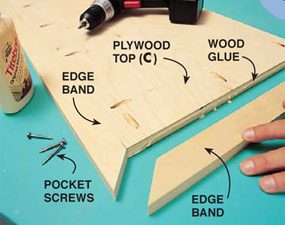
Photo 8: Pocket-screw edges
Band the edge of the plywood top with 1-1/2-in. strips of birch (K1 and K2), mitered to fit. Spread wood glue on both edges and secure the 1×2 band to the plywood (C) with pocket screws as shown. Wipe off the excess glue with a damp rag. Use an orbital sander to sand the 1×2 flush with the plywood. Position the top on the cabinet so that an equal amount hangs over both sides and the front. Hold the top in place with a clamp while you attach it through the top of the cabinet box with 1-1/4-in. drywall screws.
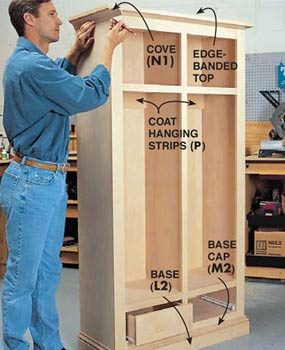
Photo 9: Finish the details
Mark, miter and nail on the 2-in. cove (N1 and N2), the 3/4-in. x 3-in. base (L1, L2) and the 1-5/8 in. base cap (M1 and M2). Use 6d finish nails for the base, and 1-in. brads to attach the moldings. Drill pilot holes for the nails to avoid splitting the moldings. Attach the hook strips with pocket screws. Then cut a piece of 1/4-in. plywood (D) to fit the back and attach it with 1-in. paneling nails. Draw lines to indicate dividers to help in placing the nails accurately.
Cut the 3/4-in. solid-birch face frame parts to length using a power miter saw. For tight-fitting joints, the edges of the boards must be square to the face and the end joints cut perfectly square. Bore the pocket screw holes (Photo 3). Now assemble the frame without glue and set it onto the box to check the fit. Take the frame apart, adjust the size if necessary, reassemble it using glue, and attach it to the box (Photos 4 and 5).
Photos 6 and 7 show how to assemble the drawer box and attach the slides. We used the inexpensive epoxy-coated drawer slides shown, but for better access to the drawer interior, you could install full-extension slides instead. Use whatever shimming material you have around to build out the sides of the drawer compartments flush with the edge of the face frame. Then you can mount the slide as shown in Photo 7.
Attaching the drawer front (T) so it’s perfectly aligned is a little tricky. Start by drilling four 5/16-in. holes in the front of the drawer box. Place the drawer in the opening. Use double-faced carpet tape or hot-melt glue to temporarily secure the drawer front to the drawer box. Gently open the drawer and clamp the front to the box. Attach it with four No. 8 x 1-1/4- in. pan head screws with No. 10 finish washers under the heads. Snug the screws but don’t tighten them. The extra-large holes will allow you to tap the drawer front into exact alignment before you fully tighten the screws.
Construct the cabinet top by attaching edging strips (K1 and K2) to the plywood (C) with pocket screws (Photo 8). Use this same procedure for edge-gluing boards for a tabletop or attaching wood nosing to a counter.
Complete the cabinet as shown in Photo 9. Glue wood plugs, available from the Kreg Company, into the exposed pocket holes on the cabinet interior and sand them flush.
Now you know how to use pocket screws in some of the more common cabinetmaking applications, but don’t ignore other possibilities. Once you get the pocket screw joining bug, I’m sure you’ll come up with your own innovative uses for this ingenious little connector.
Additional Information
Required Tools for this Project
Have the necessary tools for this DIY project lined up before you start—you’ll save time and frustration.
- 4-in-1 screwdriver
- Circular saw
- Cordless drill
- Drill bit set
- Framing square
- Hearing protection
- One-handed bar clamps
- Orbital sander
- Pocket hole jig
- Safety glasses
- Speed square
- Tape measure
