Build a Router Table by Upcycling a Kitchen Countertop
Updated: Jan. 03, 2024
Sure, you can buy a router table. But why not make your own? Let's find out how to do it.
A full day
Intermediate
$75 to $200
Introduction
I love upcycling, i.e. turning discarded material into something of value. So when I saw an old Family Handyman project about building a router table for $40, I said, count me in!
The project promised a portable, easy-to-store table, and building my own would up my handywoman cred. All I needed was an old chunk of countertop and some hardware. How hard could that be?
I'm so glad you asked!
First off, dumpster diving for a six-foot countertop remnant was not the breezy endeavor advertised. I don't know where you live, but Dallas home centers and hardware stores don't let randos dig through their garbage. Fail No. 1.
I moved on to salvage and re-use stores. On my third try, a guy said I needed to "get up a little earlier" because countertops go fast. Hmm. Good tip.
My dreams of a practically free router table were vanishing by the minute. I could buy a sheet of laminated medium density fiberboard (MDF) for $50, but bargain-basement countertops are closer to $100 to $150. Plus, aren't we upcycling? I haven't even mentioned the instruction to "find a bed frame to cut up." Clearly, this project was from another era and handiness level.
But let's say you can get your hands on free countertops and angle iron. Look at you go! This will be easy. For everyone else, this project costs about as much as buying a router table. But it's fun, and you'll have a high-quality table when you're finished.
Follow along as we walk through this Family Handyman classic.
Tools Required
- Adjustable wrench
- Angle grinder or band saw
- Brad nail gun
- Circular saw or table saw
- Clamps
- Drill bit set
- Drill or impact driver
- Hole saw kit
- Jigsaw
- Miter saw
- Router with a 1/2" pattern bit
- Safety glasses
- Safety gloves
- Screwdriver
- Tape measure
Materials Required
- 1/2" particleboard (for guides)
- 6' of 1" angle iron
- 6' of laminate countertop
- Coarse-thread screws
- Eye bolts and washers - 1/4" minimum
- Nails or brads
- Router table insert plate
- Sandpaper
- T-nuts
- Vacuum hose adapter
- Wood glue
Cutting List
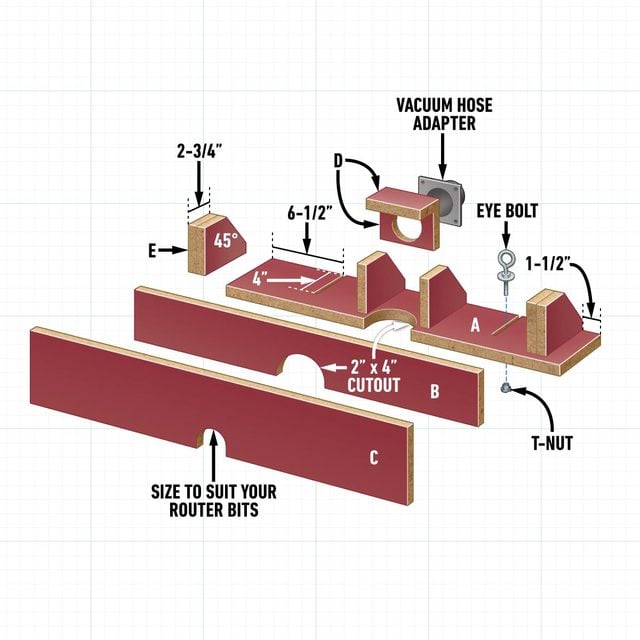
| KEY | QTY. | PART | DIMENSIONS |
| A | 1 | Base | 6″ x 28″ |
| B | 1 | Face Backer | 3-1/2″ x 28″ |
| C | 1 | Face | 5″ x 30″ |
| D | 2 | Dust Pen | 2-3/4″ x 4-1/2″ |
| E | 6 | Brackets | 3-1/2″ x 5-3/16″ |
Project step-by-step (7)
Cut the table
- Put on safety glasses and hearing protection.
- Cut off the backsplash using a table saw or circular saw.
- If using a circular saw, clamp a straight piece of particleboard to the countertop as a guide.
- To prevent chipping the laminate, cut the countertop face-up on a table saw or face-down for a circular saw.
- Cut off the raised hump on the front of the finished edge, if applicable. (If there isn’t one, leave the finished edge.)
- Cut the table to size, roughly three feet long by 21 inches wide. Width can vary, but it should be at least three feet long.
- Safety note: Plastic laminate is sharp! After cutting, swipe edges with fine-grit sandpaper.
Assemble the router plate guide
- Place the countertop laminate side-up on workbench.
- Orient the router insert plate’s long edge 3-1/2-in. from back of countertop, centered 1-1/2-ft. from each end.
- Screw the plate to the counter, temporarily.
- Build a router guide around insert plate using 1/2-in. particleboard.
- Place washers on two sides so the guide is slightly larger than insert plate.

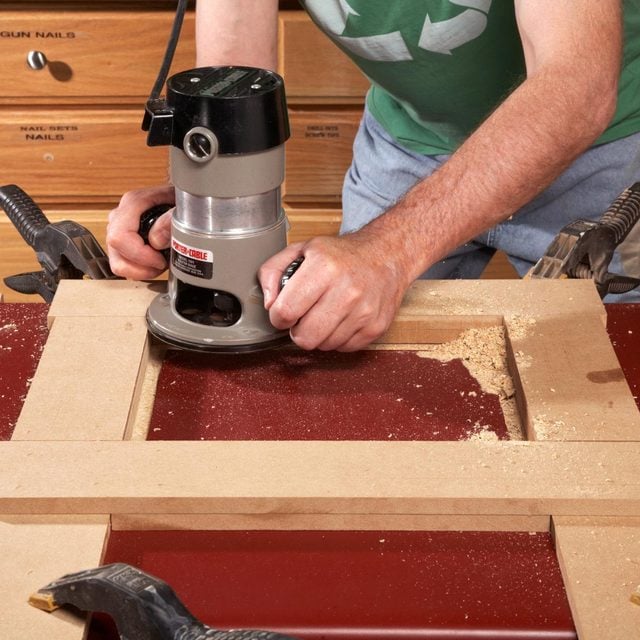
Cut groove in the countertop
- Remove the plate from the counter.
- Set the depth of the router so the groove is exactly the depth of the insert plate.
- Clamp the guide to the countertop table.
- Cut the groove in the counter using a 1/2-in. pattern bit.
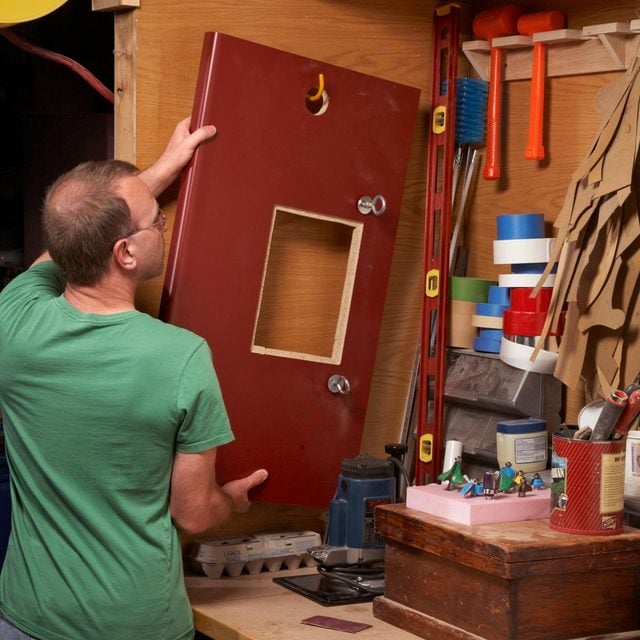
Finish plate opening
- Drill a jigsaw blade access hole in the corner of the groove along the inside edge.
- Cut along the inside of groove with a jigsaw, dropping out the middle rectangle.
- Test the fit of the plate insert.
- Sand and smooth edges, as needed.
Cut and assemble the fence
- Cut the remaining countertop into fence pieces (see Cut List and Figure A), using a table saw and/or miter saw.
- Cut the router bit access (A, B, C) and dust pen hole (D) with hole saw or jigsaw. The size depends on your setup.
- Drill 1/2-in. holes in the fence base for eye bolts and cut out 4-in. slots in the back of the base with jigsaw.
- This holds the fence to the table when routing and allows fence depth adjustment.
- Assemble the fence as in Figure A.
- Pro tips: Use screws alone when attaching laminate to wood; use glue and screws for wood to wood. Drill a pilot hole and use coarse-thread screws.
Figure A:
Add support and T-nuts
- Cut the bed frame or angle iron into two 34-in. sections with a band saw or angle grinder.
- Attach segments lengthwise across the back, a couple of inches from top and bottom.
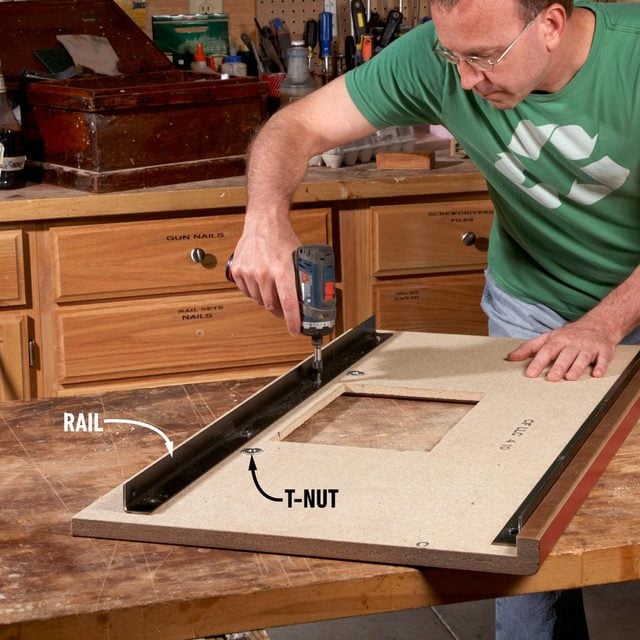
- Mark where the T-nuts that hold the fence to the table should go. Allow room to adjust the fence forward and backward.
- Drill holes according to eye bolt and T-nut size, then drive the T-nuts into the table from the underside.
Finish and store
- Flip the table upright.
- Cut a mounting/hanging hole in one end with a hole saw.
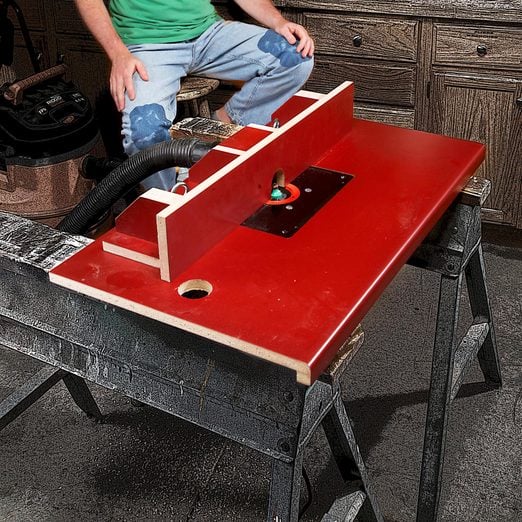
- To use, lay across sawhorses, and attach the router plate and fence.
- Rout.