
How to Install a Load-Bearing Beam
Updated: Mar. 03, 2024
Replace a load bearing wall with a microlam beam to create a bigger room.

Multiple Days
Intermediate
$101–250
Introduction
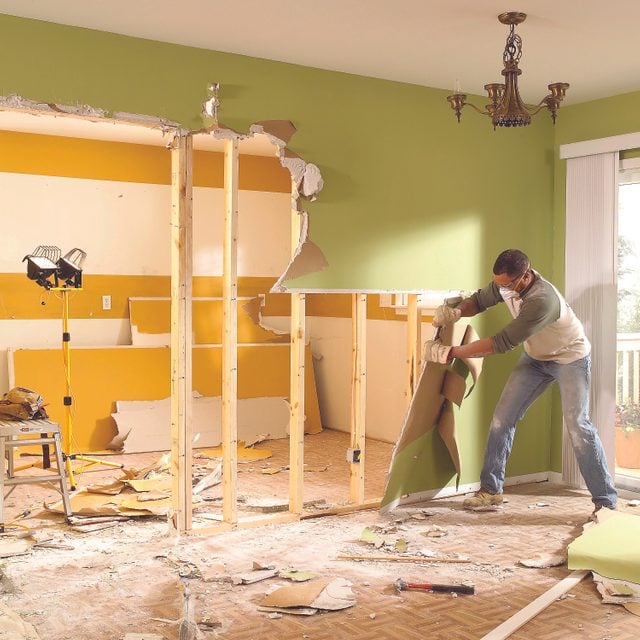
Open up cramped rooms by replacing a wall with a load-bearing beam. Create an open kitchen/dining area, a larger living room or a huge master bedroom using basic framing techniques and standard materials.
Tools Required
- Cat's paw
- Chalk line
- Circular saw
- Dust mask
- Hammer
- Jigsaw
- Level
- Pry bar
- Reciprocating saw
- Safety glasses
- Sledgehammer
- Speed square
- Stud finder
- Tape measure
- Voltage tester
Materials Required
- 16d framing nails
- 2 x 4s for walls and header material
- 8d framing nails
- Construction adhesive
- Engineered beams (LVL or Gluelam)
- Joist hanger nails
- Joist hangers
The best way to make small or cramped rooms larger is to remove a wall between adjoining rooms. When you replace a load-bearing wall with a load-bearing beam, you create a larger, more useful floor area and give your home a feeling of spaciousness.
In this story, we’ll show you how to remove nearly any wall and tell you how to add a structural beam if it’s needed. It may be scary to think about tearing walls out of your house, but don’t be intimidated. You can do it if you’ve done any basic carpentry work like framing in a wall or building a shed or deck. In fact, removing the wall and replacing it with a beam will only take a half-day or less.

Project step-by-step (18)
Remove the Drywall
- Shut off the circuit at the main panel.
- Remove the baseboards on both sides of the wall and any electrical cover plates.
- Slice through the tape at inside corners at the ceiling, and at any adjoining walls.
- Note: If there aren’t corners nearby, make a vertical slit just beyond the wall.
- Tear off the drywall from both sides of the wall.
- Pro tip: Take off one side first by driving a hammer claw through the drywall and simply pulling a chunk free. The first side will come off in small pieces. Loosen the drywall from the other side by rapping on the backside near the studs to free it from the screws. That way you can take off large pieces and minimize the cleanup.
Wait: Is It a Load-Bearing Wall?
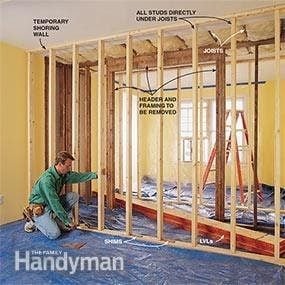
To tell if a wall is load-bearing, first check the joist direction with a stud finder. A load-bearing wall almost always has ceiling or floor framing running perpendicular to it. If you’re unsure, ask a building contractor or your local building inspector for advice. If it’s a load-bearing wall, the inspector may help size the beam or recommend that you have a structural engineer or architect size it. The inspector will check the size, issue a permit and check your work when you’re finished framing (before you start any drywall or finish work). Sometimes a full-service lumberyard will size the beam and sell it to you. In rare cases, you may be required to enlarge existing footings beneath the support columns as well to handle the additional load. That can get costly!
Know what’s in the wall. In most cases, electrical boxes and switches can be moved or rerouted relatively easily. But plumbing pipes and heat ducts inside the wall are cause for concern. If that’s the case, contact a plumber and/or heating contractor to find out exactly what’s involved in eliminating or moving pipes or ductwork before you start tearing out drywall. Apply for an electrical permit if you have to move electrical boxes or cables.
Cut a Slot in the Ceiling
- Snap a chalk line about 12 inches out from the wall and cut a slot.
- Strip 1 foot of ceiling drywall from one side of the wall.
- Pro tip: Use shallow strokes to avoid nicking any electrical cables hidden in the ceiling.

Remove Cables from the Stud Wall
- Examine the ceiling framing to determine the beam design.
- Turn off the electrical power and remove electrical cables, outlets and switches and pull the cable free of the studs.
- Cap the ends of the exposed wires with electrical connectors.

Build a Temporary Wall
- Tack a single top 2×4 plate under the floor joists and another directly below it to the floor.
- Add a second top plate.
- Tap in and toenail temporary studs every 2 feet.

Full Scope of the Work
DIYers are often surprised by how quickly and easily the beam part went and then how extensive the rest of the job is. That work generally includes drywall patching, respraying textured ceilings, entirely repainting the new room and replacing sections of wood trim. Usually, electrical outlets and switches need to be repositioned, which calls for rerouting cable and rewiring devices. If the wall contains plumbing pipes or heating vents, a plumber and a heating contractor have to be called in. And the finished flooring always has to be replaced. Be sure to consider all of these secondary expenses when calculating the cost of your project. Most of the materials for those items are fairly inexpensive if you do the work, but it’s best to get bids ahead of time for whatever work you plan to hire out.
Hammer Out the Old Studs
- Knock out the bearing wall studs with a sledgehammer.
- Bend over the leftover nail shanks in the bottom plate to protect your feet.

Cut Off Nails Sticking Out of the Framing
- Cut continuous plates and pry them free.
- Cut off the leftover nail shanks with a reciprocating saw.

Remove the Backer Stud
- Cut the nails that hold the backer studs and pry them out.
- Note: You may have to pry open a gap with your chisel to reach the nails.
- Cut the backer stud in half to remove it.

Install the Beam Cradle
- Assemble two beam cradles from pairs of 2x4s and screw them to the tie plate and floor with 3-inch screws.

Set the Beam in Place
- Cut the beam to length and cut notches (if necessary) to clear tie plates in adjoining walls.
- Slip the beam members into place and rest them on the temporary cradles.

Shim the Beam
- Drive shims between the support studs and the bottom of the beam until the beams is tight against the underside of the tie plate.

Install Trimmers Under the Beam Ends
- Cut two snug-fitting trimmers for each end of the beam.
- Tip them into place under the beam and tap them into place.
- Face or toenail each one with at least six 16d nails.

Install the Blocking Under the Beam Ends
- Cut blocking to fit between the floor joists directly under the trimmers at the beam ends.
- Toenail and end-nail the blocks to the surrounding framing.

Nail the Beam and Tie Plate Together
- Toenail the beam to the tie plate and to the framing at the ends with 16d nails.
- Nail the beam members together with three 16d nails spaced every 12 inches.

Alternative: Hide the load-bearing beam in the ceiling
- If you don’t like the appearance of a load-bearing beam, you can hide it with the following steps.
Construct Two Temporary Walls
- Cut an opening at 21 7/8-inch from either side of the bearing wall (assuming it’s 4 1/2-inches wide) so you end up with a 48-inch opening to patch when you’re done.
- Add the temporary walls about 3 feet. from the bearing wall.
- Tear out the bearing wall.
Cut the Joists
- Cut out the joist where the beam will go.
- Pro tip: Leave a little extra space so the beam will fit in easily.

Install the Beam
- Install the beam one LVL at a time.
- Nail the first LVL to the joists, then nail the second to the first and so on.
- Spread heavy-duty construction adhesive between the beams for extra strength.
- Note: If you’re installing more than three LVLs, you’ll have to nail and bolt them together.

Hang the Joists from the Beam
- Nail joist hangers (and metal straps if specified by the engineer) to the beam and each joist.
- Pro tip: Use joist hangers that are designed to carry the size of joists you have (there are hangers for 2x6s, 2x8s, etc.). Use nails specially designed for joist hangers.
- Then install 2×4 trimmers inside the walls at both ends of the beam.
