
Metal Studs: How to Use and Frame With Metal Studs
Updated: Dec. 19, 2023Tools and techniques for building basement and partition walls with steel studs.
- Time
- Complexity
- Cost
- Multiple Days
- Beginner
- Varies
Metal Studs vs Wood
As the supply of quality lumber diminishes, steel studs will replace their wood stud cousins more and more in home construction. You’ll like steel framing for the many advantages it has over wood: Steel studs are perfectly straight. They don’t shrink or split. Steel studs are light and easy to store, plus they resist fire, insects and rot. And you’ll really like the fact that steel studs are about 30 percent cheaper than wood.
At first, you’ll find framing with steel studs to be slower than with wood studs, because you’ll be working with unfamiliar materials, techniques and tools. But once you get the hang of working with steel, it’s very user-friendly. If you make a mistake, you can simply unscrew the steel parts and quickly get back on track. To get you started, we’ll show you how to build a small, non-weight bearing wall.
Tooling up
You probably already own most of the tools needed for framing with steel studs. These include a tape measure, straight-cut aviation metal snips, plumb bob or 4-ft. level and a drill (preferably cordless with variable speeds and multiple clutch settings) with a 2-in. extension bit holder. Spend $30 more for these additional “must-have” tools: C-clamp locking pliers (Photo 3) for temporarily clamping steel studs to tracks, and sheet-metal locking pliers (also called “duckbill pliers,” inset, Photo 4) for forming tight bends in steel track.
Basic steel stud cutting tips and metal stud framing details

Photo 1: Cut the metal studs and tracks
Cut both side flanges of a steel stud, using straight-cut aviation snips. Then bend one flange up-clear of the snips’ jaws-and cut across the stud’s web. For easier electrical and plumbing installations, later on, keep all the keyhole knockouts aligned by cutting all steel studs to length from the same end. Protect your hands with heavy-duty gloves.
To cut individual steel studs and tracks, use straight-cut aviation snips (Photo 1). If you need to cut dozens of metal studs and tracks quickly, use a circular saw fitted with a toothless (Carborundum) metal-cutting blade ($7). When cutting individual steel studs or tracks with a circular saw, cut on the closed (or “web”) side and support the piece tightly on sawhorses. Protect yourself from the showering sparks, acrid smoke and deafening noise by wearing safety glasses, a dust mask, long sleeves and hearing protection.
Pro Tip: A Faster way to Cut Steel Studs
To cut steel studs, snip both sides, then score and bend.
Most home centers sell circular and chop saw blades designed for cutting steel studs, but one pro prefers a quieter and less messy approach. He cuts both sides with snips and scores a line on the back. After bending the stud back and forth a few times, he ends up with a burr-free cut. No need for hearing protection and no metal shavings sticking to your boots. Caution: Steel studs and tracks are sharp. Our pro doesn’t wear gloves, but you should.
Wall building techniques
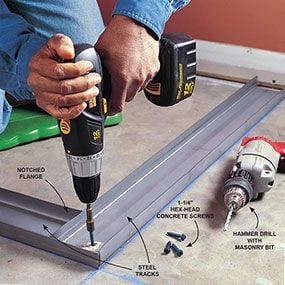
Photo 2: Layout and fasten the tracks
Fasten steel tracks to concrete using 1-1/4 in. hex-head concrete screws. Lay out the position of the track, strike chalk lines, and drill a hole through the metal and into the concrete the full length of the screw. Use a hammer drill fitted with a carbide tipped masonry bit. Set screws first at each end of the metal framing track and then every 3 ft. along the track. Overlap track corners by notching the first track’s flange so the overlapping track can slide into place. On long, straight runs, overlap adjoining tracks 6 in. and secure the overlap to the floor with a concrete screw.
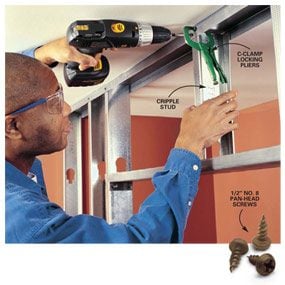
Photo 3: Mark, clamp, then screw
Join metal studs to tracks by clamping the two members tightly with C-clamp locking pliers and driving a 1/2-in. No. 8 pan-head screw in the middle where they meet. Drive the screws at medium speed. Choose a clutch setting strong enough to drive the screw home but not so strong that it strips the screw hole and weakens the joint.

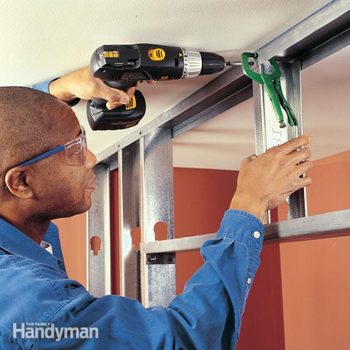
Photo 4: Doorway framing techniques
Construct a doorway in a non-weight-bearing wall using steel and wood. Fabricate the metal header by cutting the track 2 in. longer than the rough opening width. Cut each flange of the track (on both ends) 1 in. lengthwise and bend the web down 90 degrees using sheet metal locking pliers (as shown in inset photo). At the rough opening height specified, fasten the header by driving two pan-head screws through each web flap (drawing the header tight to the king stud) and then driving a screw through each flange of the track.

The best technique for framing steel walls is to first fasten the floor and ceiling tracks and then install the studs one at a time. On the floor, lay out and mark the location of the wall, fasten the steel track (Photo 2), and then locate the position of the ceiling track using a plumb bob or a level held against a steel stud. On a finished ceiling where the stud wall framing track runs perpendicular to the joists, fasten the track to the underlying joists with 1-1/2 in. self-tapping drywall screws. If the track runs parallel to the joists, fasten the track to the ceiling with drywall anchors.
Other wall-framing tips
- After marking the positions of all studs on the ceiling and floor tracks, carefully measure the exact height for each stud. This ensures a proper fit by compensating for a sloping ceiling or floor.
- Cut the studs with a metal stud cutter to a height that provides a tight contact to both the top and the bottom of the tracks. Gaps larger than 1/16 in. at either end are too great because they transfer the bearing weight of a wall onto the screws.
- When you’re marking the height and width of door openings, allow an extra 1-1/2 in. for the height and 3 in. for the width to accommodate the 2×4 wood bucks you’ll add for nailing the door frame and wood trim (Photo 4). Connect the wood buck to the metal framing by turning the solid webs of the king studs toward the rough opening and fastening the wood to the metal with 1-1/4 in. drywall screws.
Pro Tips: Wall Building
Don’t lay track across a door opening
Lay out your walls and openings just like you would with wood, but when you install the bottom plate, don’t run the track across the door openings. You can’t use your reciprocating saw to cut the opening out later, as you can with wood. Concrete screws work well to attach the track to concrete.
Use a stud to locate the top plate
Unlike wood, steel studs are reliably straight. Cut one stud to size and use that, along with a level, to mark the location of the top plate at both ends, and snap a line to guide placement. Don’t worry about cutting your metal studs to fit perfectly. It’s completely unnecessary. This is a great advantage if you’re working on an uneven floor. You can cut steel studs about 1/4 in. shorter than the actual measurement.
Use the track for blocking
Top plates that run parallel to joists often need to be fastened to braces. You could use wood, but Joe prefers to use scrap pieces of the track instead. Just cut the sides of the track and fold them out. Then fasten the track to the underside of the joist with drywall screws.
Wood bucks simplify door hanging
Frame the openings 3 in. wider and 1-1/2 in. higher and use drywall screws to fasten 2×4 bucks on the inside of the steel opening, then hang your door from the wood bucks. The bucks are also there for nailing on the casing. Slide a plastic shim under each side 2×4 if the wood is going to be in direct contact with a concrete floor.
Running electrical lines
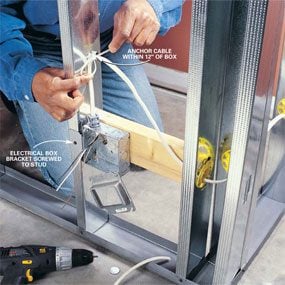

Home centers and electrical suppliers carry the special electrical boxes and parts used with steel framing. Because electrical boxes attached to steel studs can flex when electrical cords are plugged and unplugged, electricians attach the boxes to wood blocking with 1-1/2 in. self-tapping drywall screws.
Pro Tip: Protect Your Electrical Cords and Yourself
Accidentally stepping on an extension cord that’s draped over a sharp track is a perfect way to cut your cord. To avoid potentially shocking developments, many pros take a scrap chunk of track, flip it upside down and put it under the cord.
Installing drywall and wood trim
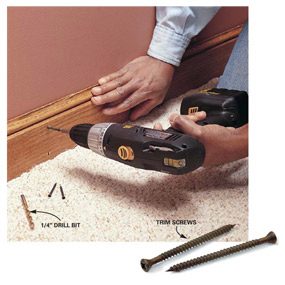
Photo 6: Install wood trim
Install wood trim to underlying steel wall framing with self-tapping trim screws. Use a stud finder to locate the wall studs, and mark their position on the trim piece. To avoid splitting the trim, countersink the screwhead with a 1/4-in. bit. Then predrill the hole with a 1/8-in. bit. Set the drill clutch “light” so that the screw doesn’t strip out. Drive the screw home and fill the screw hole with putty.
If your steel stud wall seems flimsy, keep in mind that it gains full rigidity once drywall or sheathing is applied. Hang drywall or sheathing using 1-1/4 in. self-tapping drywall screws spaced every 8 in. along edges (where two sheets meet on a stud) and 12 in. on center elsewhere.
The flange on a steel stud is flexible and may deflect when you’re trying to pierce it with a drywall screw, especially when two-panel edges meet on a single stud. To prevent this, secure the first panel to the open side of the metal stud (the one that’s opposite the web)—to give it rigidity—and then hang the second panel. Grip the back of the stud flange near the screw connection point with your fingers (to give it support) and then drive the screw. Don’t try nailing trim into steel studs. It will not hold. Instead, use specially designed trim screws for the job (Photo 6). When countersunk, their small heads are easy to conceal with putty.
Pro Tips: Installing Trim
Cut a kerf in the blocking
Like doors, cabinets and other heavy objects need extra support. You can use plywood or 2x4s, but make sure you cut a kerf in it to accept the lip on the inside of the stud. If you don’t, that lip of the stud will press against the support board and twist the stud, creating a bow in the wall.
Build up the bottom plate
Base trim can still be installed with trim screws. If you don’t like the look of the screw heads, you can install two layers of 2×4 plates instead of steel track. With 3 in. of wood under the track, you’ll be able to nail all the base trim just as you would a wood-framed wall. Over concrete, make sure you use treated wood for the bottom plate.
Pro Tips: Installing Drywall
Leave the last stud loose at inside corners
The proper way to drywall an inside corner is to slide the first sheet all the way into the inside corner and then fasten the last stud on the wall adjacent to the drywall. To do this, you’ll need to leave that last metal stud loose until the drywall goes up. This method may seem a little goofy, but it requires fewer studs, and it results in an extremely stable joint. When laying out the tracks, make sure you leave a gap for the drywall to slide in.
Leave the last stud loose at “T” intersections too
Similar to handling inside corners, leave the last metal stud loose on the wall that makes up the stem of a “T” intersection. After the drywall is hung, that last stud on the intersecting wall will be fastened to the drywall. Once again, this method requires fewer studs and results in a rock-solid joint that’s almost guaranteed not to crack the drywall mud. Leave the top and bottom tracks short to allow room for the drywall to slide behind.
Buying Steel Studs
Steel studs are sold in a variety of widths (comparable to dimensional lumber sizes), lengths and metal stud gauges (the lower the gauge number, the thicker the steel). You anchor the top and bottom to steel track (of matching width), which only comes in 10-ft. lengths. Use 1/2-in. No. 8 pan-head screws. Most home centers and lumberyards carry only the most popular 3-5/8 in. wide (comparable to 2×4 lumber) 25-gauge steel studs in 8-, 9-, 10- and 12-ft. lengths, along with all the fasteners. These lightweight studs are designed for stud wall framing interior, nonweight- bearing walls (walls that don’t support floors or the roof). If you can’t find steel studs at your home center or lumberyard, check with suppliers that cater to builders (look in the Yellow Pages under “Dry Wall Equipment and Supplies”). These suppliers will have a wide range of widths and gauges for framing everything from non-weight-bearing perimeter walls in existing basements (1-5/8 in. wide) to load-bearing exterior walls (up to 5-1/2 in. wide).
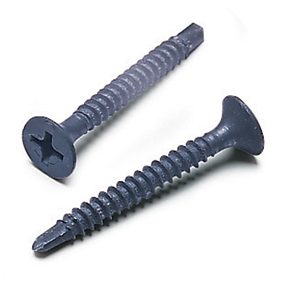
Choose the right screws
Don’t use drywall screws to screw your studs together—they’re not designed for that. Pan-head framing screws work best. Concrete screws work great to attach the bottom track to the floor. And be sure you use fine-threaded drywall screws to hang the drywall.
Required Tools for this Project
Have the necessary tools for this DIY project lined up before you start—you’ll save time and frustration.
- Chalk line
- Cordless drill
- Hammer drill
- Hearing protection
- Level
- Safety glasses
- Sawhorses
- Stepladder
- Tape measure
- Wire stripper/cutter
Required Materials for this Project
Avoid last-minute shopping trips by having all your materials ready ahead of time. Here’s a list.
- 'Duckbill' pliers
- C-clamp Locking pliers
- Leather Work Gloves
- Plumb bob
- Straight-cut aviator's snips
