
Drywall Finishing Tips From the Pros
Updated: Feb. 08, 2024
We'll walk you through professional advice for drywall finishing to achieve smoother walls and less wasted time.
An hour or less
Beginner
Free
Introduction
Learn the drywall taping tips and techniques that pros use to speed up their work. Avoid irritating problems like lumpy mud, nail pops and tape bubbles, and get a better looking job every time.Tools Required
- 4-in-1 screwdriver
- Drywall sander
- Dust mask
- Mud pan
- Sanding block
- Sanding pole
- Taping knife
- Utility knife
Materials Required
- 120 grit drywall sandpaper
- 120 grit sanding sponge
- Drywall tape
- Lightweight joint compound
- Setting-type joint compound
- Stain-blocking primer
Project Overview: How to Finish Drywall
Making the joints in freshly hung drywall disappear behind a smooth, flawless taping job will try your patience. Resist the temptation to lower your quality standards. We’ll show you how to hang drywall like a pro.
In this story, we’ll demonstrate tips and techniques that pros use to avoid the most irritating slow-ups and flaws. We show these tips roughly in the order you’d use them—drywall prep, selecting your materials, applying the tape and three coats of compound, and sanding to finish up.
The pros we interviewed stressed a methodical approach; if you skip a step, chances are you’ll lose time later. Although you won’t be able to work with the speed and dexterity of a pro, these tips will make your drywall finishing taping go faster, and it’ll look better for even the most inexperienced hand.
We’ve hung and patched and primed and finished our fair share of drywall. Check out 20 of our expert tips for working with drywall to make your next build or repair easier.
While you’re at it, find out how to tape a drywall.
NOTE: We used water-resistant drywall finishing for visual contrast—the taped seams and strips are easier to see against its green color. Don’t use water-resistant drywall on ceilings (it sags). Also, check with a building inspector; many areas do not permit its use on exterior house walls.
Project step-by-step (19)
Tips Before Taping Drywall:
Making the joints in freshly hung drywall disappear behind a smooth, flawless taping job will try your patience. Many problems interrupt the smooth, efficient flow of your work:
- Slow-drying taping compound
- Crushed drywall edges
- Protruding screwheads
Other little problems—scuff marks, dips and ridges—won’t show up until the dust clears and you prime the walls with drywall primer. Going back to fix stuff is time-consuming and a lot of fuss.
Check for Under-Driven Screws and Nails
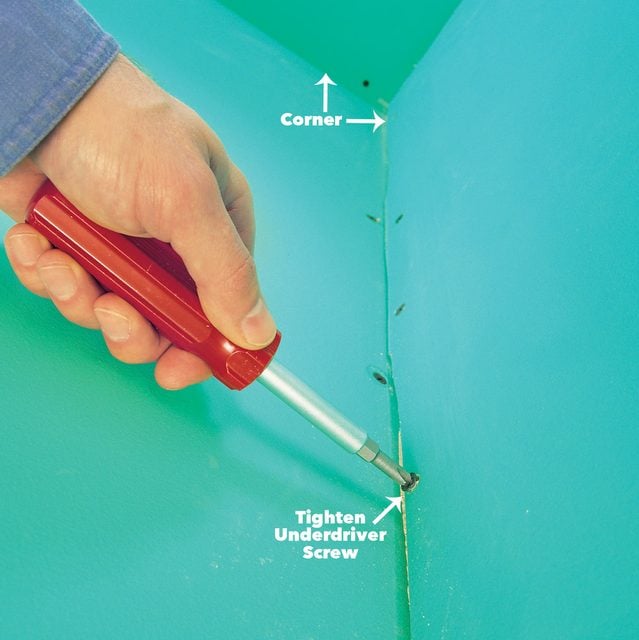
Slide a 6-in. drywall knife across all the fasteners. A telltale metallic click will alert you to any that are left protruding above the face of the drywall. The problem often occurs along corners. Drive screws in with a twist of a Phillips screwdriver.
Tap nails slightly below the drywall face
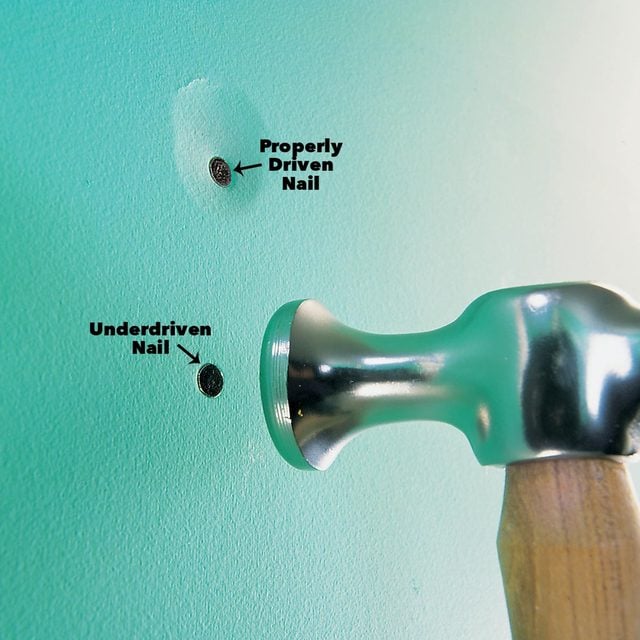
The curved face of the hammerhead should set the nailhead in a shallow dimple, but the nailhead shouldn’t break through the paper or crush the stiff drywall core. A special drywall hammer is ideal for this, but a regular hammer will do if you’re careful.
Trim away loose, torn paper with a sharp utility knife
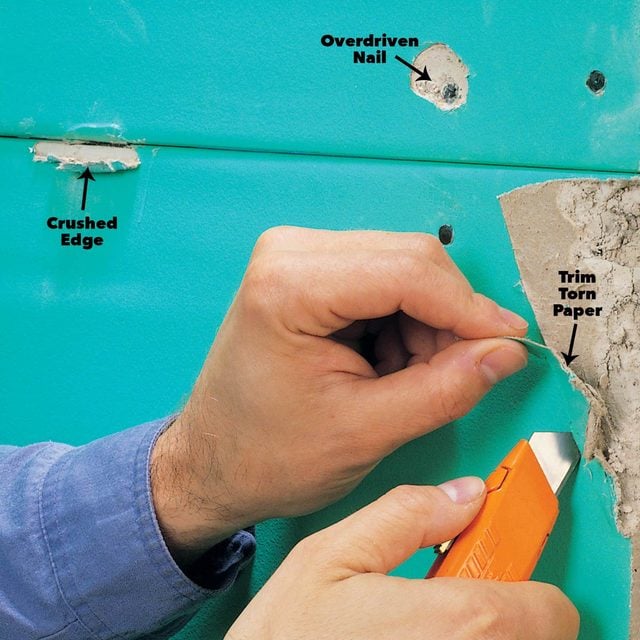
Cut the paper away from tears and soft spots where the gypsum core is crushed. This allows the drywall compound to reach and solidify these weak areas. A loose or torn paper surface will come back to haunt you when it causes bubbles later or pokes through the final finish.
Spray a stain-blocking primer
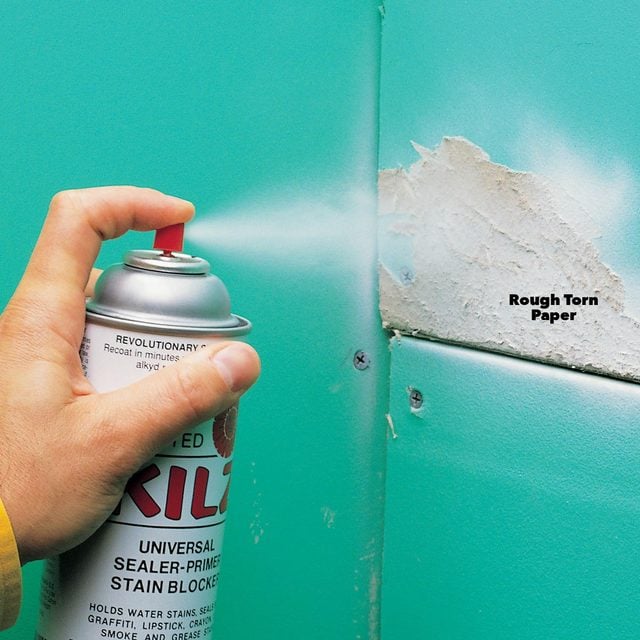
Prime rough and torn areas to consolidate loose paper fibers and seal in chemicals that can bleed through and stain the finish coat of paint. (KILZ and BIN are two common brands available at paint stores.) Ventilate the room well and wear a vapor-absorbing painter’s mask when using solvent-based primers.
Nail metal corner bead
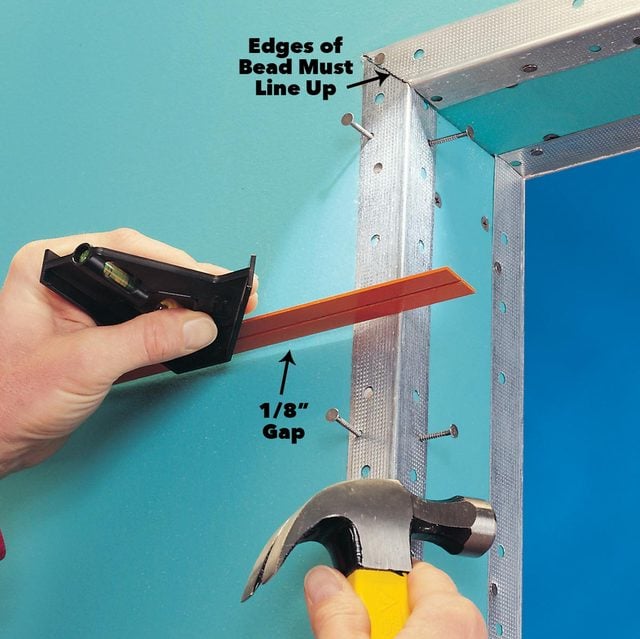
Leave a 1/8-in. gap along each flange as a pocket for drywall compound. You should be able to run your taping knife along the bead and the drywall surface without hitting a nailhead or scraping against the flanges. Use a single length of bead for each corner. Otherwise, you’ll get a bump or crease where two pieces join.
Fill deep gaps at drywall joints

Setting compound, unlike regular compound, hardens rapidly and doesn’t shrink. You can begin your taping as soon as it hardens. You buy it powdered and mix it with water. It’s available with a 20-, 45- or 90-minute hardening time from most stores that sell drywall materials. Be sure to buy the sandable variety. Avoid the 20-minute stuff; it’ll harden in your pan.
Use setting-type compound for deep fills
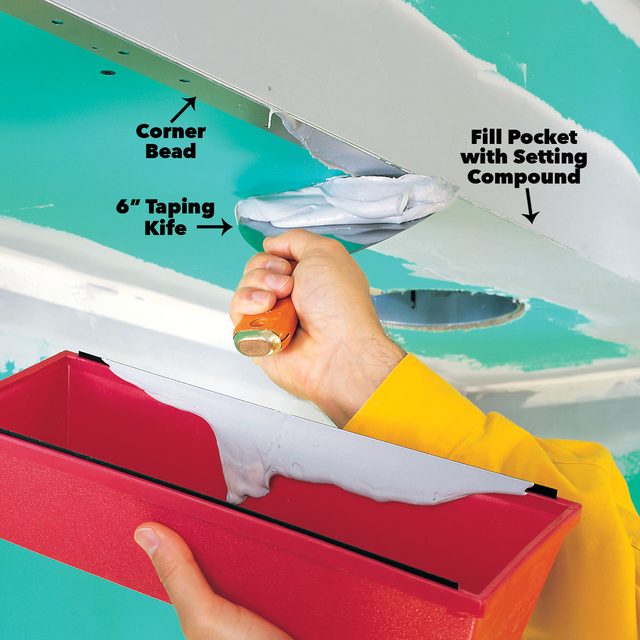
Apply setting-type compound to areas that need a deep fill, like the first coat over a corner bead. Once it hardens, you can apply a second coat of regular drywall compound.
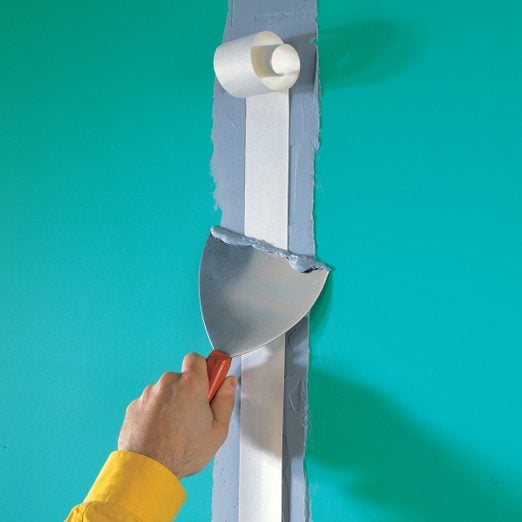
Shave off bulges in setting compound
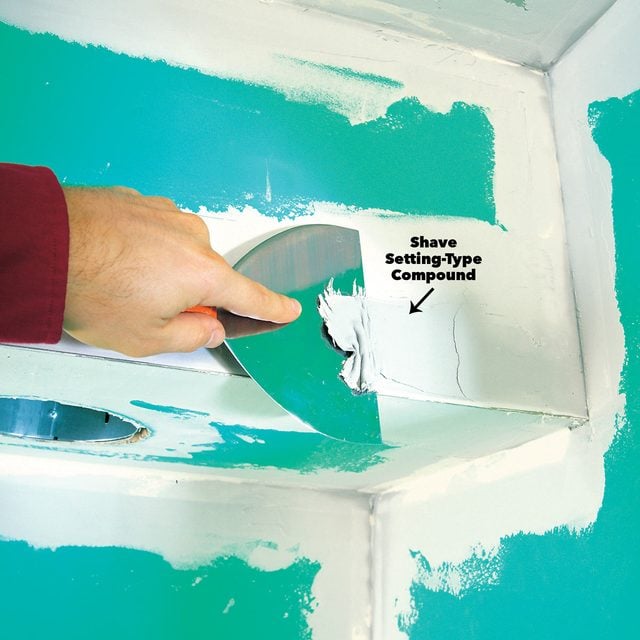
Shave off lumps and sags in setting compound with your taping knife when the compound firms up a bit, to about the consistency of bar soap. Deeply filled areas sometimes flow and bulge before they harden. Once it hardens, setting compound is difficult to sand down.
Fill gaps around electrical boxes
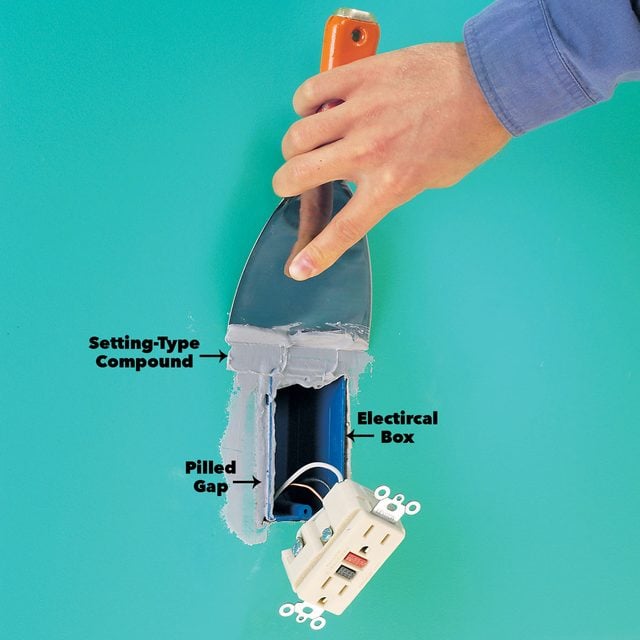
Fill any gaps larger than 1/8 in. Shut off the electrical power at your main service panel first, before pulling out electrical switches or receptacles to fill around their plaster ears. Make sure the power is off by touching the neutral and hot wires with a voltage tester. More than one pro has spot-welded a taping knife to a hot wire!
Clean your drywall mud pan and knife thoroughly
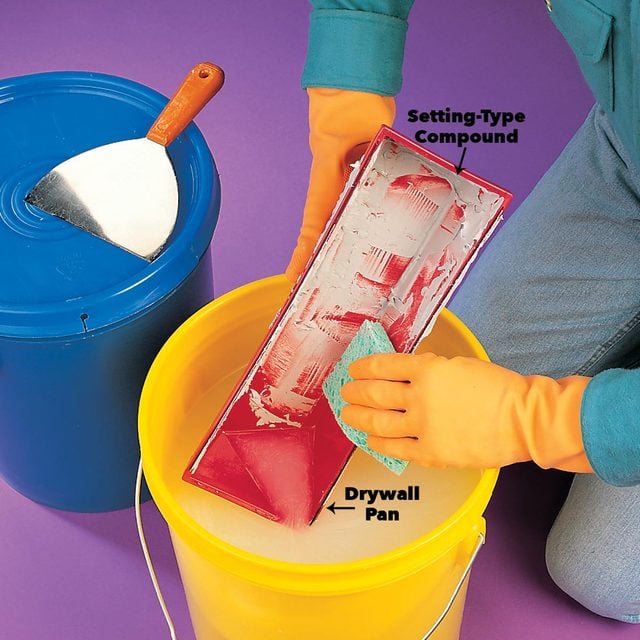
Start cleanup before the setting-type compound begins to harden. The leftover compound will catalyze and harden the next batch rapidly before you can spread it. Heat also accelerates hardening, so on warm days mix the compound with cool water. Dump the leftover mud in a bucket, not down the sink, where it can harden and clog the drain.
Stir premixed drywall compound

Tape with smoothly mixed compound applied sparingly. Stir with your taping knife until it’s smooth and creamy. It comes lumpy and stiff from the typical 5-gal. pail. If necessary, add water to thin it so it flows better off your knife. Apply the first coat of mud and tape to cover the joints, then two additional coats to smooth the joints. Buy the “lightweight” all-purpose compound because it shrinks less.
Cover rows of screw or nail heads with one long sweep
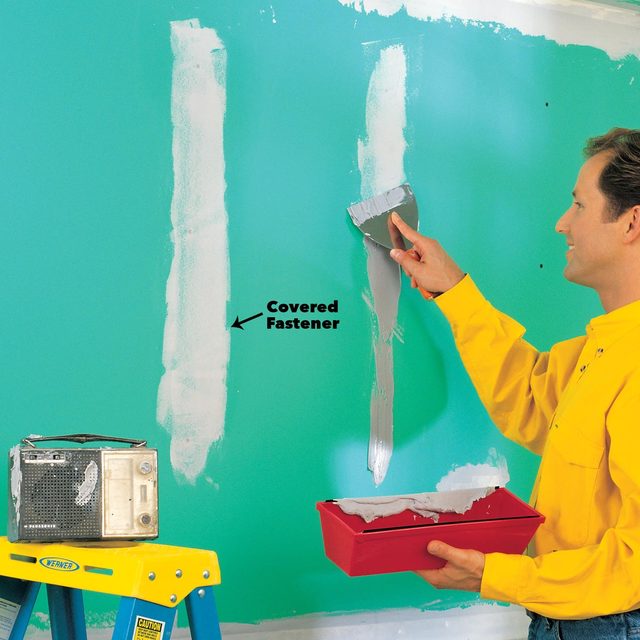
Scrape your knife against the paper to leave as little compound as possible on the surface. Make a second pass to scrape off all excess. Light coatings reduce mud buildup and ease the messy job of sanding later. It takes three coats to completely hide the fasteners.
Sweat the details or they’ll show up as flaws later
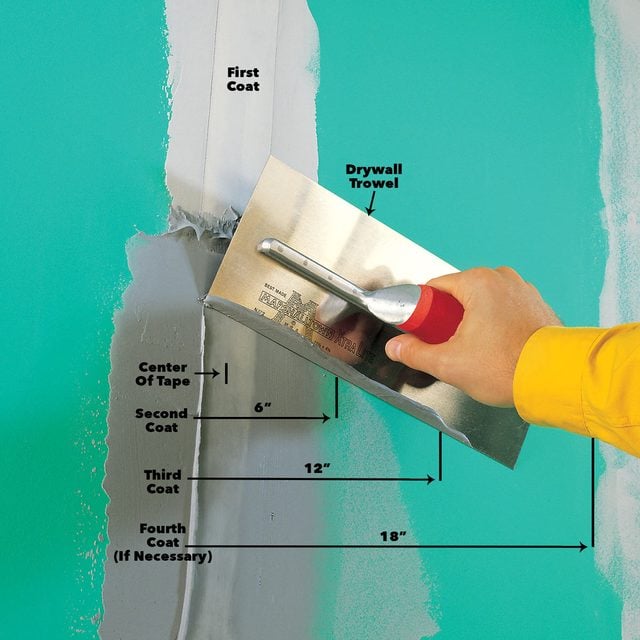
Tape troublesome butt joints by embedding your tape in a thin first coat, about 1/8 in. thick, that you partially squish out when you apply the tape (see Fig. A, down below). After it dries, draw a second, third and even a fourth coat well out to each side of the joint to hide the ridge.
Make each coat smooth and flat by running one end of a 12-in. knife along the tape and the other end along the drywall. (Many pros prefer using a 12-in. drywall trowel like we show here.) Check your progress by placing a 4-ft. straightedge on the wall across the joint. Hiding a butt joint takes patience!
Cut bubbled tape out
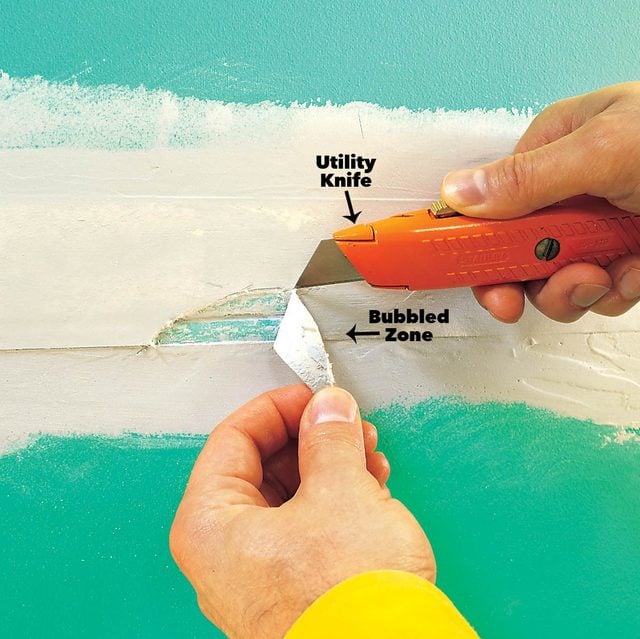
Use a sharp utility knife and recoat the area with compound. Don’t try to hide bubbles with a heavy layer of compound. They always show through.
Tape over large gaps
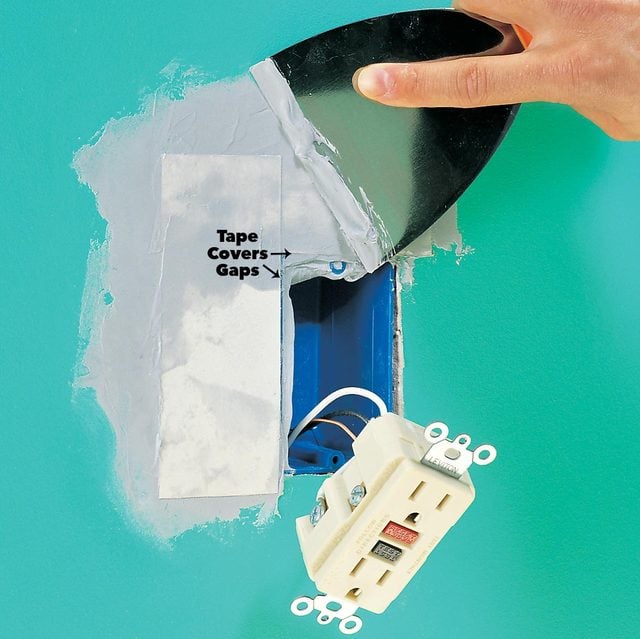
Use tape if the gap will show beyond the edge of the cover plate. Fill the gaps first with setting compound. If the gap isn’t taped, the compound filler will slowly crumble.
Sand the compound lightly

Sand with a block and 120-grit sandpaper, concentrating on the edges where it blends into the drywall. Wear a dust mask, eye protection and a hat for this dusty job.
Sand corners lightly with a dry sanding sponge
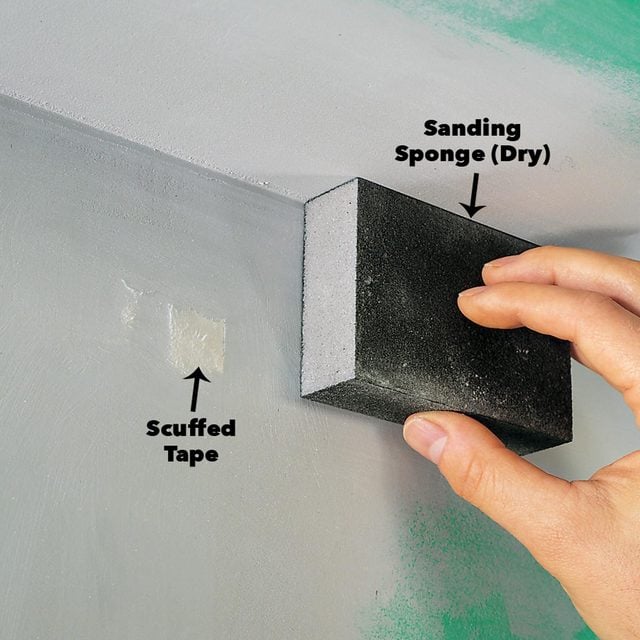
Recoat spots where the sanding breaks through and scuffs the paper tape. Otherwise, those spots will show through your paint later.
Figure A: Tapered and Butt Joints
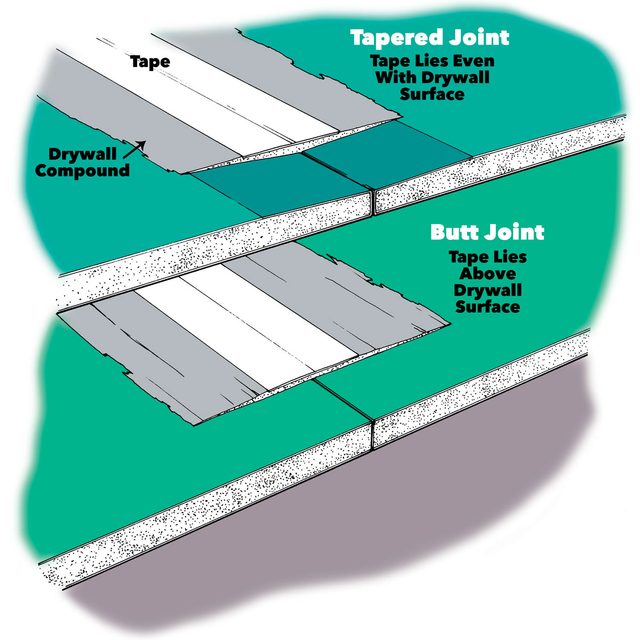
Tapered joints are easy to cover because the two tapered edges of each sheet of drywall leave a pocket that you fill with drywall tape and compound. Butt joints, the non-tapered ends of drywall sheets, are difficult to hide because the tape protrudes above the wall surface. Pros avoid butt joints by installing longer sheets of drywall that reach from corner to corner.