
How to Stain Wood
Updated: Sep. 09, 2022
Get a perfect finish on even hard-to-stain woods like cherry and pine
Introduction
Woods like cherry, pine and birch can become blotchy and unattractive when stained — unless you use a sealer before staining.Tools Required
- Paintbrush
- Rags
Materials Required
- 220-grit sandpaper
- Clear finish
- Painter's tape
- Stain
- Wood sealer
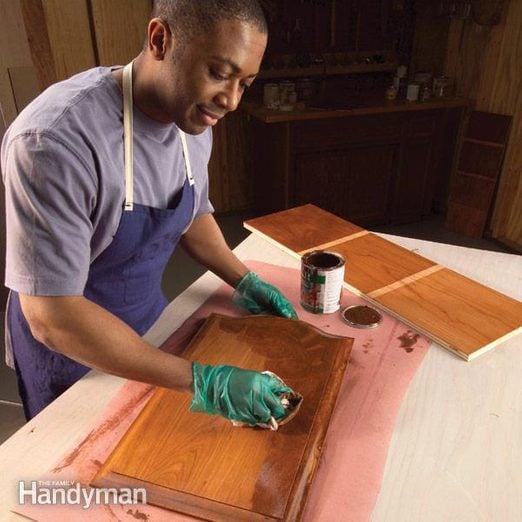
Some types of wood, like pine, cherry, birch and maple, are notoriously difficult to stain. A board that has a nice, attractive grain pattern can end up with dark, splotchy areas after you apply the stain. But there’s a simple way you can prevent most stain blotches. In this article, we’ll show you how.
Video: Tips for Staining Wood Evenly
Project step-by-step (6)
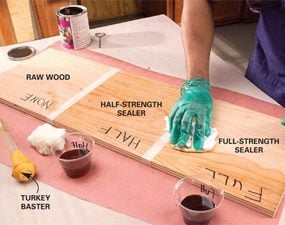
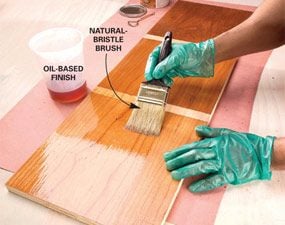
Start with Wood Stain Sealer and a Test Board
- Divide a test board into three sections.
- Leave one section raw; wipe full-strength sealer on one section, and wipe half-strength sealer on the third section.
- Pro tip: An inexpensive turkey baster is a great tool for measuring small amounts of finish and mineral spirits. Mark the baster with a permanent marker. Draw out equal amounts of sealer and solvent to make a 50 percent solution.
- Let it dry for a few hours.
- Sand lightly with 220-grit paper.
- Note: We’re using a wipe-on oil finish as the sealer. The key is to apply a thin base coat to partially seal the wood before wood staining. Sanding sealers, dewaxed shellac and wipe-on finishes will all do the trick.
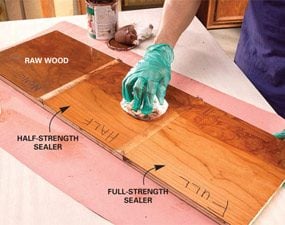
Test the Stain Sealers
- Rub stain over all three sections with a rag.
- Wipe it off to leave an even layer.
- Decide which amount of wood stain sealer gives you the desired look.
- Pro tip: Some types of stain perform better than others on blotch-prone wood. In general, gel or heavy-bodied stains work best. Since these types of stain tend to have a high concentration of pigments, they also work better if you have to add several layers for a darker color. Just make sure the sealer and stain you’re using are compatible. Using products from the same manufacturer is the safest bet.
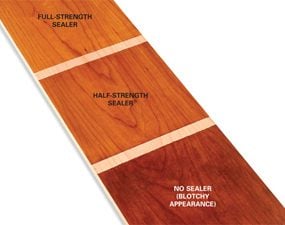
Results of the Wood Stain Sealer Test
The test board shows the effects of different amounts of wood stain sealer.
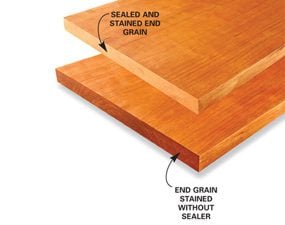
Treat the End Grain
-
- Note: End grain can look great and complement the board’s surface, but it often ends up too dark.
- Once you’ve chosen a sealant strength, apply it to the end grain before you stain.
- Sand off any sealer that gets on the face of the board before you stain.
How to Test for Desired Shade
- Prepare a new test board with your chosen sealer concentration.
- Let it dry, then sand it.
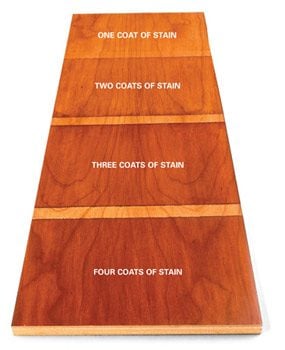
- Stain the entire board.
- Let it dry and add a second layer of stain to all but one section.
- Repeat this process until you get to the desired color depth.

Check the Results
- After the test board dries, examine the results in different light and locations to see which amount of stain gives the most appealing results.
Stains and Grains
Applying multiple coats of stain isn’t always the best way to achieve a deeper color. For one thing, it’ll take a long time to finish the project. You have to wait for each layer of stain to completely dry before adding the next. Otherwise, the new coat will dissolve the previous coat and you’ll have a real mess on your hands. In fact, some stains will dissolve the stain below even if it is dry. (That’s why testing is critical for a nice finish.) Another problem with multiple coats is that the stain will begin to obscure the natural grain. One solution is to opt for a less concentrated sealer. You’ll get a bit more blotchy appearance, but the grain will show up better—a fair compromise.
Finish your Test Board
- Apply the final clear finish to see how it looks.
- Note: This is also a good time to test the effect of different sheens. Most finishes are available in sheens ranging from almost flat to high gloss. You’ll be surprised at how much richer the stain looks after a coat of finish.
Seal Pine Before Wood Staining
Dark stains on pine can look horrible. In addition to blotchiness, the softer areas between the grain lines soak up stain like a sponge, creating an unnatural look. The photo below shows the dramatic difference between the raw and sealed areas of pine using the same stain color. Experiment with sealing the wood on your next pine project. You’ll be amazed at the results.