
Best DIY Affordable Home Improvement Ideas
Updated: Mar. 20, 2023How to get the most value for your remodeling dollar

Improvement 1: Bathroom mini makeover—$430
If you’ve long wanted the elegance of natural stone in your home, consider a new granite bathroom vanity top, which is a great, affordable way to get it. You can now find granite tops at Lowe’s, Home Depot and other home centers. Prices range from $150 to $450 depending on the size. Complete this bath makeover with a new faucet and mirror, and you’ll still keep the price under $500.
Begin by ordering your new items and don’t start the project until you have them all on hand. Be sure to inspect them for flaws (a common problem). Then tear out the old fixtures and repair the walls as needed. Keep the old vanity if it’s in good shape. But paint it to freshen it. Use a few cans of spray paint to get a smooth finish and avoid brush marks. And replace the old pulls with new ones to dress it up.
Next, paint the walls and add the new mirror. If your old mirror included a recessed medicine cabinet, make sure the new one fits within the existing opening. Enlarging the opening often expands the job considerably!
Finally, mount the faucet, install your new granite top and connect the plumbing. Whew! If all goes well, you’ll finish in a long weekend.
Cost: Granite vanity top, 31 in. long, $200; faucet, $130; 24 x 36-in. mirror, $60; paint and cabinet pulls, $40. Total: $430.
Time: Two to three days.
For more information type “bathroom,” “faucet,” and “towel bars” in the search box above.
Simple Bathroom Makeover
Granite vanity tops cost as little as $150 and come complete with an under-mounted sink.
Improvement 2: Wallpaper one wall—$280
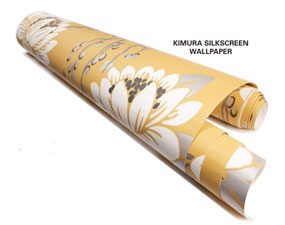
If you haven’t visited a wall-covering retailer lately, you’re missing a treat. With the revived popularity of wallpaper, stores are offering an expanded range of choices. The prices of some of these may knock your socks off too.
But take heart. You don’t have to cover every wall to make a dramatic change. Papering only a single wall will do, and that’ll make some of those fine, expensive papers or fabrics affordable. It’ll also lessen the time, effort and mess of papering an entire room. This is an especially good solution for a room with plain walls, slim baseboards and window trim, and no built-ins. You create instant character.
Begin by taking a photo of your existing room and measuring its dimensions. Take these with you to the interior design or wall-covering store. Ask a specialist to help sort through options that’ll work well with your existing furnishings. The specialist will also help you pick the best wall for the new paper and estimate the amount to order.
Some papers can be hard to hang, especially fabrics, rolls with uncut edges and other designer papers. Always check the hanging instructions and ask the dealer about the difficulty level. If you’re a novice paperhanger or fall in love with a super-expensive paper, consider hiring a pro. The extra cost should be modest for a single wall, from $150 to $250.
Be sure to fill holes and smooth your wall before beginning. Rough spots might show through the paper. Then seal the wall surface with an acrylic primer. It dries hard and smooth. This allows you to slide the paper a bit more easily to tighten seams.
Cost: $122 for a double roll of the paper shown and $20 to $50 for supplies.
Time: Half to one full day, depending on the wall condition.
For more information type “wallpaper” in the search box above.
Wallpaper on One Wall
Wallpaper on one wall adds drama to a dull room with less effort and expense than covering the whole room. It also lets you choose a bold pattern that would be overpowering on four walls.
Improvement 3: Halogen track lighting—$180
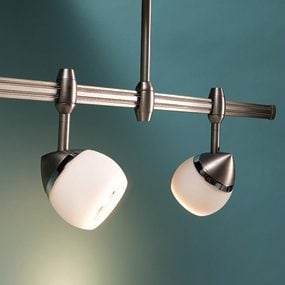
Track lighting lets you put light exactly where you need it—on countertops, walls or objects—and brighten just about any area. The tiny halogen bulbs emit a dazzling white light that illuminates colors brilliantly.
The price of track lighting has dropped in recent years. And many systems now operate on standard household voltage. That means you don’t have to install a Transformer—just connect to any existing junction box in the ceiling.
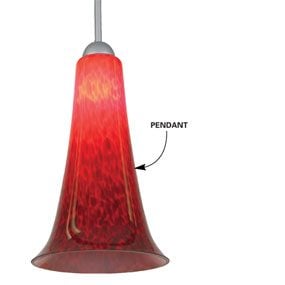
The “rail” system that hangs below the ceiling like we show will hold both spotlights and pendants. Rails typically run either 4 or 8 ft. You can bend the rail for a more decorative appearance and position the lights anywhere on it.
Look for rail system kits (typically with three to five light fixtures) in home centers, lighting stores or online. Check manufacturers’ Web sites or check the catalogs at a lighting specialty store to see all the options. This is especially important if you want to assemble your own system or add extra lights to the rail. You want to be sure you get all the correct parts.
Cost: $150 and up for a basic kit.
Time: One to two hours if you have an existing electrical box in the ceiling.
For more information type “ceiling lights” in the search box above.
Improvement 4: Kitchen rollouts—$40 to $80
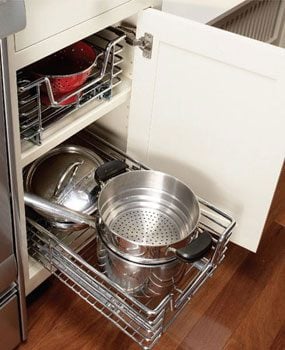
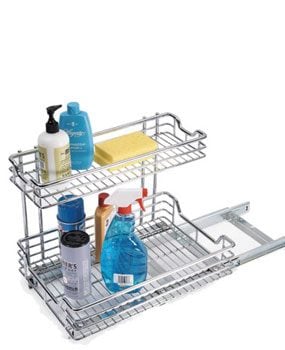
Rollouts are one of the easiest and most satisfying upgrades you can make to your kitchen. They bring everything that’s tucked out of sight in the back of cabinets right to your fingertips—you actually gain usable storage space.
If you don’t want to make the rollouts yourself, you can shop for moderately priced yet sturdy rollouts online or at Lowe’s and Home Depot. You simply mount them to the existing shelves in your cabinets with four screws.
The biggest mistake is ordering the wrong size. When you measure the opening in the front of the cabinet, be sure to account for the door, hinges and other obstructions.
Cost: $40 to $80 per rollout.
Time: 15 minutes per rollout.
For more information type “rollouts” in the search box above.
Improvement 5: Trim and paint—$380
By adding two simple lines of trim—a chair rail and a crown molding—you create the perfect framework for any handsome two-color wall combination. This is one of the secrets of fast, easy redecorating.
To have the biggest color impact, paint your trim. This also simplifies installation. You don’t have to cut perfect joints, because a little filler and paint will leave them looking sharp and crisp. You can also use less expensive materials.
The trim combination we show looks best in rooms with at least 4-1/2-in.-tall baseboards. If your baseboard is narrower, consider replacing it or choosing a different wall decorating technique. (See “Wallpaper one wall” above.)
Then make the new chair rail 60 to 70 percent of the width of your baseboard. Use a two-piece combination that mimics a windowsill (stool) and its apron (the trim underneath) if you have this type of trim. Otherwise, use trim similar to your window trim with a 5/8- to 3/4-in. strip on top. Center your chair rail at about one-third the wall height. Choose crown molding that’s 30 to 40 percent of the width of the baseboard.
Finding colors that work well together and go well with the existing room furnishings can be challenging. We suggest that you take full advantage of pictures in magazines and the combinations recommended by paint manufacturers that you find at every paint store. Take photos of rooms you like (or clothing combinations you like!) and work with a paint dealer to match colors. Most home centers and paint dealers now offer small paint samples. You can try them directly on the wall or paint a 2 x 2-ft. scrap of drywall or cardboard instead. That way you can view the samples in different parts of the room. Then look at the colors both in daylight and with your lights on at night. (Some colors change dramatically under different types of light.)
TIP: Prepaint the trim and paint the walls before you put the trim up. Touch up afterward.
Cost: 6 gallons of paint—$180; 80 ft. of chair rail and crown moldings—$200.
Time: Two to three days.
For more information type “trim” and “paint” in the search box above.
Remodeled Dining Room
Painted trim requires less skill, time and expense than stained and varnished trim. To create wall stripes, apply easy-release masking tape over a light base color.
Right-Sized Trim
To accentuate—rather than dominate—colorful walls, choose chair rail that’s about two-thirds of the baseboard width and crown about one-third the baseboard width. For a more traditional look, choose crown that’s about two-thirds of the baseboard width.
Improvement 6: Backyard oasis—$450
Two elements make for a great backyard retreat—shade from the sun and protection from irritating insects. The good news: You can now choose from a wide range of screened canopies (also called gazebos) that handle both sun and insects. They’re easy to put up and maintain, you can plant them in almost any flat spot, and they’re reasonably priced, typically $200 to $500, depending on the size. Typical sizes range from 10 x 10-ft. to 12 x 12 ft. You can create a comfortable sitting area in just a few hours. Look for screened canopies at home centers and outdoor furniture dealers.
A grass floor is inviting, but it’ll wear out fast. If you don’t have an existing deck or patio that’s suitable, we recommend building a paver patio for the floor. Brick and concrete pavers are durable, handsome, and available in many styles and colors. And you don’t need special skills or experience to lay them successfully. Even a novice can do a first-class job and complete a small project in a weekend. OK, it is hard work. You’ll have to dig a bit and rent and operate a heavy plate compactor. Look for pavers at home centers and patio and garden centers.
Begin by choosing a canopy style and size. Then make your patio slightly larger to accommodate it. Or consider an even larger patio, leaving part of it open.
Cost: $150 and up for a screened canopy; about $3.50 per sq. ft. for a paver patio.
Time: Two hours for a canopy; a weekend for a small patio.
For more information type “brick” in the search box above.
Screened Canopy
Block out the hot sun and bothersome bugs with a screened canopy.
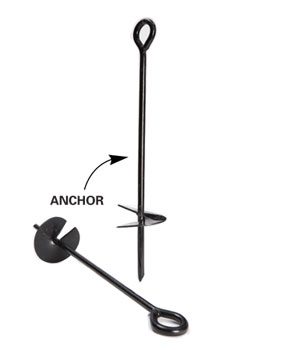
Improvement 7: Closet organizer—$100
You don’t have to spend a fortune to have a neat closet. Wire shelving systems are inexpensive, practical and easy to install. They increase your storage space and simplify cleaning too. Almost everything hangs on the walls, keeping the floor clear for easy vacuuming. And the wire shelving won’t collect dust like solid shelving does.
A novice can install a system with only a drill, a level, a hacksaw and basic hand tools. Begin by measuring your closet dimensions. At home centers, you’ll find basic kits with a full complement of shelves and clothes rods priced from $50 to $75. If you want a more elaborate system, either begin with a kit and then add accessories, or build a custom system from readily available parts. Visit a home center to see a complete selection of parts and get arrangement ideas. Then plan your system by laying out all the shelves and other components using masking tape on the back of your closet wall. You can also draw up a plan on paper, but measure carefully if you use this method. Often manufacturer Web sites have planning guides.
Most brands have solid, drill-and-tap-in wall anchors that work well even in drywall. Use a hacksaw to cut the heavy wire shelving to fit your layout.
Finally, check for accessories like shoe racks, tie and belt racks, and baskets to expand storage options and make the best use of leftover space.
Cost: $200 for the closet system shown.
Time: Half day to remove old shelves and install the new system.
For more information type “closet” in the search box above.
Closet Organizer
Make the most of closet space with wire shelving and accessories. You can outfit an entire closet in one morning.
Improvement 8: Laundry center—$480
Stand back and look at your laundry room. Chances are it could use better organization, better lighting and more storage. These simple upgrades give you all that.
Everything you need is available at home centers. Start with a stock countertop (you can order colors that aren’t in stock, but you’ll pay two to three times as much). Don’t forget to buy end caps to cover the raw ends of the countertop.
To support the countertop, build super-simple shelf units from 8-ft. lengths of 23-1/4-in. wide shelving. We chose Melamine shelving, which has a tough plastic coating and doesn’t need painting. Size and space the shelves to suit your laundry baskets (we made ours 14-1/2 in. apart and 35 in. above the floor). Cut the parts and screw them together with 2-in. screws. Cover the screw heads with plastic caps (sold near the shelving).
Next, hang a pair of inexpensive 18-in. x 30-in. utility wall cabinets over the countertop to hold detergents and other cleaning supplies. Fasten an adjustable clothing rod between them for clothes hangers.
You’ll want especially bright lighting to help you sort clothing and spot stains and other problems. Fluorescent tubes work well because they cast light evenly with few shadows. We recommend a four-bulb fixture that’s 4 ft. long with a prismatic plastic cover for extra brightness. Make sure to buy fixtures with electronic ballasts to avoid the annoying hum that goes with magnetic ballasts.
TIP: Equip the fixture with 90-plus CRI (color rendering index) bulbs to better see the true colors of your clothing. These fluorescent bulbs are more expensive ($8 to $10 each) and may drive you over budget. Order them online.
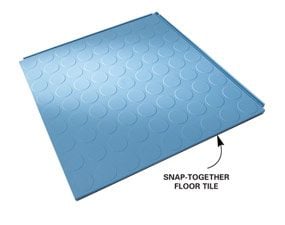
Finally, soften and brighten your floor with rubbery plastic floor tile. Used mostly in garages and commercial buildings, this flooring is tough, but easy on your feet. And it may be the world’s easiest to install floor: You simply snap the tiles together; you don’t have to glue it down. The 12 x 12-in. tiles come in several colors and surface patterns. Look for them at home centers or online.
Cost: 6-ft. countertop, $70; 3/4-in. Melamine supports and shelving, $40; two 18-in. wall cabinets, $150; adjustable clothes rod, $10; light fixture, $54, plus $45 for four high-CRI bulbs; flooring, about $3.50 per tile.
Time: One or two days.
Cutting List for Shelving
- Four 3/4′ x 23-1/4′ x 34-1/2′ Melamine supports
- Four 3/4′ x 23′ x 22′ Melamine shelves
- Two 1/4′ x 23-1/4′ x 34′ plywood backs
For more information type “cabinets” and “laundry room” in the search box above.
Laundry Center
Equip your laundry room with a spacious folding table, more storage space, better lighting and a durable floor in one weekend.
Improvement 9: New bath accessories—$470
Replacing accessories like towel bars, light fixtures and towels, plus applying a fresh coat of paint, is the absolutely easiest way to make your bathroom feel new and clean. You don’t need special skills for success; it’s a screwdriver- and-paintbrush project you can complete in a weekend. But keep in mind that this face-lift will only work if your basic fixtures—the sink and faucet, vanity, toilet, tub and tile—are all still in reasonably good shape.
Also keep in mind that the total cost of this makeover will vary widely depending on your choices. You could spend as little as $200 or much more than $500.
When you shop for accessories, stay with a consistent style and finish. Manufacturers help here by offering matching sets of towel bars, shelves, soap dishes and other accessories.
Simply painting the walls a new color makes a quick, dramatic change. But beware. If you choose the paint color first, you may spend days hunting for matching towels, a rug and shower curtains. To make color coordination easier, shop for accessories first, using paint samples as a guide. Then settle on a paint color.
TIP: Remove the old wall accessories, then repair, clean and repaint the walls before adding the new accessories.
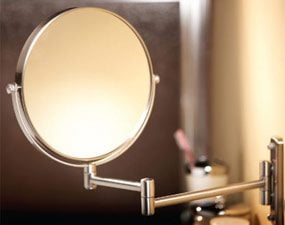
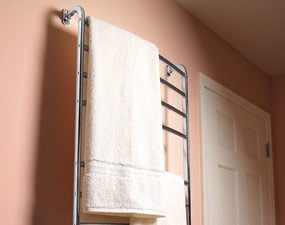
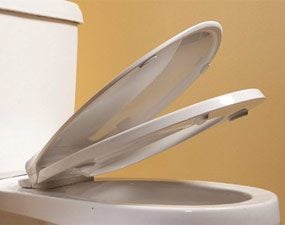
Extra accessories we especially like (and that might blow the $500 budget!): a pullout mirror near the sink; multiple-level towel bars (shown below); a towel warmer ($40 to $200); and a self-closing toilet seat.
Cost: About $340 for the accessories shown above. Add $30 for paint and $100 for a rug, towels and shower curtain.
Time: One weekend.
For more information type “bathroom” in the search box above.
New Bath Accessories
Revive your bathroom in a weekend with fresh paint and updated hardware.
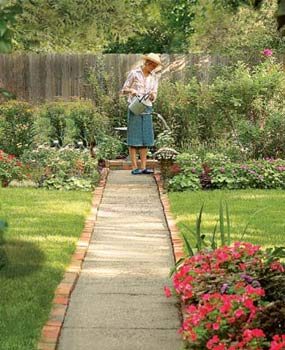
Improvement 10: Add curb appeal—$200 and up
Tired of a shabby, uninspiring front entry? Take heart. You can totally transform it with a series of small accents and minor changes that will impress your guests, please the neighbors and, perhaps most important, make your house a more pleasant place to come home to. All are easy to do and cost little.
Begin with paint. Renew your trim and siding (if painted) and take a hard look at your front door. If it’s the primary feature, consider painting it a strong color. Color choice can be difficult, so look in magazines and at other doors in your neighborhood for ideas you like.
Then buy new accessories, like the house number, mailbox and light fixture. In most cases a screwdriver is the only tool you’ll need to install them. Also replace the door handles and latch if they’re worn.
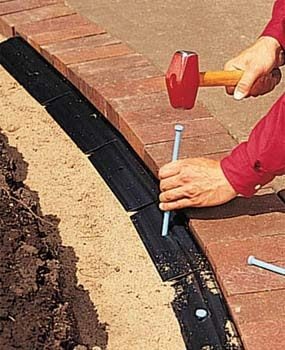
Next, spruce up the approach to the front door. If you have a plain concrete walk or driveway, choose one of our favorite upgrades: Add a simple border of bricks, or other pavers, depending on the style of your home. Dry set them (no mortar) on a firmly tamped base. For lasting results, dig a trench about 5 in. deep. Add 2 in. of compacted gravel such as “class V.” Cover the gravel with an inch of sand and set the bricks.
Cost: Paint, numbers, mailbox, etc., less than $100 total; bricks or pavers $3 per sq. ft. and up.
Time: One or two weekends.
For more information type “paint” and “brick” in the search box above.
Simple Front Entry Upgrades
A fresh coat of colorful paint and updated hardware on your front door give your home a quick face-lift.
