
DIY Deck Plans
Updated: Jun. 09, 2023Cantilevered bays, overhead lattice, custom rails, cascading stairs… Wow! These may be small deck plans, but they're big on features!
- Time
- Complexity
- Cost
- Multiple Days
- Intermediate
- $501-1000
Step 1 Overview: DIY Wood Deck Plans
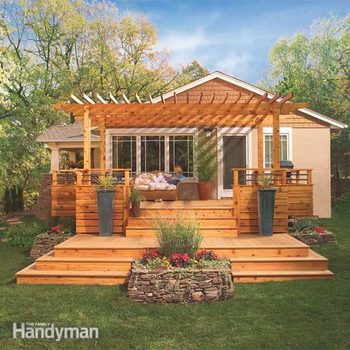
This DIY wood deck isn’t huge—about 16 ft. wide x 18 ft. deep plus bays and stairs—but it’s big on features. The upper deck is just the right size for entertaining small groups—spacious but intimate. It has cantilevered nooks on both sides that provide space for seating and barbecue storage. The pergola shades the upper deck and the home’s interior from the sun, and it offers a space for hanging or climbing plants. The lower deck is a great place to hang out in the sun, while the cascading stairs flow into the yard and provide lots of space for planters and pots.
This deck has some out-of-the-ordinary construction details that contribute to its unique look. For starters, the deck joists run parallel to the house and overhang the beams to form the cantilevered bays on both sides. Rather than a bolted-on ledger board, special “long-tail” joist hangers support the deck at the house. The deck material is also unusual. It’s a low-maintenance composite material with a tongue-and-groove shape that allows you to hide the fasteners by driving them through the tongues.
The rail system combines horizontal boards for privacy and an open design of copper plumbing tubes at the top, allowing you to see out easily. These unusual details make the deck a bit harder to build, so you’ll have to follow the photos and drawings carefully to get everything to fit. If you have some carpentry experience, you shouldn’t have any trouble building this deck. It’s a big project, though, and will probably take you and a helper about two solid weeks to complete. You don’t need any special tools, although a power miter saw speeds up the work.
Required Tools for this DIY Deck Project
Have the necessary tools for this DIY project lined up before you start—you’ll save time and frustration.
- Adjustable wrench
- Chalk line
- Circular saw
- Clamps
- Cordless drill
- Drill bit set
- Framing square
- Hammer
- Jigsaw
- Level
- Miter saw
- Paintbrush
- Posthole digger
- Safety glasses
- Sawhorses
- Socket/ratchet set
- Spade
- Speed square
- Stud finder
- Wood chisel
Step 2: Plan ahead—you may have to special-order a few items
For these small wood deck plans, you’ll find treated lumber, cedar boards and many of the metal fasteners at your local home center or full-service lumberyard. You’ll may have to special-order the tongue-and-groove composite decking (we used a type called “Geodeck”), the 6×6 posts and the special “long-tail” beam hangers. Make sure to use joist hangers labeled G-185. These have extra zinc coating to prevent corrosion caused by the chemicals in treated wood. Expect to spend around $7,000 on materials for this deck.
Before you order materials, submit a deck plan to your local building department. Include details for the footings, attachment to the house, steps and handrails, and brand of composite decking. Some of the details we show may not be acceptable in your area. A few days before you plan to dig the footings, call to have underground utilities in the vicinity of the deck located and marked (call 811). Then follow Photos 1 – 21 and Figures A – F to build the deck, rail and trellis.
A complete Materials List is available as a pdf in Additional Information below.
Deck Plan
Figures A, B and C in these small deck plans show the construction details of the deck with a cutaway view, framing elevation and framing plan. Use this plan or adapt it to your own site.
Additional Information for this DIY Deck Project
- Deck Blueprints: Figures A, B and C
- Deck Blueprints: Figure D
- Deck Blueprints: Figure E
- Deck Blueprints: Figure F
- Materials List
Step 3: Locate the footing holes accurately with string lines
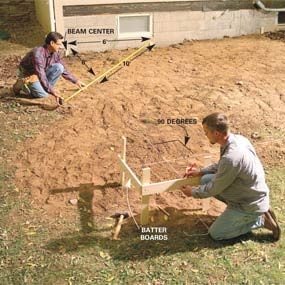
Photo 1: Lay out footings
Set stakes at the house and drive nails to indicate the beam centers. Stake out batter boards about 1 ft. beyond the perimeter. Stretch a string between the boards parallel to the house. Use the 6-8-10 triangle method to stretch strings perpendicular to the house. Measure diagonally to check for square.
Start by driving two stakes along the house, centered on the outside beams. Drive nails into these stakes to mark the center of the beams. Next stake out two sets of batter boards about 1 ft. outside the perimeter of the deck (Photo 1). The top of the horizontal boards should be close to level with the top of the stakes near the house. Finally, stretch strings between the stakes and batter boards and square them to the house.
Use the 6-8-10 triangle method to establish lines that are perpendicular to the house (Photo 1). Measure 6 ft. along the house then 8 ft. out from the house and mark the string. Then measure between the 6-ft. and 8-ft. marks and move the end of the string line along the batter board until the distance is exactly 10 ft. (Photo 1). Double-check your entire string setup by measuring diagonally from corner to corner as in Photo 4. Adjust the lines until the diagonal measurements are equal.
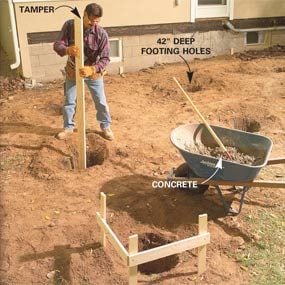
After marking the footing locations, dig the holes to the depth required. Make the holes at least 12 in. in diameter to allow room for slightly adjusting the position of the 6×6 treated posts. After your building inspector has approved the excavation, pour an 8-in.-deep concrete pad in the bottom of each hole (Photo 2).
Step 4: You don’t need a bolted-on ledger board for this deck
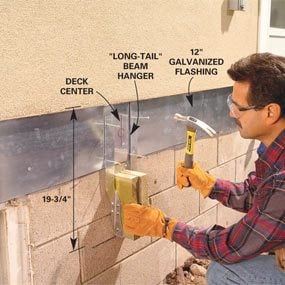
Photo 3: Flashing and joist hangers
Remove the siding from the level of your finished deck on down. Slide No. 30 building paper and galvanized flashing under the siding and nail it with galvanized roofing nails. Position the beam hangers and nail them to the house framing.
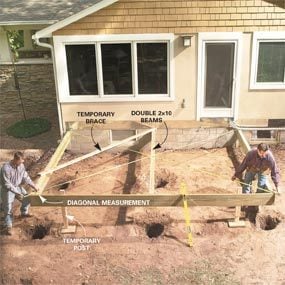
Photo 4: Square the frame
Cut and nail together 2x10s for the three double beams. Rest the beams on the beam hangers and nail a 2×10 across the front. Prop the beams so they slope about 2 in. down from the house. Adjust the beam assembly until the diagonal measurements are equal. Then nail on a diagonal brace.
The beams in these deck blueprints are supported by 6×6 posts and are connected to the house by special “longtail” beam hangers (Photo 3). The details of installing flashing and attaching these hangers to your house may differ from what we show, but a successful installation hinges on two key points. After you cut away the siding, slide the flashing under the siding and the existing building paper to make sure it sheds water. And second, nail the hangers into solid wood or consult your building inspector for the correct way to fasten the hangers to concrete, brick or block if necessary. Use 16d common hot-dipped galvanized or stainless steel nails to attach the hanger to the house and to the beams. Measure carefully to make sure the hangers are the correct distance down from the top of the deck surface and that they’re level with each other (Photo 3).
After the beam hangers have been attached to the house, the next step is to construct the beams and install them on temporary supports. Since the tongue-and-groove decking boards fit tight together, without space for water to run through, slope the deck about 2 in. away from the house for drainage. Do this by leveling the beams and marking the temporary 2×4 supports. Then measure down 2 in. and make another set of marks. Line up the beams with the lower marks. Tie all three beams together with a 2×10 across the front. Then square and brace the beams (Photo 4).
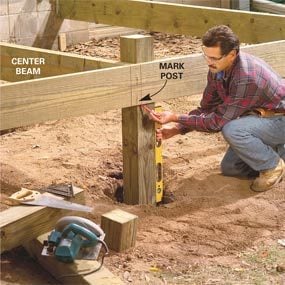
With the beams in place, it’s easy to measure for the posts. Just cut them a little long and drop them into the holes (Photo 5). Place the uncut factory end of the post down for the best rot resistance. Then mark the post at the bottom of the joist and cut each post at the marks. Connect the posts to the beams with metal post-to-beam anchors (Photo 7). Double-check that the beam assembly is square. Then fill the holes with the soil you removed, packing it as you go.
Step 5: Adding joists is a snap
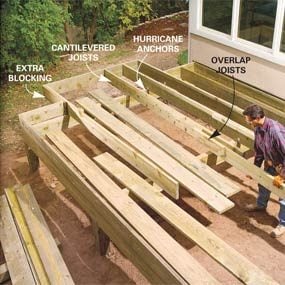
Photo 6: Add joists
Cut the 2×10 joists and position them according to the dimensions in Figure C. Attach them to the beams with hurricane anchors. Overlap the cantilevered joists in the middle.

Prepare for installing the joists by marking their positions on the top of the beams. Study Figures A and C for help in positioning the joists that overhang the beams. They overlap in the center and require additional blocking at the overhang to line up correctly. Cut the joists and tack them to the beams. Check that the overhanging sections are square to the main deck. Also sight down the front joist and outside joists of the overhanging sections to make sure they’re straight. When you’re confident everything’s square and straight, fasten the joists to the beams with hurricane ties (Photo 6).
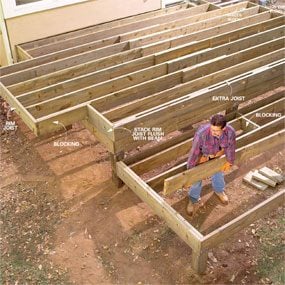
The joists for the lower deck section fit inside the beams, rather than run overtop. Build the beams and support them on posts just as you did for the upper section (Photo 7). Then cut the joists to fit inside and attach them with metal joist hangers and galvanized joist hanger nails (Photo 8). Add a row of blocking down the center to increase stiffness. The extra joists and blocking on the front of both the upper and the lower sections are needed to support the deck board that forms the stair nosing (Photo 8 and Figure C).
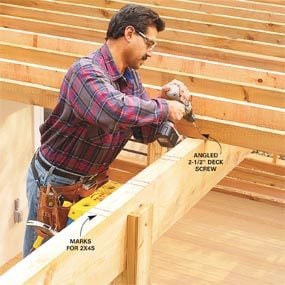
Step 6: Use full-width and continuous-length deck boards
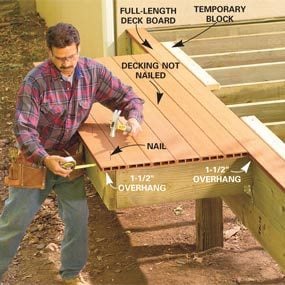
Photo 9: Start the decking
Set a full-length deck board to overhang the joists by 1-1/2 in. and screw temporary blocks behind it. Cut six deck boards for the cantilevered section and press the tongues and grooves together. Measure the overhang (it should be 1-1/2 in.) and nail the first board into place. Unscrew the blocks and slide the decking back.
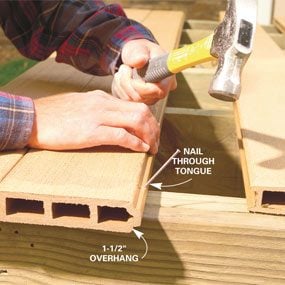
Photo 10: Nail the decking
Slide the tongues and grooves together and line up the ends. Then nail through the tongue into each joist at the angle shown. Use 10d stainless steel ring shank nails.
To avoid having to rip the deck boards lengthwise and expose the hollow inside, we planned the deck framing to accommodate full-width boards. Adjust your framing dimensions if you use a different-width deck board. With careful planning, you’ll have 1-1/2-in. overhangs.
The horizontal 1x6s in the railing cover the hollow ends of the deck boards. We left a 1/2-in. space between the deck boards and rail to allow water and debris to escape.
Photo 9 shows how to get started installing the decking. Precutting and laying out the boards without nailing them gives you a chance to double-check your framing and make sure the first 12-ft. long deck board is straight and has the proper overhang. You’ll have to drive nails through the top face of the first board (Photo 9). Nail the remaining deck boards through their tongues into each joist (Photo 10). We used 2-1/2-in. stainless steel ring-shank siding nails, but 2-1/2-in. hot-dipped galvanized nails will also work.
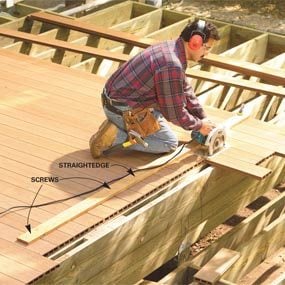
Sight down the first full-length board to make sure it’s perfectly straight. It’s difficult to correct problems later. Leave the ends of the boards long and use a straight board as a guide to cut them later (Photo 11).
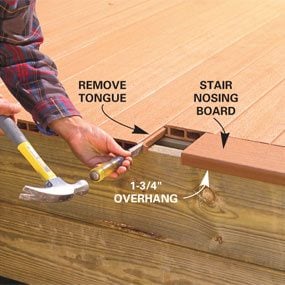
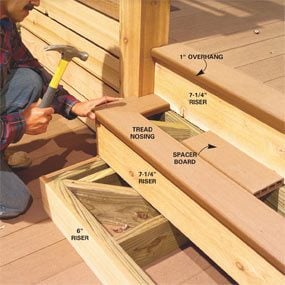
Along the edge of the lower platform and at the stairs, use square-edged rather than tongue-and-groove decking (Photo 11 inset and Photo 19). Photo 19 shows how to cut and nail the stair nosings and border pieces. Face-nail these boards.
Step 7: Take your time crafting the posts; they’re full of tricky details
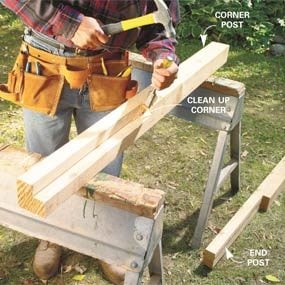
Photo 12: Prepare the posts
Mark the 1-1/2-in. notches for the six 4×4 corner posts to fit over the joists and decking. First, cut them with your circular saw. Pry out the cutout piece and clean up the notch with a sharp chisel. Notch four 4×4 posts for the ends. Drill 1-1/8-in. holes 3/4 in. deep for the copper railings (Figure D).
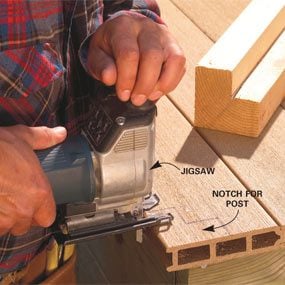
Photo 13: Notch for the posts
Mark the corners and end post locations on the decking. Notch out the decking with a jigsaw to allow the posts to fit tight to the joists.
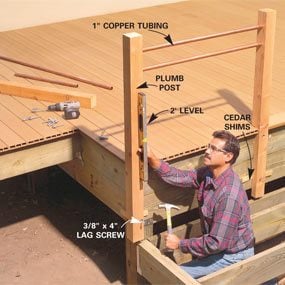
Photo 14: Attach the posts
Drill 1-in. countersink holes and 3/8-in. clearance holes in the posts for the lag screws. Cut the copper tubes and set them in their holes. Plumb the posts with shims and attach them with lag screws.
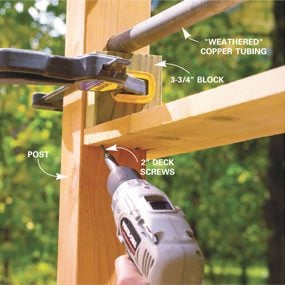
The rail system starts with posts that are notched 1-1/2 in. to fit around the joists and drilled to accept the 1-in. copper tubing. The trickiest part about making the posts is keeping track of the orientation of the notches and holes. Here’s a tip. Cut the posts to length and distribute them to their locations on the deck. Move from one to the next, marking the notches and holes. Then move them to your sawhorses for cutting and drilling (Photo 12).
We used manufactured 6×6 posts for the trellis. They won’t split and twist like regular 6x6s and are almost perfectly straight. The hollow interior makes it easier to cut and notch these posts. Standard 6x6s will also work. Double-check measurements before cutting. You don’t want to goof up on these expensive posts.
Notch the wood decking for the posts (Photo 12). Then drive 3/8-in. x 4-in. lag screws through predrilled 3/8-in. clearance holes to secure the posts. Use a tubing cutter to cut the copper tubing and install it along with the posts. Don’t forget to cut, drill and center the two short pieces of 2×4 cedar that support the top railing and copper tubes on each cantilevered section.
Fitting the 1×6 lower rail cap is challenging, since it’s notched around each post and mitered at the corners. The key is to mark boards in place whenever possible. See “Marking and Cutting the Lower Rail Cap,” below. Even though the cap fits between the posts at about 21 in. above the deck, mark the notches at deck level. This will ensure that the posts will be parallel to each other when the caps are screwed in.
Figure D: Pergola Post and Figure E: Deck Railing
Follow the detail drawings in Figures D and E when constructing the posts and railings using these small deck plans.
Marking and Cutting the Lower Rail Cap
- Cut the 1×6 lower rail caps, allowing extra length. Mark the post locations. Then use a speed square to mark the 3-1/2-in.-deep notches at these locations. Saw out the notches for the posts.
- Mark the intersection of the two tails. Make another mark on each cap where they intersect at the post. Connect the marks and cut the angle with a power miter saw or circular saw.
- Lap the cut piece overtop and mark the angle on the lower piece. Cut this angle and check the fit.
Step 8: Install the horizontal 1x6s
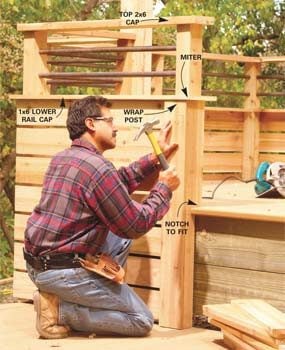
Start at the top and work down, using 5/8-in. blocks to maintain even spaces between boards. Cut the end of the 1x6s square and overlap them at the outside corners. Plan the overlaps so the butt ends of the boards are facing the sides of the deck where they’re less conspicuous. Measure down to the decking at opposite ends before nailing each row to keep the boards parallel to the decking. The lower boards hide the treated framing. Cover the ends of the boards near the stairs by wrapping the boards and 4×4 posts with 1x6s (Photo 17 and Figure E). You’ll have to rip and notch the 1×6 boards to fit.
Step 9: You don’t need to cut complicated stringers for these stairs
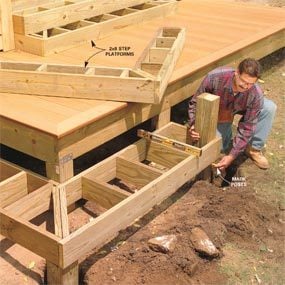
Rather than notch 2x12s to make traditional stair stringers, we chose to build and stack platforms. This method requires more lumber but eliminates complicated layout work. If the top surface of your deck is 42-1/2 in. above the ground, you can build the two sets of steps exactly as shown in Figure A. Otherwise you’ll have to adjust the rise or change the number of steps to fit your situation.
To simplify the design process, draw the entire stair system actual size on a large piece of cardboard (Figure F). It takes an hour or so but helps prevent mistakes. Codes vary slightly, so check with your building inspector before constructing the stairs. In general, plan for a rise (distance from the top of one tread to the top of the next tread) of between 6 and 7-1/2 in. and a tread about 10 in. (11 in. with the nosing). Finish the stairs with 1×8 riser boards, ripped to fit, and treads (Photo 19). On sloping lots, you can regrade the lawn a little to make the lowest rise more consistent.
Figure F: Stair Elevation
Use platforms instead of stringers to construct the steps.
Video: How to Build Deck Stairs
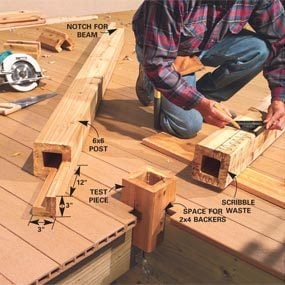
Step 10: Set beams on the notched 6×6 posts and add 2x4s to complete the pergola

To avoid having to special-order 22-ft.-long beam material, simply splice shorter pieces as we show (Photos 20 and 21). A single 2×12 has enough strength. The second 2×12 simply improves the appearance. Start by arranging the 16-ft. 2x12s for the best grain and color match at the splices. Then lay out and cut one tail (Figure A) and use it as a pattern to mark and cut the three remaining tails. Use 2-1/2-in. deck screws to connect the beams to the notched 6×6 posts. Install the first layer (Photo 20). Then nail the second layer to the first with 2-1/2-in.-galvanized casing nails. Complete the lattice by screwing the 12-ft. 2x4s to the beams (Photo 21).
Step 11: Finish the wood parts of your deck to protect and preserve them
We applied clear exterior oil finish for the most natural look. The drawbacks to clear finishes like this is that they don’t protect against graying as well as finishes with more pigment and they must be reapplied annually. In general, the more pigment, or color, a deck finish has, the greater protection it offers.
Aged Copper
The copper tubing will age naturally to a mellow bronze color, and after many years may turn green. We accelerated the process by thoroughly cleaning the copper with steel wool, and then applying copper aging solution according to the manufacturer’s instructions. You can find copper aging solution at antiques stores, paint stores and hobby shops. Gun bluing solution will also work.
