
How to Build a Soffit Box with Recessed Lighting
Updated: Mar. 20, 2024
Add interest to a bedroom or kitchen by building a soffit with drywall, wood trim and rope lights.
Multiple Days
Intermediate
$101–250
Introduction
Add drama and beauty with this easy-to-build soffit system and well-placed lighting. This is the ultimate improvement for ordinary ceilings.Tools Required
- A trim gun will speed up the woodwork
- Chalk line
- Circular saw
- Clamps
- Drill bit set
- Drill/driver - cordless
- Drywall sander
- Drywall saw
- Framing square
- Jigsaw
- Level
- Lineman's pliers
- Miter saw
- Non-contact voltage tester
- Paint roller
- Paint tray
- Stapler
- Stepladder
- Stud finder
- Tape measure
- Utility knife
Materials Required
- 1/2-in. drywall
- 1/2-in. plywood
- 2x2s
- 2x4s
- Electrical remodeling boxes
- Hardwood trim
- Non-metallic cable
- Recessed lighting fixtures
- Rope light
- Tear-away edging
The Big Picture: How to build a tray ceiling
If you’re bored by a plain boxy room, take heart. You don’t have to rip apart walls and ceilings to make the space more inviting, better lit and more dramatic. The simple soffit lighting project we show here will do all that. A soffit is a dropped section of ceiling that’s usually positioned along the walls. It creates a multi-height ceiling, which in itself adds a visual feature. But even better, it offers a perfect home for lighting—general lighting for the room as a whole and recessed lights for practical uses like illuminating closets and reading, as well as for highlighting artwork and display shelves.
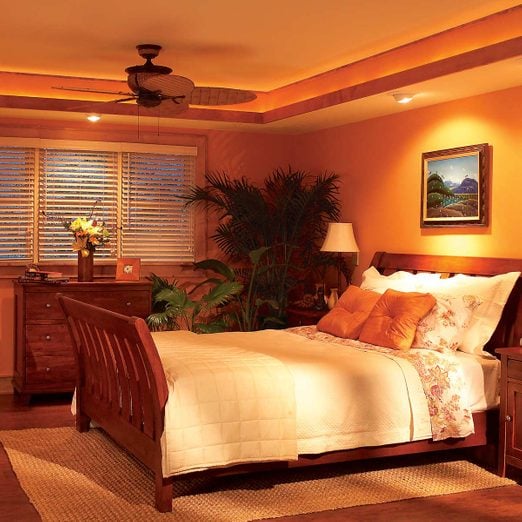
Before the Remodel:
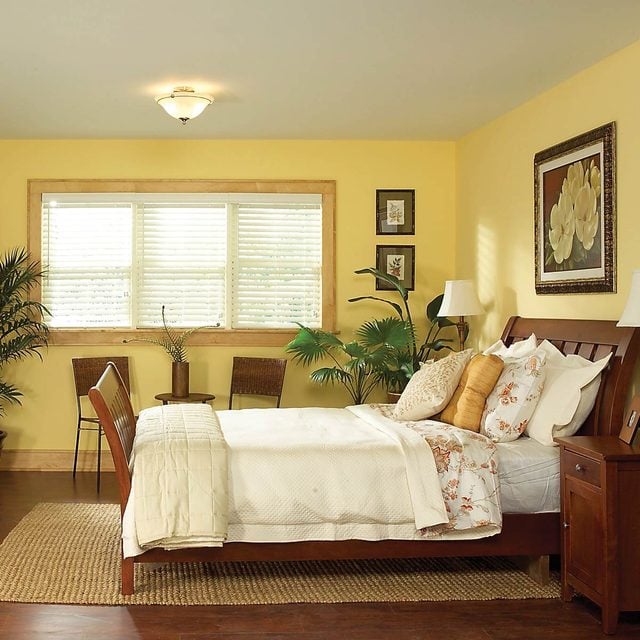
In this article, we’ll show you how to dramatically improve any room with a soffit and lights. This room, in particular, was a dull, drab bedroom before the new lights and soffits. We’ll walk you through a simple soffit building method that leaves the existing ceilings and walls intact, so there’s no messy drywall repair work. And we’ll show you how to install electrical fixtures and run wires inside the new soffit lighting so you won’t have to open up walls for the new electrical work.
If you’ve successfully tackled any simple carpentry project, such as building a deck or installing utility shelves, you’re more than qualified to handle this project. Most of the project is just a matter of cutting 2x4s and plywood to length and screwing them into place. Start to finish, you can complete this project in two easy weekends.
What you’ll need for this tray ceiling framing project:
You’ll only need everyday carpentry tools, including a 4-ft. level, circular saw, screw gun, a jigsaw and a miter saw for accurate cuts on the trim.
You’ll also need basic electrical skills to complete the wiring (see “Planning the Wiring” below). We won’t show in this article how to set new electrical boxes, run new wires or install the fixtures. If you’re unsure about these details, hire an electrician. Apply for an electrical permit before you start. In the meantime, check out 10 things your electrician wants you to know.
Project step-by-step (22)
Figure A: Designing your soffit lighting
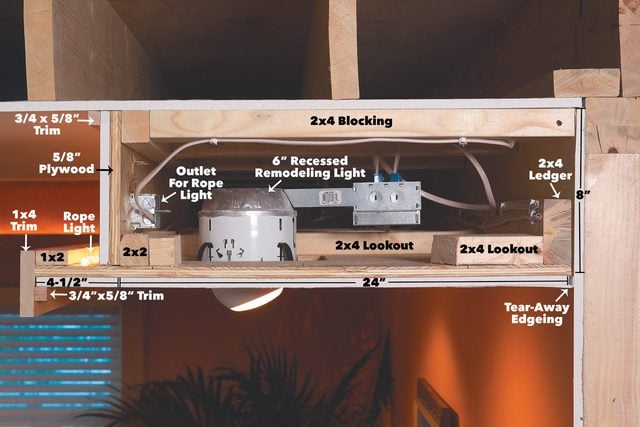
This soffit lighting cross-section illustrates the framing, wiring and trim details. You can build deeper or taller soffits, but it’s important to make yours at least 8 in. high to leave enough room for mounting recessed lights.
Our soffits are 8 in. high and 28 in. wide, and they’ll fit in any room with 8-ft. or higher ceilings (as long as the door and window trim is at least 10 in. from the ceiling). You can make soffits wider or taller to suit larger rooms if you wish. But the 8-in.height is the minimum needed to handle the depth of the recessed lights. The 28-in.width is about the minimum needed to position recessed lights far enough from walls to effectively light wall-hung features. Larger rooms may benefit visually with upsized soffits.
We added three wood trim bands to finish off the soffit (Figure A). Choose wood profiles, types and finishes for these that match or contrast with the room’s other trim. Our trim is lightly stained 3/4-in. thick maple.
The lighting fixtures in our soffit are of two types:
- “Rope” lighting for unobtrusive mood lighting and recessed soffit lighting fixtures for specific lighting tasks. Rope lighting’s all the rage among designers. It’s cheap, and it can be cut to length for shorter runs or spliced together for longer ones. Special splicing connections and end caps make that easy. Measure the inner perimeter of the soffit to determine how much rope light you’ll need. The home center will carry lengths from just a few feet to dozens of feet. The rope light is controlled by two three-way switches so the light can be flipped from either the bedside (for those midnight bathroom runs) or from near the door.
- Recessed lights are perfect for specific lighting tasks. You’ll need to select trim rings and bulbs designed for your purposes. We’ll say more about that in “Selecting Recessed Lights” below.
Planning the Wiring
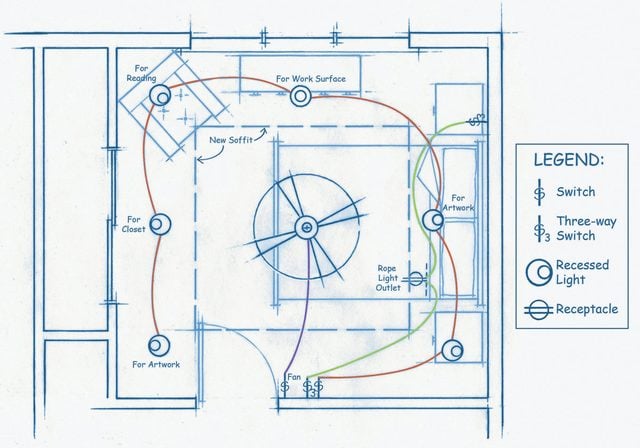
Draw up a diagram showing the light and switch positions to help you plan the wiring (as seen above). The power source will be an existing circuit at a switch box or outlet. To make sure you don’t overload the circuit, add up the wattage of each bulb you intend to use (our total was 450 watts) and any other appliances or lights already on the circuit. Divide that number by 120 (volts) to get the total amperage load on the circuit with the new lights. That number shouldn’t exceed 80 percent of the rating of the circuit breaker that protects the circuit. If it does, find another circuit or have an electrician run a new one.
Try to select switch locations that are easy to reach with a cable from the power source. The soffit will serve as easy access to most spots. Alternatives include running cable through an unfinished basement or the attic, and mounting switches near an existing light switch in the same stud space.
Spend some time thinking about your switch locations to best suit each individual light or group of lights. For example, consider placing the switches for nightlights and reading lights within easy reach of headboards in bedrooms. Also consider your switch options: dimmer switches for lighting artwork or display shelves, three-way switches for controlling lights from two locations, and motion detector switches.
Mark your lighting locations and the ceiling framing
Begin by walking around your room and deciding where you’d like more light. Artwork, display shelves, tables, favorite reading spots, closets and entry areas are all prime candidates. After you decide the best locations, mark them on the wall with painter’s tape about 1 ft. down from the ceiling. Then draw up a wiring plan and apply for your electrical permit. (See Figure A above and “Planning the Wiring,” for more details.)
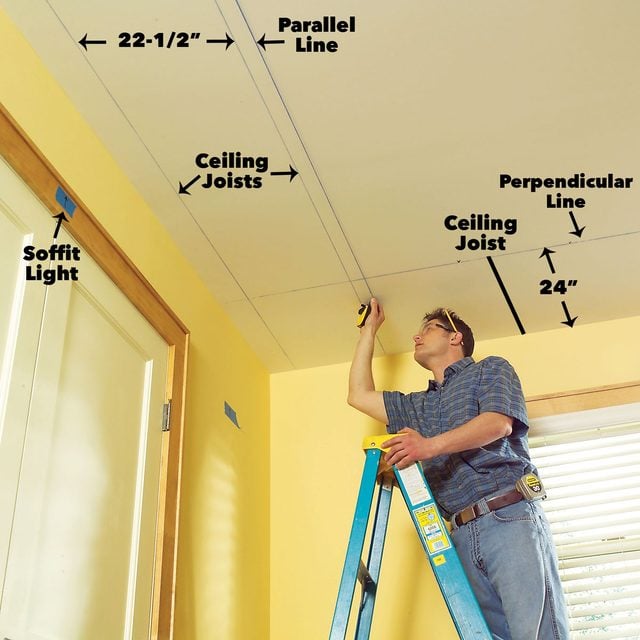
Use a stud finder to find any ceiling framing that falls within 24 in. of the walls. On two sides of the room, ceiling framing will run perpendicular to the walls, and on the opposite sides, it will run parallel. Mark the framing locations with chalk lines and pencil marks as shown in Photo 1. Lay out the soffit framing by snapping a chalk line around the perimeter of the room 24 in. away from the wall where the joists are perpendicular and 22-1/2 in. away where the joists are parallel (Photo 1).
Attach the cleats
Anchoring the soffit to the ceiling requires two different techniques, depending on whether the ceiling joists run perpendicular or parallel to the wall.
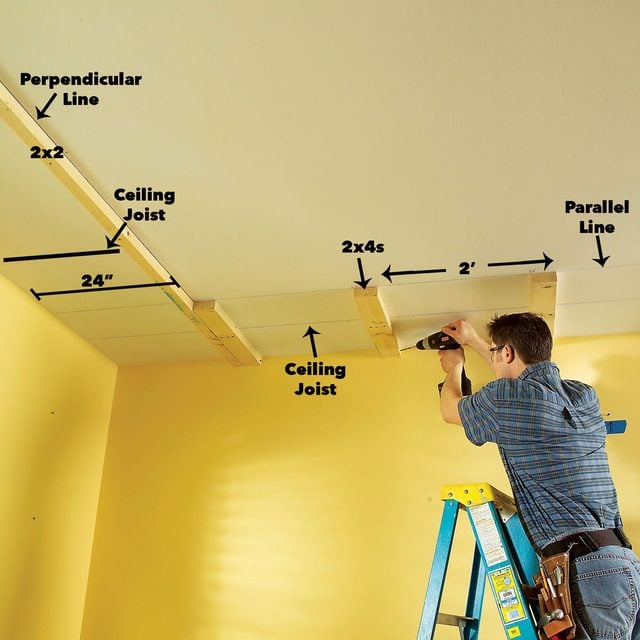
- Along walls with perpendicular joists, simply screw a 2×2 even with the chalk line that’s 24 in. away from the wall. You can buy 2x2s, but they’re notorious for being crooked and only come in 8-ft. lengths. If you have a table saw, simply rip long 2x4s in half.
- Along walls with parallel joists, screw 2×4 blocks to the ceiling joists and nail 2x2s to the ends. If you only catch one ceiling joist, toe screw the 2x4s to the top 2×4 wall plate.
Screw 2x2s along the line that’s perpendicular to the joists, and 22-1/4 -in. blocking at a right angle to the line that’s parallel to the joists. Use 3-in. screws.
Measure the room and buy the materials
Measure the length of each wall in the room, and using our photos and Figure A, write up a materials list. If possible, buy 2x2s and 2x4s as long as each wall. You’ll need roughly:
- Three 2x4s for each wall, the same length as the wall
For every 8 ft. of wall:
- One 4 x 8-ft. sheet of 5/8-in. thick CDX plywood
- One 4 x 8-ft. sheet of 1/2-in. thick drywall
- One 8-ft. length of “tear-away” drywall edging
- One 8-ft. pine 1×2
In addition, buy:
- A 1-lb. box each of 3-in. drywall screws, 16d nails, 1-5/8 and 1-1/4 in. screws (enough fasteners for all but the largest rooms)
- A 1-gallon pail of taping compound and roll of tape.
You’ll also need 1×4 material for the soffit trim (Figure A) and 3/4 x 5/8-in. trim for the soffit underside and ceiling joint. Rip the narrow trim from a 1×3 with a table saw or buy slim moldings. For accurate trim lengths, it’s best to measure the soffit after it’s framed. Avoid splices for a more polished look.
Frame the soffit and add ledgers
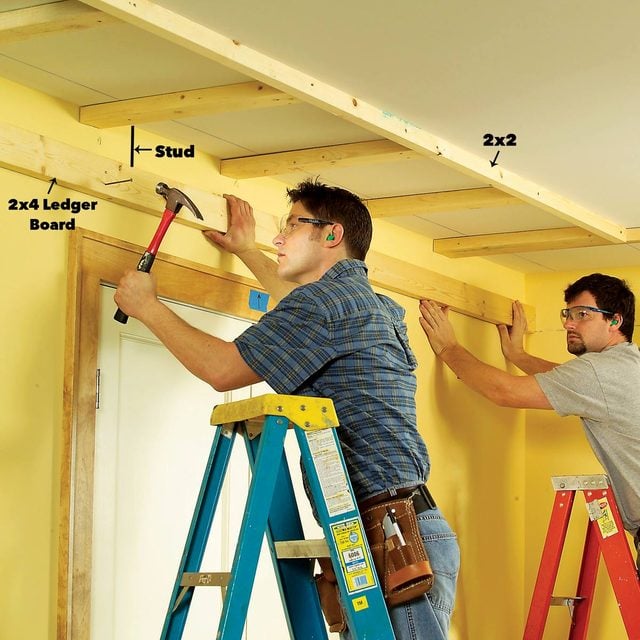
Nail the ledger to the wall studs (nail 2x2s to the ends of the 2×4 blocks). Then snap a chalk line on the wall 8 in. down from the ceiling and nail 2×4 ledgers into the wall studs with 16d nails. Keep the ledger exactly even with the 8-in. guideline. (Take down any pictures on the other side of the wall or Whistler’s Mother may take a dive!) Finding studs and joists behind drywall is easy with a good stud finder, but if you have trouble, probe with a nail in a spot that’ll be hidden by the soffit. The rest of the framing will be spaced either 16 or 24 in. from any that you find.
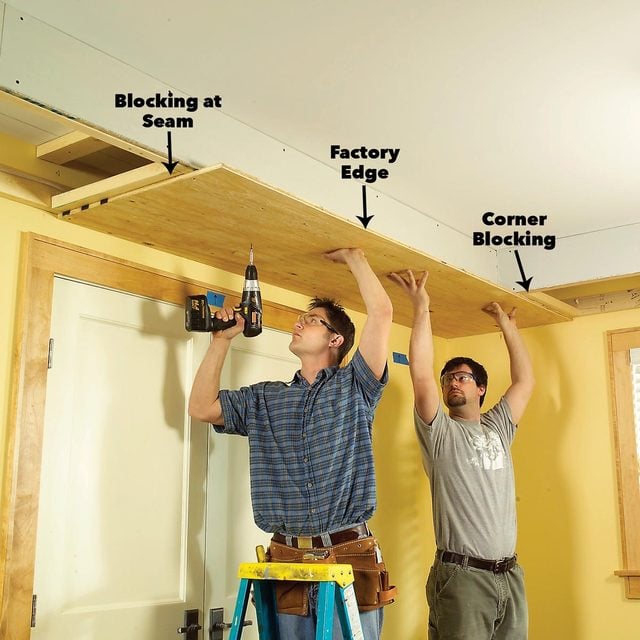
Facing plywood

Now rip each sheet of plywood into two widths: one 28-1/2 in. for the soffit underside and the other 8 in. for the soffit facing. Measure and cut both pieces from opposite edges of the sheet so you leave a straight factory edge on each one. It’s important to set the 8-in. facing pieces perfectly level. Check for level at a few places in between. If you have a sagging ceiling, you may have to scribe the plywood against the ceiling and cut it to accommodate variations. Level the bottoms even with the ledger and screw them to the 2×2 with 2-in. screws.
Add bottom 2×2
If all is level, drive the rest of the screws, spacing them every 6 in. and working your way around the room. Then add the 2x2s and lookouts to the lower plywood edge.
Rough-in the wiring
We’ll show you how to route and run the cable here, but we won’t show how to install boxes or make wiring connections.
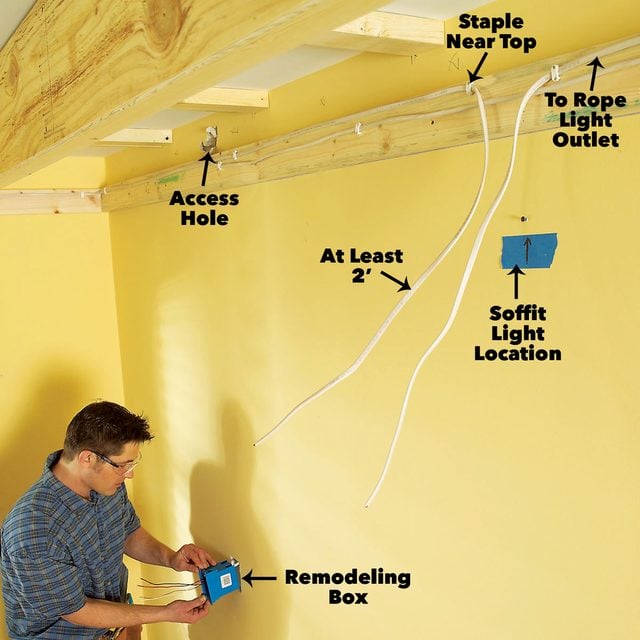
To begin installing the wiring, carefully cut holes for new switch boxes and then knock holes in the wall behind the soffit directly above them. Feed the cable down through the soffit hole and out the remodeling box hole, then run the cable to each soffit light location, stapling it every 2 ft. to the upper part of the 2×4 ledger. Cut the cable at each light, leaving at least 2 ft. of cable for hooking up the lights later. Don’t scrimp on the extra cable or you’ll have problems later. We recommend leaving an extra 2 ft. of cable at each light.
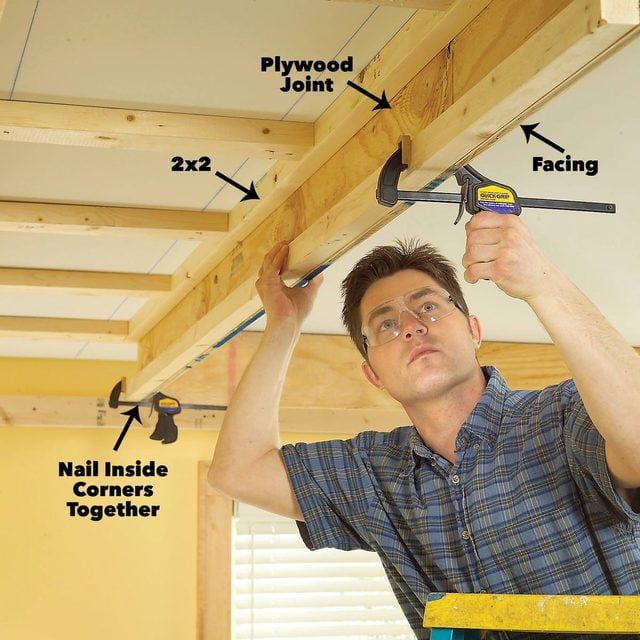
Add Lookouts
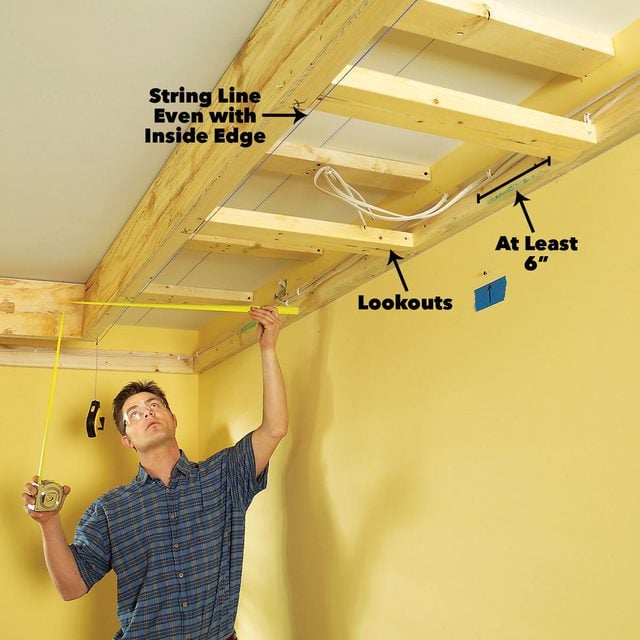
Walls are rarely as straight as you might think, so use this technique to get the soffit straight. String a chalk line even with, but not touching, the inside edge of the 2×2 and use it as a guide to measure exact lengths for the 2×4 “lookouts” spaced every 24 in. Wedge each lookout into place and check the string to make sure it fits before nailing it into place. Lookouts can be spaced anywhere from 2 ft. to 3 ft. But keep them at least 6 in. away from the recessed light locations. Coil both ends and temporarily tack them to the framing with a staple, then continue running the cable to the rest of the lights.
Detail of mounting a duplex box
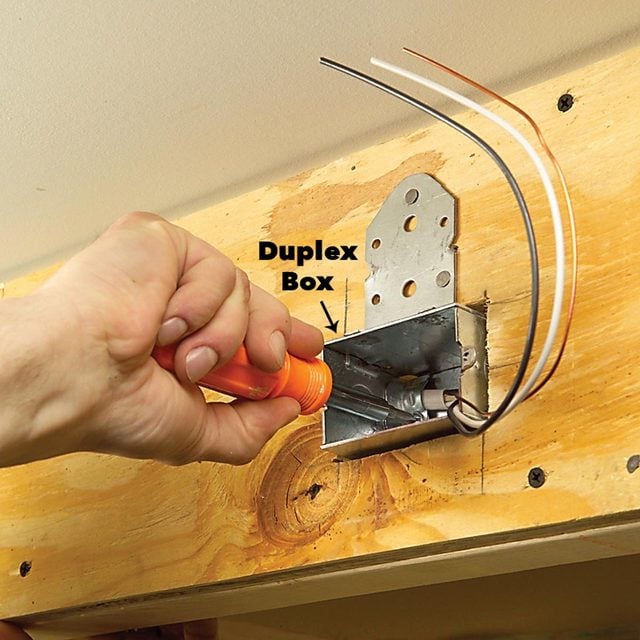
Select a spot for the duplex outlet that powers the rope lights. Cut the outlet hole at the bottom of the soffit just above the 2×2 in the soffit facing with a jigsaw. Run a cable from the switch box to this outlet. (You’ll have to carve out the back of the drywall later to eliminate the bulge caused by the nailing flange.)
Finish up the framing: Drywall the soffit face
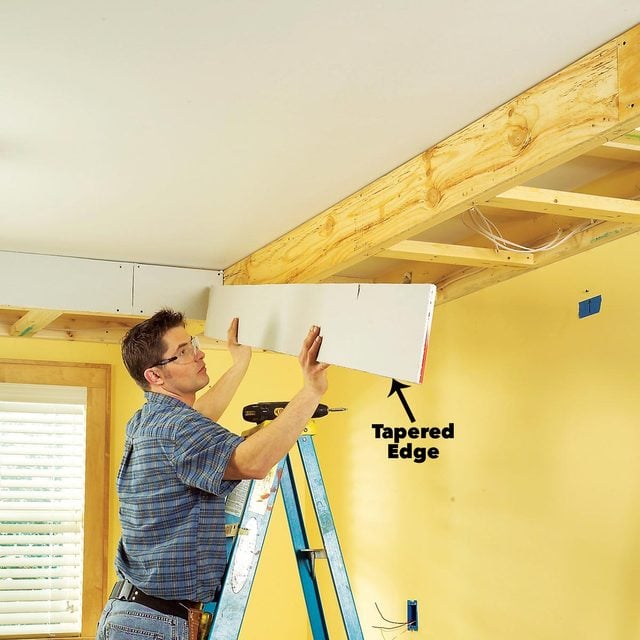
Drywall the soffit faces first. Cut a 7-3/4-in.-wide strip from each sheet and set the larger leftover sections aside for the soffit underside. Screw the tapered edge of the strip near the bottom of the soffit where it won’t show. Trim off overhanging edges.
Add the Plywood
Rip 5/8-in. plywood to 28-1/2 in. wide and screw it to the framing with 1-5/8-in. screws. Orient the plywood with the factory edge facing the room. Next, screw the plywood to the underside of the soffit. If you have wavy walls, you may have to cut some sheets narrower to make them fit. Cut the plywood so the ends join under soffit lookouts.
Cut holes for lights
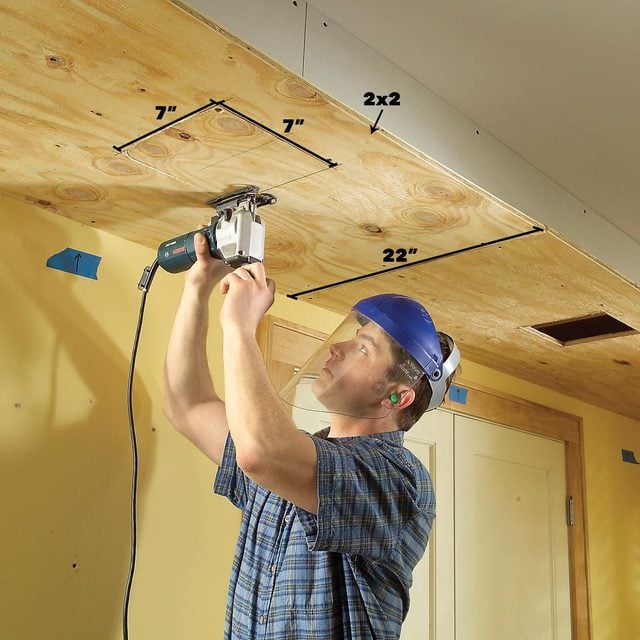
Cut out the holes for the light fixtures. Center 7-in. square holes at each recessed light with the outer edge even with the 2×2. Drill 1/2-in. starter holes and cut out each hole with a jigsaw. These holes are extra large because the fixtures will mount to the drywall, not to the wood.
Add the 1×2 nailer
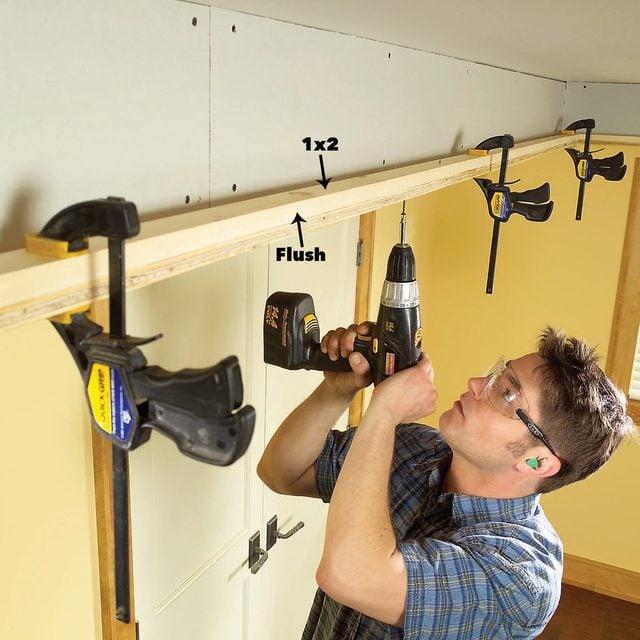
Clamp and screw a 1×2 nailer flush with the plywood lip using 1-5/8 in. screws. Make sure to overlap plywood seams by at least 1 ft.
Drywall the underside
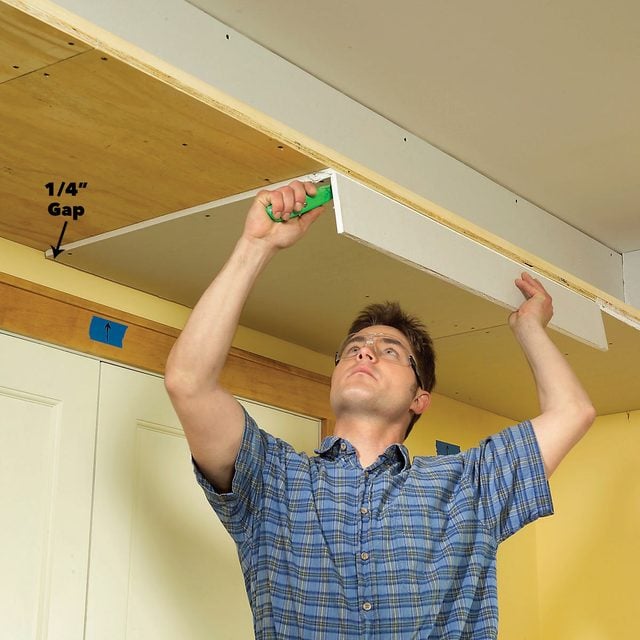
Next, screw 1/2-in. drywall to the underside of the soffit plywood with the cut edge facing the wall, leaving a 1/4-in. gap against the wall for the tearaway drywall edging. Reach over the top and score the drywall along the soffit face. Then snap the piece and finish the cut from the underside. Trim the outer edge flush with the plywood.
Cut out the openings

Recessed lights usually come with exact templates to help you mark the mounting holes. Mark the exact center of each recessed light 18-1/2 in. from the wall. Position the light template and trace the fixture opening. Cut the opening with a drywall saw.
Finishing the drywall
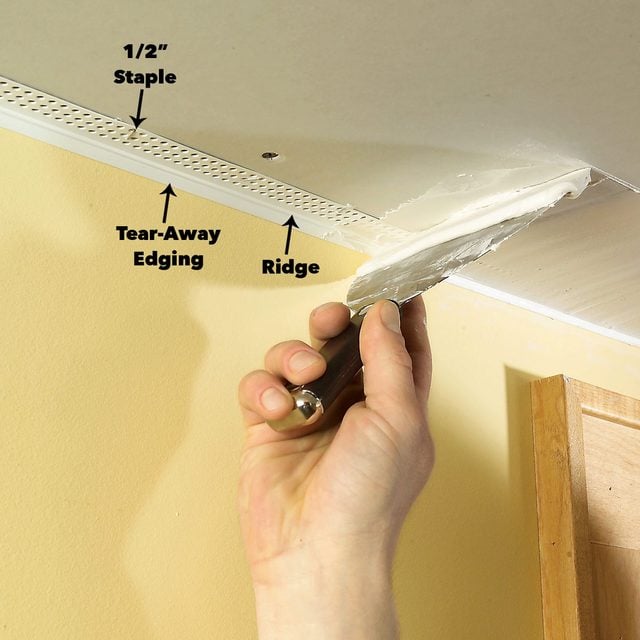
Begin finishing off the drywall by installing the tear-away edging. Slip the fixed flange of tear-away edging behind the drywall and staple it into place. Staple it about every 4 in. and wherever the edging puckers. Fill in the edging with taping compound using a 6-in.putty knife. Ride the knife’s edge on the ridge of the edging near the wall. Apply at least two coats, letting it dry between coats. Also, tape the drywall joints and fill the screw holes as well. It’s not necessary to tape against the ceiling because trim will cover that joint. Tear off the flange, then sand over the flange and any joints, then paint.
Selecting Recessed Lights
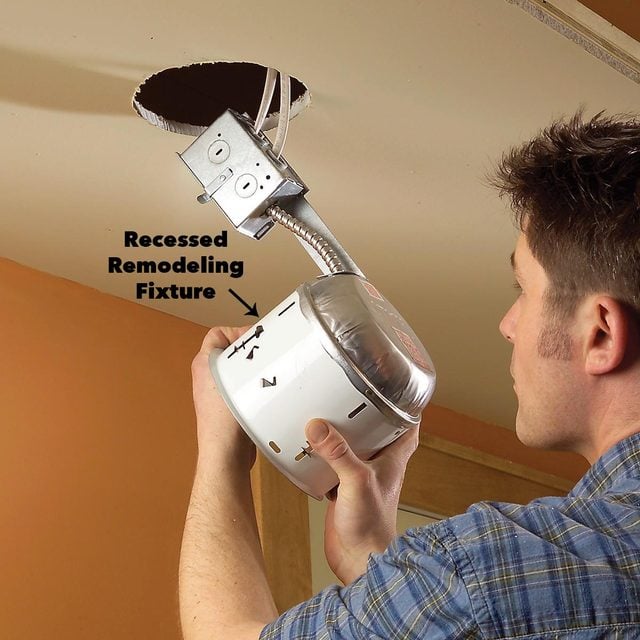
For your soffit lights, we recommend 6-in.-diameter recessed fixtures that are labeled “remodeling.” They’re simple to install because they have little clips that clamp the housing onto the drywall lip that surrounds the opening. They also make building the soffits a breeze because they don’t require special framing.
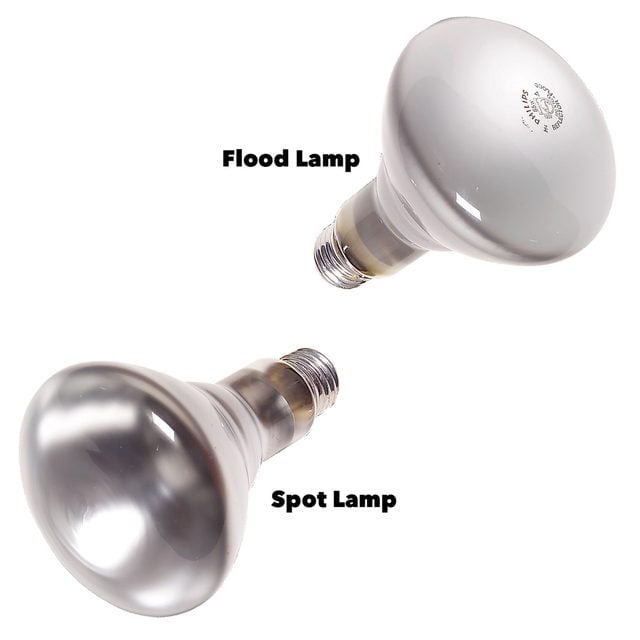
“Trim rings” finish off the fixture at the soffit underside. You can choose between a number of different styles and finishes. We chose eyeball rings (opening photo) because you can aim the light in whatever direction is best for the task. Finally, select the type (spot or flood) and intensity (wattage) of the light bulbs. Spot lamps are good for highlighting artwork, while flood lamps work best for spreading the light over larger areas like the inside of a closet. Each fixture has a wattage limit, but you may not want the maximum output. The best way to work out these variables is to buy a couple of each type of bulb in different wattages and experiment to find the best choice for each fixture.
Finish the wiring and install the recessed fixtures
Hook up the recessed lights by pulling the cables free of the opening and stripping off 8 in. of the sheathing. Slip the wires through the back of the fixture box and tighten the wire clamps. Join the wires with electrical connectors and reclose the metal electrical box. The directions that come with the fixtures will make the clamping system clear. Slip them into the openings and anchor them with the locking flanges. Wire and install the rope light outlet and then the wall switches, adding remodeling boxes where needed.
Add the trim
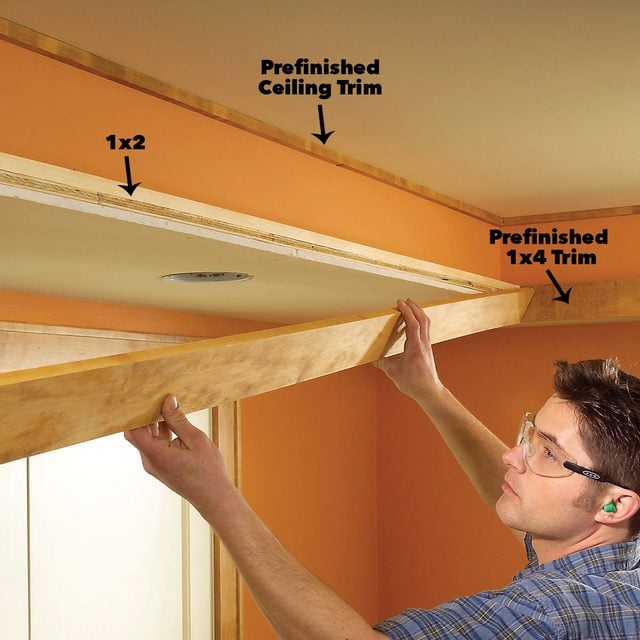
Prefinish all the trim and nail all trim pieces with 2-1/4-in. brads. Then nail the 1×4 flush with the top of the 1×2 with 1-1/2 in. brads. Finally, add the trim on the back of the 1×4. The ends of the trim will show from below at corners, so if you’re a persnickety trim carpenter, miter the corners.
Lay the rope lights
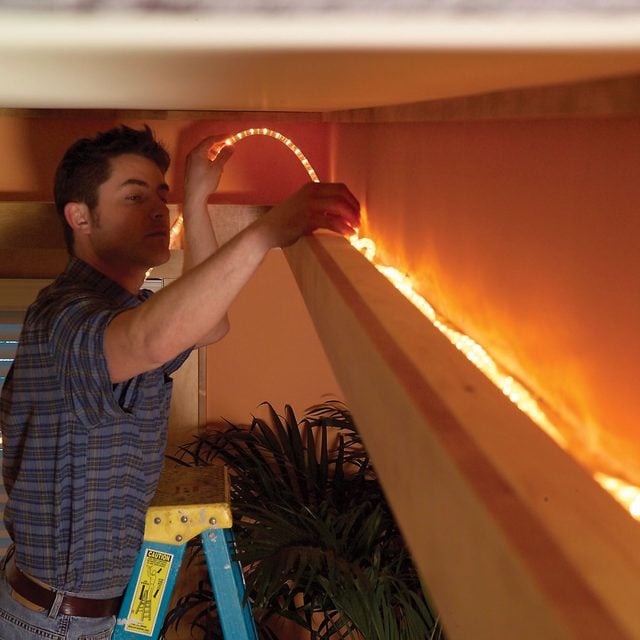
Finish up the lighting by screwing in the bulbs and snapping the eyeball trim rings into place. Install the switched receptacle for the rope lights. Assemble enough rope light length to fill the soffit perimeter. Lastly, cut the rope light to fit or splice together lengths so it fills the trough around the inner perimeter of the soffit. Then plug it in and lay it into the trough. Here’s our guide to maintenance-free aluminum soffit installation.