
How to Locate Your Gas Shutoff Valve and Water Shutoff Valve
Updated: Apr. 04, 2024
How to find and operate shutoff valves for gas and water pipes.
On This Page
Finding the shutoff valves
Some things in life are worth learning before it’s too late—like the locations of your water and gas shutoff valves. Now granted, these shutoff valves are often hidden in some dark, creepy corner of the house. But if a water pipe springs a leak, knowing where the shutoff valve is could save you thousands in water damage repairs. What’s more, you can’t make those major plumbing repairs or improvements unless you first turn off the water. The same goes for turning off the gas—though with some strict safety precautions, which we’ll talk about later.
Home water and gas systems contain two types of shutoff valves: main or master shutoff valves for stopping the flow of gas or water to the entire house, and individual or supply shutoff valves for specific appliances and fixtures. We’ll look at both types and tell you how to identify them (since they often look similar), where they are and how to operate them.
You’ll notice this story contains a lot of “oftens,” “usuallys” and “almost always’s.” That’s because valves vary greatly in location, shape and number, depending on the age of your house, the local codes and which part of the country you live in. This article covers the basics of each system.
Check out all of our plumbing valve content here. You may just find something you’ve been curious about for awhile.
Gas shutoff valves
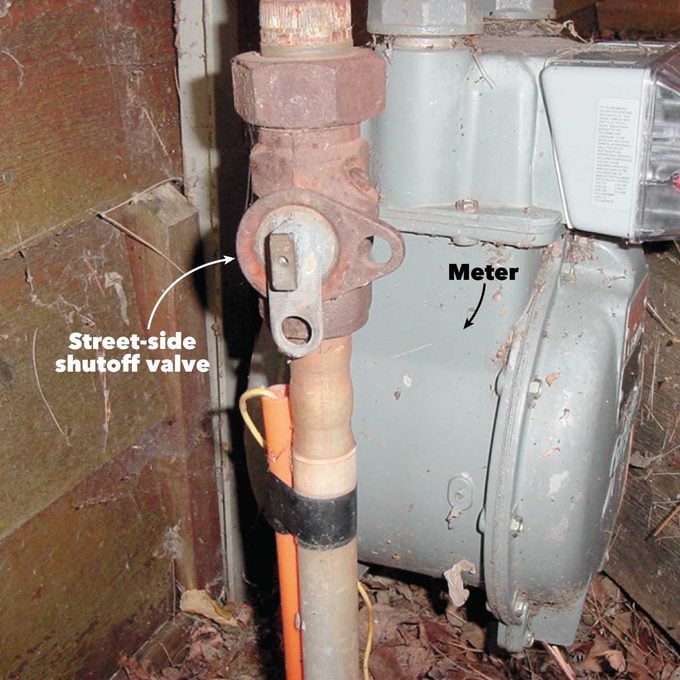
Photo 1: Street-side gas valve
Houses with natural gas have a main shutoff valve (Fig. A) located just before the gas meter. This valve, often called the street-side valve, is normally a rectangular nub (Photo 1). When the long side of the nub or handle is parallel to the incoming gas line, it’s open and the gas is flowing. When it’s turned a quarter turn, perpendicular to the incoming pipe, it’s closed.
The street-side main shutoff valve must be opened and closed with a wrench, and, truth be told, gas companies don’t want you operating this valve; they only want their own employees, plumbing and heating contractors and fire department personnel to use it. They’d rather you use the house-side main shutoff valve located after the meter (Photo 2).
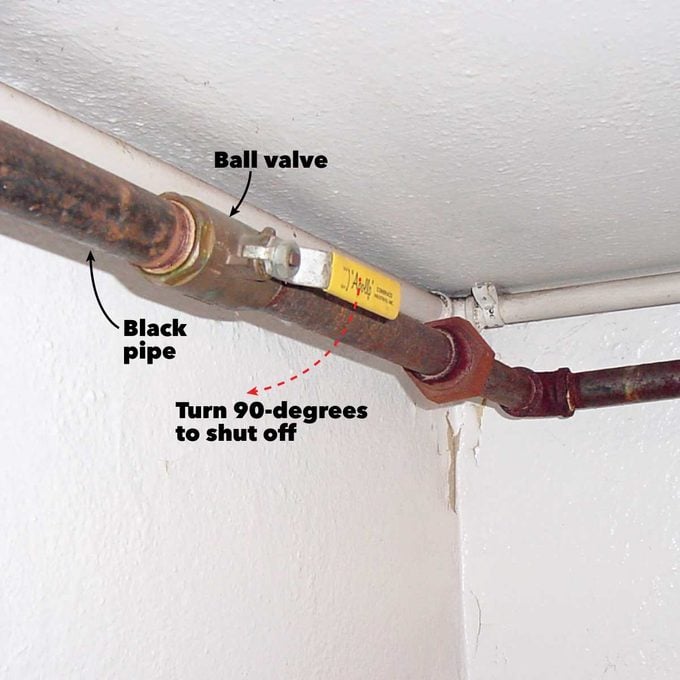
Photo 2: House-side gas valve
This house-side valve—usually a ball valve—may be located where the pipe first enters the house or farther down the line, but it will always be located before the first appliance. If iron pipe is transporting the gas, it’s often black; this differentiates it from similar-shaped, gray galvanized water pipe.
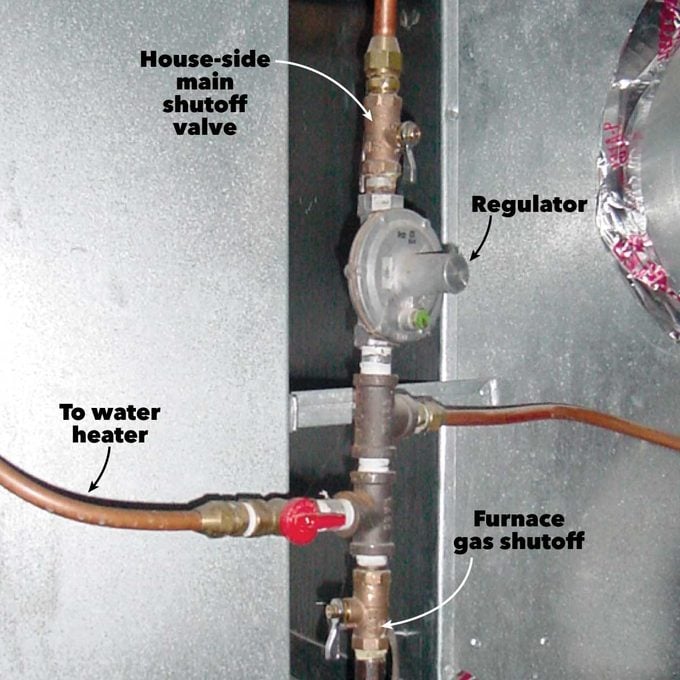
Photo 3: Higher pressure natural gas system
If your home is newer and you find a flexible copper pipe running from the meter into your utility room, you probably have a higher pressure gas system. In this case, your inside main shutoff valve (Photo 3) is probably near your furnace or water heater, just before it enters a flying saucer–shaped doodad called a pressure regulator. There’s also a chance your home—especially if it’s older—doesn’t have a house-side main shutoff valve.
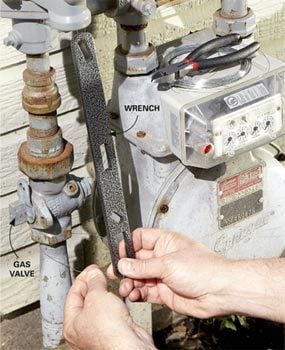
Photo 4: Hang a wrench near the shutoff
Hang the wrench from the gas meter supply pipe with a piece of stainless steel wire. Then secure the bottom portion. Twist the wire just a few times so it’ll release quickly in an emergency.
Locate those valves?
Well, don’t just sit there; get up and locate those valves! Then tag ’em as we explain in Fig. B. In addition to the house-side main shutoff valve, individual gas appliances should have a service or appliance shutoff valve (Fig. A) that’s immediately accessible, in the same room and within 6 ft. of the appliance. These valves allow you to stop the flow of gas to your dryer, oven, furnace, water heater or gas fireplaces to make repairs or new installations without cutting off gas to your entire home.
Most service valves are single-lever ball valves; again, handle parallel to the line means gas is flowing, perpendicular means it’s cut off. On dryers and ranges, this valve is usually hidden behind them and can only be reached by sliding the appliance out from the wall. This service valve will usually be at the end of a fixed pipe and connected to a flexible supply pipe called an appliance connector. Take care not to kink or pinch this flexible pipe.
When you repair or replace a gas appliance, use these shutoff valves to stop the flow of gas. (Most pros replace the flexible connector when they replace the appliance.) If you discover you have a faulty supply valve, or your system doesn’t have one, turn off the gas using the house side main shutoff valve.
For those with propane or liquefied petroleum gas, there’s a main shutoff valve on the tank itself, and usually a main shutoff valve somewhere before the first appliance. Some valves (both gas and water) manufactured before 1980 contain a lubricant to help the valve seal better and operate more smoothly. In many cases, this lubricant will have hardened or reacted with the gas to make the valve difficult to turn. Applying gentle heat with a hair dryer and working the valve open and shut in stages will usually free it up again. Sometimes you need to use a pliers to free the stuck handle.
Important! Now that you know where your gas valves are, also know this: it’s not always safe for you to turn these valves off in an emergency. When gas reaches a certain concentration in a room or house, the slightest spark can set off a tremendous explosion. A light switch or telephone—even static electricity from your clothes—can produce such a spark.
If you’re working near the main or individual gas valve and clearly know the source of the gas leak and that gas hasn’t been leaking for long, shut off the valve and get out. But if you’re uncertain of the source or how long the gas has been leaking, clear yourself and your family out and call the gas company or fire department from a neighbor’s house (not your own—remember, phones can generate sparks!). Always err on the side of caution.
Stay in the know: If you have natural gas in your home, be sure you know the signs of a gas leak and what to do in case of an emergency.
It’s a good idea to get ready for gas emergencies before they happen, because sometimes projects involving gas lines don’t go as planned. When a gas project goes bad, that’s not the time to be searching for the right tool to shut the gas off at the meter. A good strategy is to buy an emergency gas meter wrench shutoff tool and secure it to the meter as shown in Photo 4. Pick one up at a home center for about $12.
Also note: When you shut off main or individual gas valves, you’ll be extinguishing the pilot lights to certain appliances. Many newer appliances have “pilot light–less” electronic ignition systems, but if you have older appliances, you’ll need to relight the pilot lights. Most appliances have clear relighting directions on a label near the pilot light or in the instruction manual.
But some pilots are pretty darn hard to reach. If you’re uncomfortable with relighting the pilot light, hire a plumber or call your local gas service company.
Click here to learn how to fix a water heater pilot light.
Figure A: Typical Gas System
This illustration shows how gas is brought into the house from the street. You can find a larger version of this image in the Additional Information.

Figure B: Gas System Inside the House
This illustration shows how gas is delivered in the house. Once you’ve located your main shutoff valves, label them. You can find a larger version of this image in the Additional Information.
Water shutoff valves

Photo 5: Supply valves
Almost all water meters have one main shutoff valve directly before the meter and another directly after (Photo 5). Where the meter is located depends on the climate in your area.
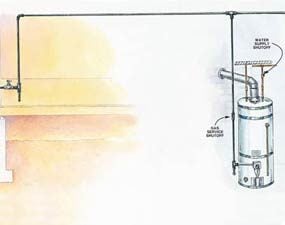
In cold climates (Fig. D), the meter and main shutoff valves are located inside, usually in a basement or other warm area to prevent freezing. In milder climates (Fig. C), the meter and its two shutoff valves may be attached to an exterior wall or nestled in an underground box with a removable lid.
Since these things can leak like crazy and cause tremendous damage, I’m replacing it with a standard supply stop as soon as I’m done with this story.
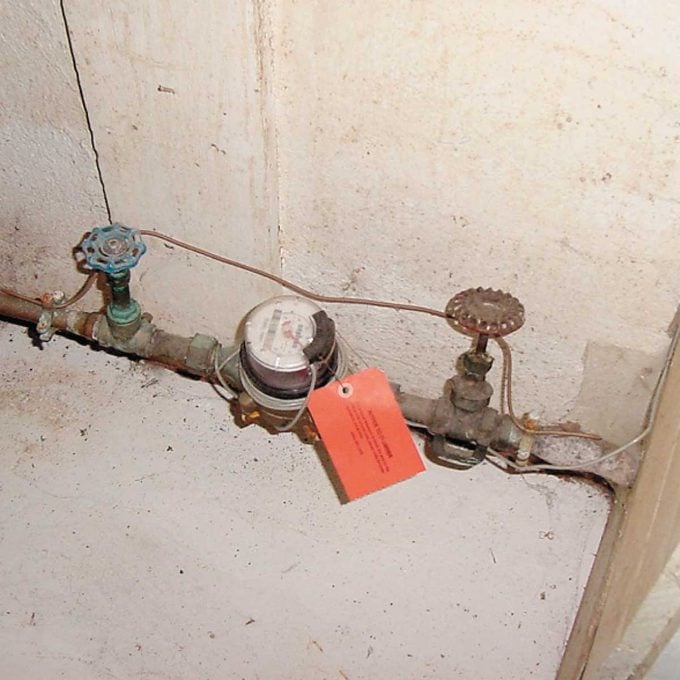
Photo 6: Water shutoff valves
The valve on the right in this photo is Marie’s street-side main shutoff; the valve on the left is the house-side main shutoff. In newer homes, these will probably be ball valves.
Learn how remove crud and replace your main water shutoff valve here.
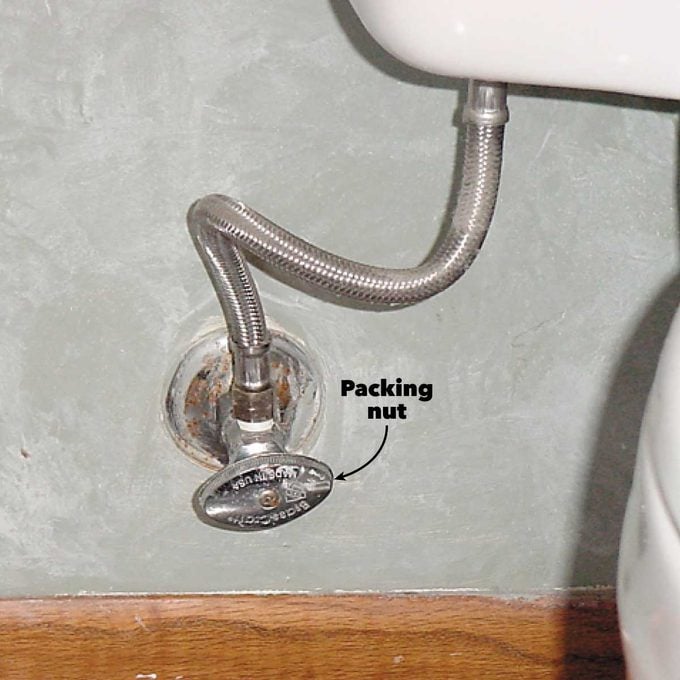
Photo 7: Supply stop for a toilet
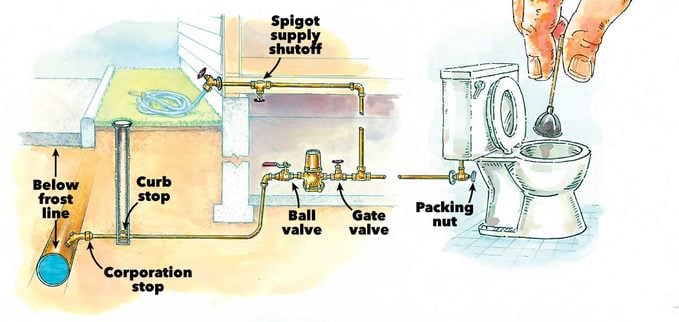
Between the water main in the street and the meter, there’s also usually a buried curb stop valve (accessible only by city workers wielding special long-handled wrenches) and a corporation stop, where your house water line hooks up to the water main. Your city absolutely doesn’t want you messing around with these last two valves.
They prefer you turn your water off or on using the main valve on the house side of the meter. This valve will normally be a gate-type valve, with a round knurled handle, requiring several full clockwise rotations to turn off. In newer homes, it could be a ball valve.
In addition, most houses built today have small, localized shutoff valves called fixture supply stops (Photo 7) installed on the supply lines leading to toilets, faucets, dishwashers, washing machines, water softeners and water heaters. These supply stops usually have a small round or oval handle that you turn clockwise two to four full turns to shut off the flow of water. Many older homes have them only at toilets, if at all. This can lead to great family discord, since working on a single drippy faucet can require shutting off water to the entire house at the main valve, leaving everyone shower-less, flush-less and waterless. With supply valves, you can turn off the water to a single fixture while fixing or replacing that faucet.
If your plumbing system lacks supply stops, install them when you shut off the main valve to repair a sink, toilet or appliance. Eventually you’ll have supply stops at every fixture, and your family won’t yell at you every time they see you with a wrench in your hand. Remember, fixture supply stops must be easily accessible; you can’t drywall or plaster over them without installing an access panel to reach them.
Supply stop problems
Be aware of these common problems with fixture supply stops: Many water supply valves drip when turned off and then back on again after an extended period of disuse.
To fix a drippy supply valve, try gently tightening the packing nut (Photo 7) with a wrench, or opening and shutting the valve several times until the drip stops. If a supply valve simply won’t stop leaking, your only option is to replace it—which will require shutting off the main valve. In cold climates, most people remember to close the supply shutoffs for their outdoor spigots to prevent freezing, but many then forget to open the outside spigot to drain the remaining water.
If the water trapped between the spigot and supply shutoff valve freezes, it can burst that section of pipe. Since there’s no water flowing through this short damaged section of pipe, there are no obvious leaks or sign of damage—yet. But when you turn the supply valve back on in the spring and pressure returns to that pipe, the burst section of pipe will leak like crazy—and often go unnoticed for hours or days. One plumber told me he’s made dozens of repairs dealing with this mistake.
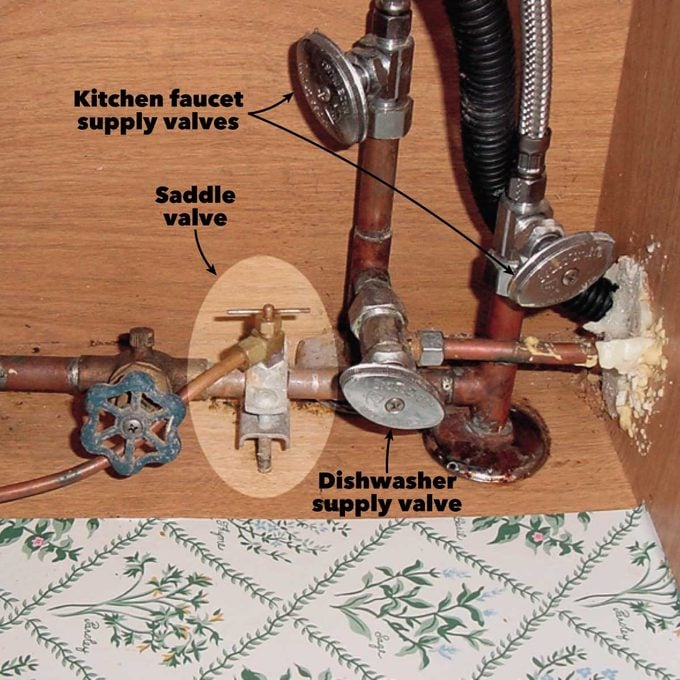
Photo 8: Supply valves
Finally, many ice makers and furnace humidifiers are fed by small flexible copper tubes that are connected to larger copper pipes via a very small T-handled device called a saddle valve (Photo 8). These valves essentially bite into the larger pipe to feed the smaller one. Leaky saddle valves are a major cause of residential water damage and are no longer code-compliant in many areas. If you have saddle valves, replace them with standard supply stops. Since these things can leak like crazy and cause tremendous damage, I’m replacing it with a standard supply stop as soon as I’m done with this story.
Learn more about installing a valve for an ice maker here.
Figure C: Typical Warm-Weather Water System
This illustration shows how water comes into the house in warm climates. You can find a larger version of this image in the Additional Information.
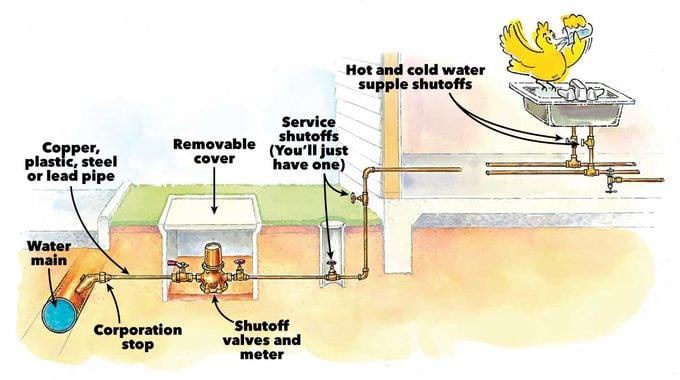
Figure D: Typical Cold-Weather Water System
This illustration shows how water comes into the house in cold climates. You can find a larger version of this image in the Additional Information.
Additional Information
- Figure A: Typical Gas System
- Figure B: Gas System Inside the House
- Figure C: Water system for warm climates
- Figure D: Water system for cold climates
Required Tools for this Project
Required Materials for this Project
Avoid last-minute shopping trips by having all your materials ready ahead of time. Here’s a list.
- Stainless steel wire