Drywall Repair: How to Fix and Patch Drywall
Updated: Sep. 07, 2023
It's easier than you might think to do your own drywall repair. We'll show you how to fix drywall and other damaged walls.
A full day
Beginner
Less than $20
Introduction
Fix damaged drywall with these DIY repairs you can do. Don't melt down if a doorknob, misguided chair or an impromptu hockey game knocks a big hole in your drywall. With a little patience, a little joint compound and a few dabs of paint even a novice can complete a near invisible wall repair.Tools Required
- Drywall sander
- Drywall saw
- Dust mask
- Paintbrush
- Screw gun
- Taping knife
- Utility knife
Materials Required
- Drywall
- Drywall screws
- Drywall tape
- Joint compound
Being able to fix a hole in drywall is one of the most useful basic drywall skills a DIYer can learn. Start by measuring the thickness of the drywall (most likely 1/2 in.), and look for a large enough scrap from a damaged piece at a home center as you see how to fix a hole in drywall, rather than buy a full 4 x 8-ft. sheet. Cut it to size and screw it into place, spacing the screws every 6-in.
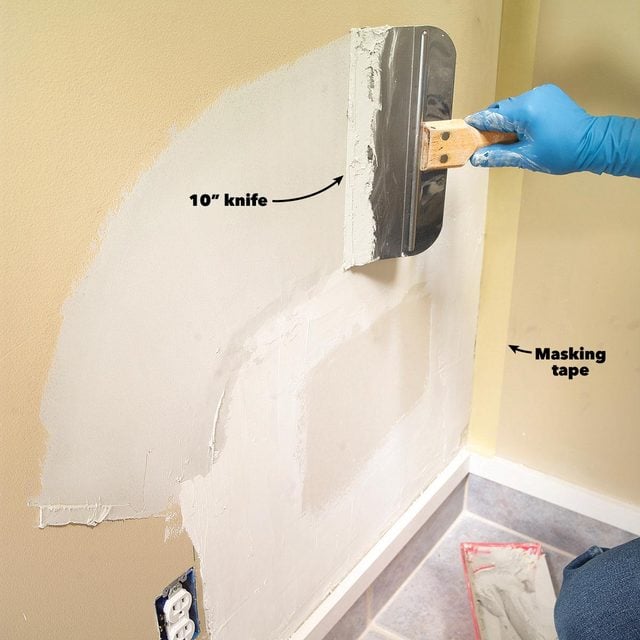
Taping the edges of the patch of drywall to make it invisible is the trickiest part of this project. Buy a gallon tub of drywall compound and a roll of paper tape. You can use mesh tape, but it isn’t as strong. If you have a lot of repairs, also buy a sack of 20-minute setting compound. It hardens quickly and doesn’t shrink, so it’s ideal for filling cracks and gaps before applying the joint tape. For smoothest results, also pick up flexible 6- and 10-in. taping knives.
Apply a coat of compound and tape to each joint. Thin the compound a bit with water to help embed the tape. Smooth the tape with the 6-in. knife, pulling out from the center toward each end. Squeeze some, but not all, of the compound out from under the tape so you don’t create a big hump on the wall. Immediately apply a light coating to the topside of the tape, tapering it out onto the wall.
The second and third coats are to blend and smooth the taped joints so they’ll be invisible when painted. After each coat is dry, set a straightedge against the wall to check for obvious dips and bumps. Knock off bumps and ridges with your taping knife. Add more coats as needed. Then sand, prime and paint. The following will walk you through more important tips and steps for how to fix a hole in the wall.
Project step-by-step (12)
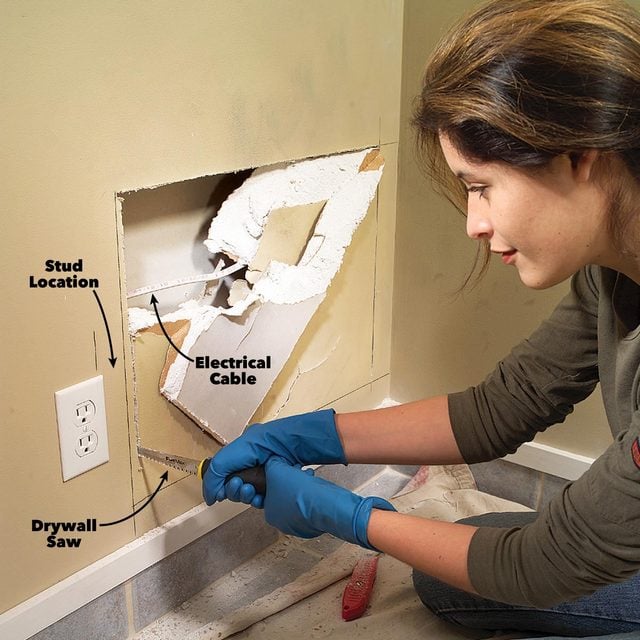
Check for wires
Before cutting out the damaged area, check the wall for obstructions. Often you’ll find a wire, pipe or duct. If so, work carefully around them with a drywall or keyhole saw. Or make a shallow cut by repeatedly scoring the line with a sharp utility knife to begin a hole patch.
It’s easier to add backer board than to try to cut the drywall over studs. Then cut out the section with a drywall saw or utility knife.
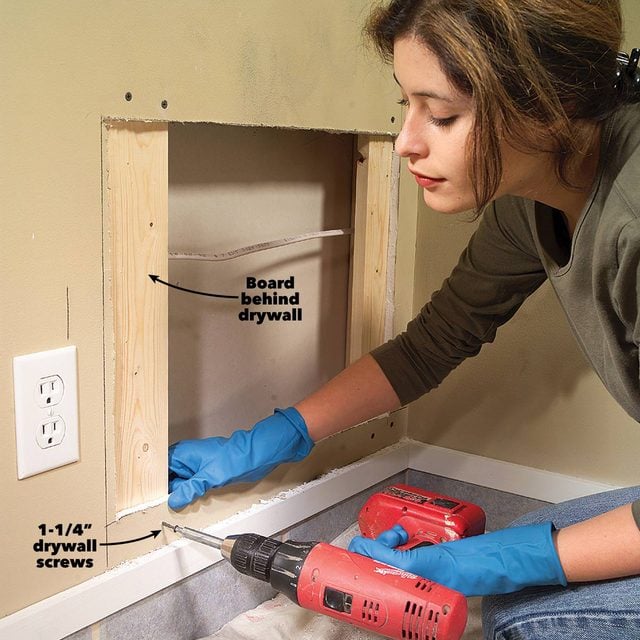
Insert backer boards
Cut the backer boards about 4 in. longer than the height of the hole. Pine or other soft wood works well. Hold them tight to the backside of the drywall when fastening them. Hold the boards carefully so the screw points won’t prick your fingers if they pop out the backside.
The drywall screws will draw the boards in tight. Sink the screwheads slightly below the drywall surface.
Tape the joints
Lay a 1/8-in.-thick bed of patch drywall compound over the joints and press paper tape into the compound with a flexible 6-in. knife. Immediately apply a thin layer of compound on top of the tape. Allow the compound to dry as you work your way through.

Apply a second and third coat
Apply a second coat of compound, drawing it at least 6 in. beyond the edge of the first coat to taper the edges of the repair. Let dry, then add a third coat to smooth any remaining uneven areas.
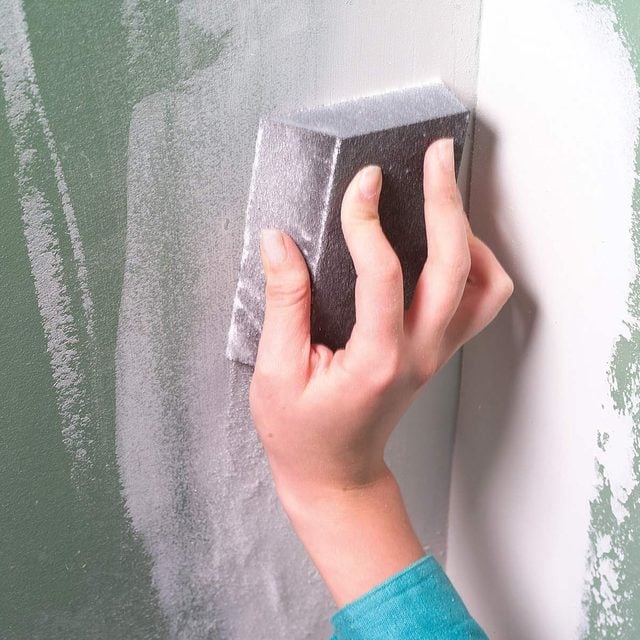
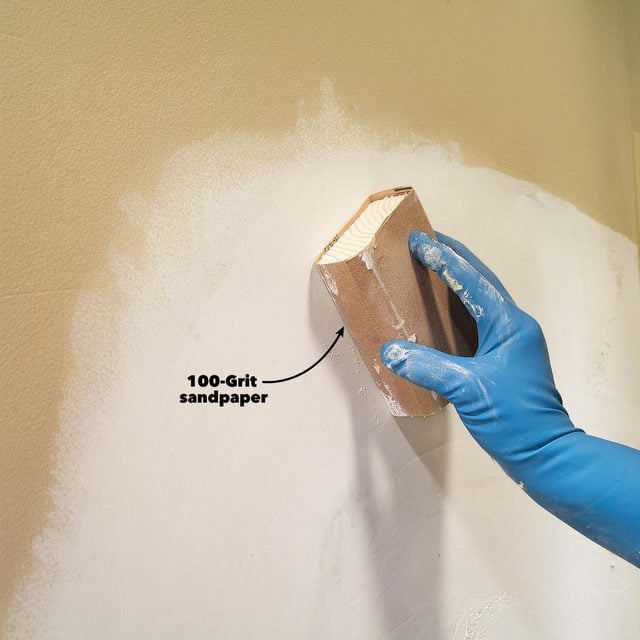
Sand the dry compound
The final steps are sanding the dry compound lightly with 100-grit sandpaper to remove ridges and blend edges and then prime and paint.
Small Holes
Small holes caused by screws or hooks, wall fasteners or drywall fasteners that pop up are simple to repair, but again time-consuming because you almost always have to repaint the walls. Nail pops are common and particularly irritating because you’re likely to have more than one. But drywall screws sometimes pop up too, as a result of damp framing that dries out and shrinks during the first year or two in new construction.
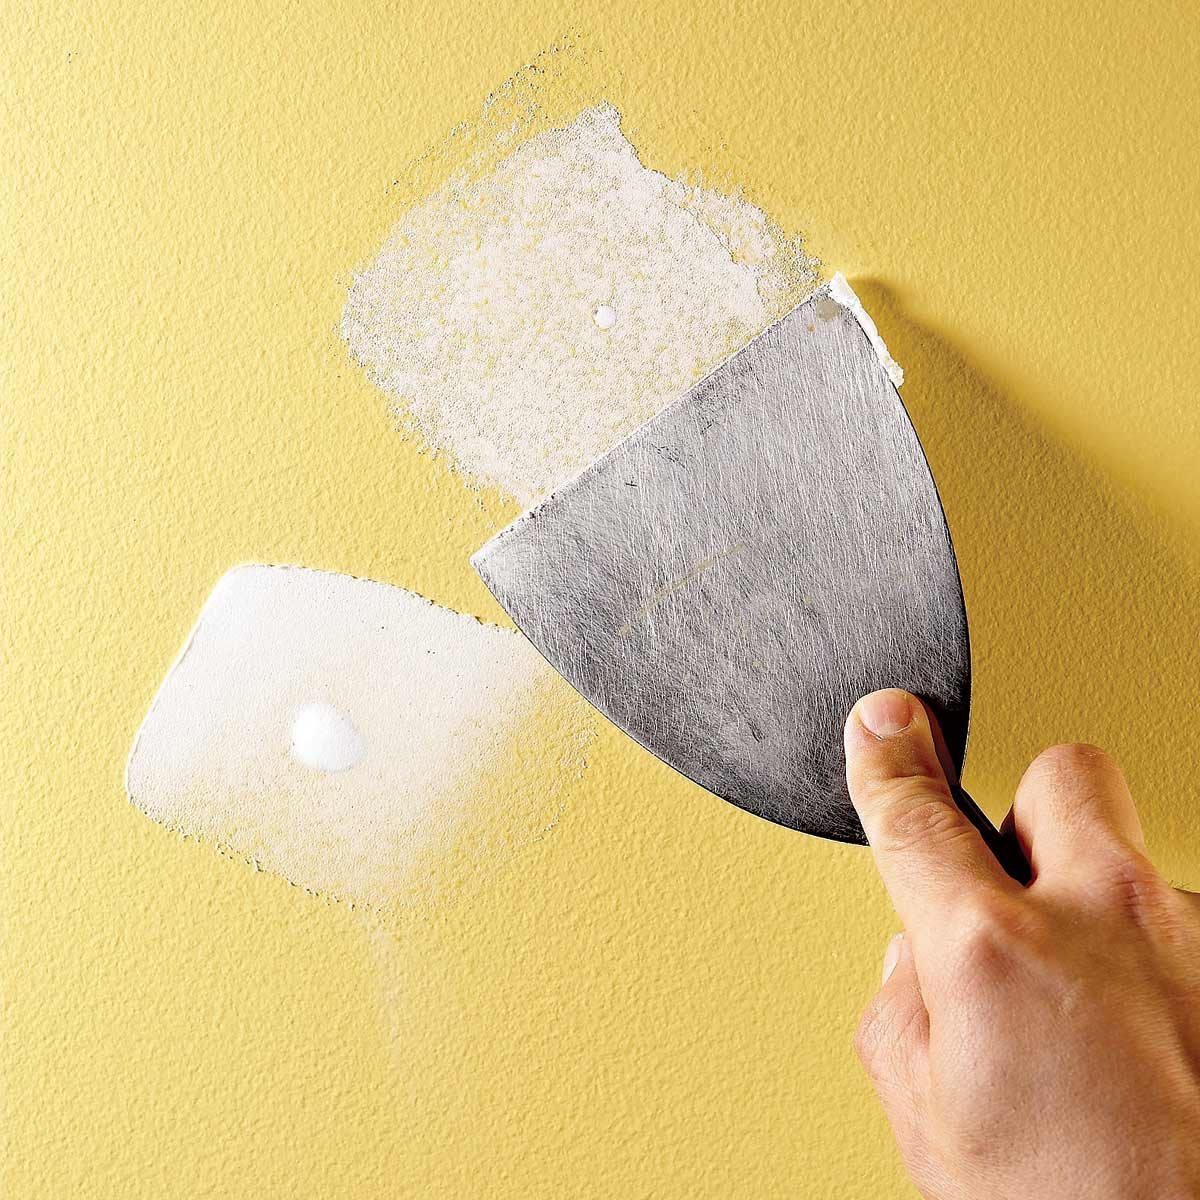
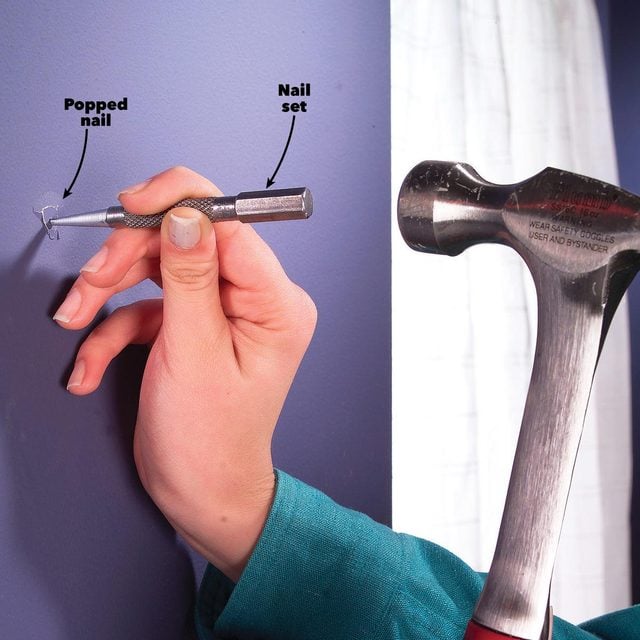
The first step of patching a small hole in the wall is to drive nails back down using a nail set. If you have screws, dig the drywall compound from their heads with a utility knife and turn them in tight with a screwdriver.
Then dimple the hole slightly concave with a hammer to indent any raised edges. But take care not to crush the drywall core. In addition, cut away any paper tears with a sharp utility knife. This is a good technique to use with old wall fasteners as well. It’s usually easier to tap them into the wall slightly rather than pull them out.
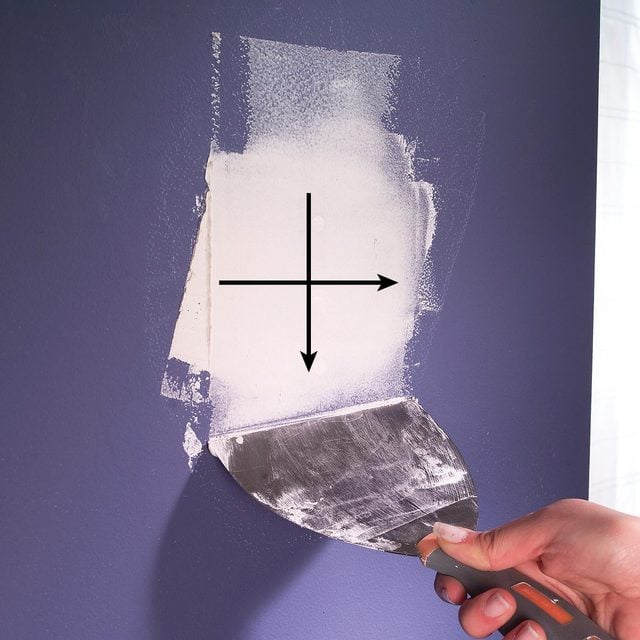
Two coats of drywall compound, applied with two swipes of the knife in a “+” pattern, should fill the holes. The first coat will shrink a bit, leaving a slightly smaller dent to be filled by the second coat. Scrape the excess off the surrounding wall so you don’t build up a hump. Sand lightly to blend with the surrounding wall. Be sure to prime the spot. Otherwise the topcoat will absorb into the patch and make the area look different from the surrounding paint. And use a roller when priming to help raise the surface texture to match the surrounding wall.
How to fix a hole in the wall fast: 20-Minute Setting Compound
Twenty-minute setting compound is a great product for filling deep holes and gaps and for your first taping coat because, unlike regular joint compound, it hardens quickly without shrinking. That means less time spent filling. And you can apply a second coat of compound as soon as the first hardens. You don’t have to wait for it to dry completely as you complete a how to fix drywall project.
For most uses, buy the lightweight type. It comes as a powder in sacks. Mix only what you can use in about 10 minutes. It hardens quickly, often in your pan if you’re too slow! Completely clean your pan and knife before mixing a new batch in your how to fix drywall task. Otherwise it’ll harden even faster! To avoid clogging the sink drain, throw leftover compound into the trash.
Drive a popped nail below the surface
Drive a popped nail below the surface of the drywall with a hammer and a nail set. Cut away any loose joint compound and paper shreds.
Drive in drywall screws
Drive drywall screws about 1-1/2 in. above and below the popped nail. Sink the screwhead just below the surface of the drywall.

Fill the holes
Fill the holes with joint compound, swiping first across the holes, then down. Let dry, apply a second coat, then sand, prime and paint.
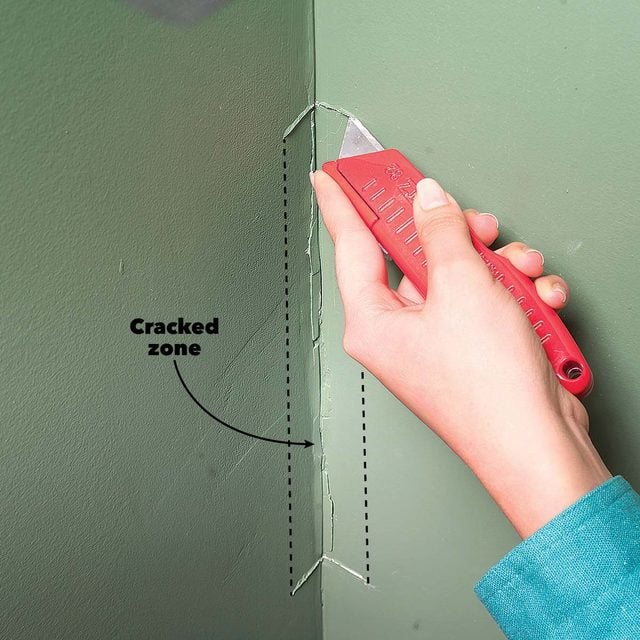
Cracked corners sheetrock repair
Every home settles unevenly as it ages. This sometimes causes inside corners to crack or ripple. Often the crack will run from floor to ceiling. Once you spot this problem, watch it for two to three months for continued movement and fix it after all movement stops.
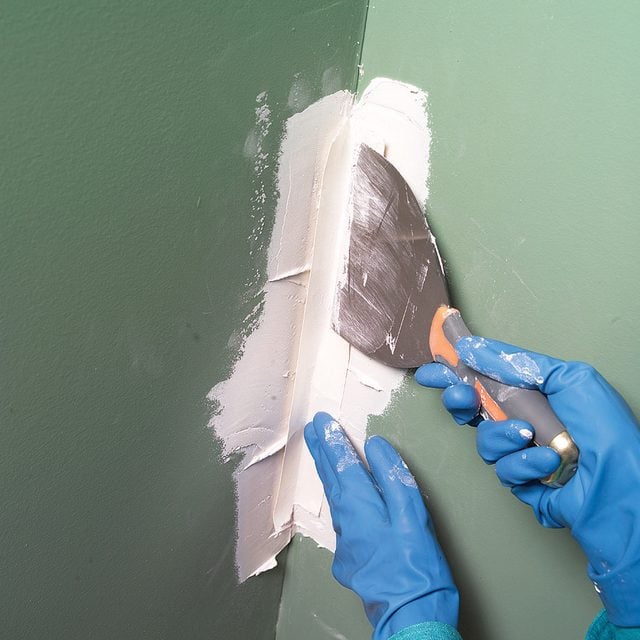
The key to renewing the strength of the corner is to remove all loose tape and drywall compound. If the drywall below has crumbled, cut it away with your utility knife and fill the gap with setting compound.
Retape the joint. Crease the paper tape down the middle so it fits into the corner easily. It’s difficult to spread compound smoothly on one side of the corner without marring the other side. The trick is to apply compound for the second and third coats only on one side at a time. Let the one side dry, then do the other side.
Finally, buy a fine-grit sanding sponge to smooth the corners. It’ll do a nice job without gouging.
Cut through the tape
Cut through the tape at the ends of the cracked area and slice, scrape and tear away all loose tape and compound.
Apply joint compound
Apply a 1/8-in. layer of joint compound, then fold and press paper tape into it. Stroke the length of the tape, squeezing compound out on both sides. Let dry.
Apply second and third coats
Apply second and third coats to smooth the joint, tapering the compound about 6 in. out. Let one side dry before applying compound to the other side.
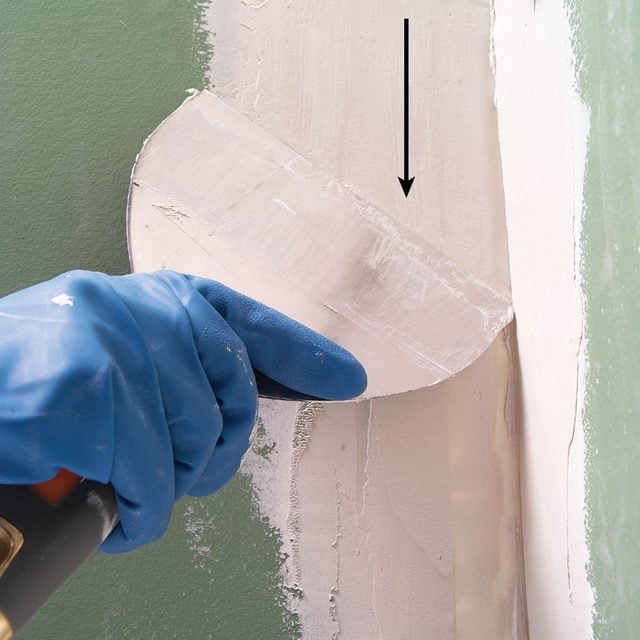
Lightly sand the repaired area
Lightly sand the finished repair using a fine-grit sanding sponge to make a crisp corner. Prime and paint to match the existing wall.
Check out our drywall section for more drywall repair and drywall installation tips.