
Gas Stove Burner Repair Tips
Updated: Feb. 16, 2023Try these solutions before calling for service help
Problem 1: Oven won’t light
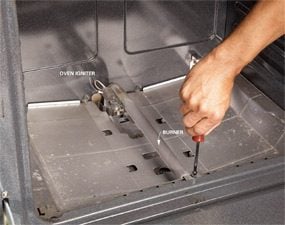
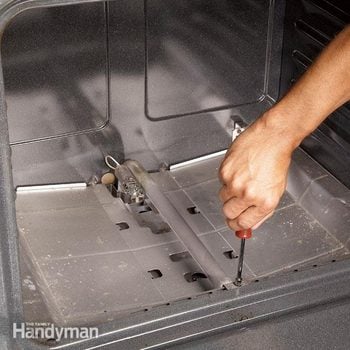
Photo 1: Remove the gas stove burner
Remove the old igniter from the burner. Unscrew the gas stove burner if necessary. Cut or unplug the wires.
First check to be sure the oven is plugged in and getting power and that the gas valve is open. If you have an older oven with a mechanical instead of a digital timer, check to make sure you haven’t bumped it off the manual setting. If your oven still won’t light, you probably need a new igniter. Even if you see the igniter glowing, it can be faulty.
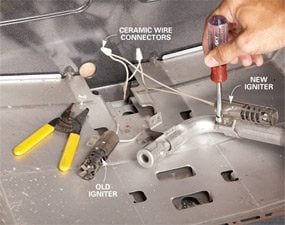
Replace the gas stove igniter
We removed the gas stove burner for easier access to the igniter (Photo 1), but on some ovens this isn’t necessary. To replace the gas stove igniter, remove the screws that secure it to the burner. Then remove the wires. Some gas stove igniters simply unplug. Others, like ours, require you to cut and strip the wires and reconnect the new igniter using the special ceramic wire connectors included with the gas stove igniter (Photo 2). Remove 1/2 in. of insulation from the wires with a wire stripping tool. Then reconnect the new gas stove igniter by aligning the ends of the stripped wires and twisting on the ceramic wire connectors. Reassemble the igniter and burner in the reverse order.
CAUTION: Unplug the oven before starting this repair.
Gas Stove Burner Replacement Problem 2: Burners won’t light
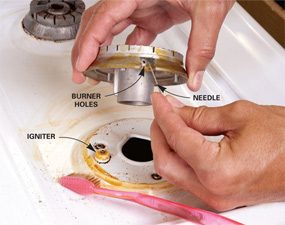
Photo 3: How to clean the gas stove burner holes
Clean the gas stove igniter and burner holes if the burner won’t light. Brush the igniter with a stiff toothbrush to remove gunk. Clean out the gas stove burner holes with a needle. Learn more about how to clean a stove top.
If a burner on your gas range doesn’t light, it’s likely that you can fix the problem with one of the solutions we show here. We’re showing repairs to a range with an electronic ignition system and sealed burners (if your range clicks when the burner lights, it has an electronic ignition). For repair information on ranges with pilot lights and ranges with open burners, type “gas range repair” in the search box on this site.
Before you undertake more-complex repairs, check for simple solutions. Be sure the gas range is plugged in and getting power. The oven light should come on when you open the door. Also check that the gas valve is open—it may have been turned off by accident. Learn how to fix your gas oven if it is not heating up.
Clean the gas stove igniter and burner holes
Start by cleaning the spark igniter (Photo 3). The igniter is the white ceramic nub that’s located near the base of the burner. Your range may look different from the one shown here. On this range we lifted off the burner to access the igniter. Clogged burner holes can also prevent the burner from lighting. Use a needle to clear the tiny hole or holes in the burner (near the igniter).
If your burner still won’t light after you’ve cleaned the burner holes and igniter, there are three parts that could be faulty: the igniter, the igniter switch or the igniter control module. Of these, the most likely cause is a bad igniter control module. Occasionally an igniter switch will go bad. An igniter is rarely to blame. Photo 4 shows you how to replace the igniter module. Search for “gas range repair” on this site for information on replacing a gas stove igniter switch.
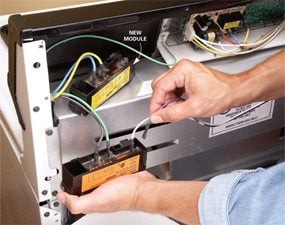
Test the gas stove igniter control module
Darken the room and turn each burner to “Light” for three seconds and then off again. If you don’t see sparks, replace the igniter control module (Photo 4). First unplug the range. Then locate the control module to replace it (Photo 4). In most cases, you’ll have to pull the range away from the wall to access the module, which is usually located behind a removable metal cover on the back of the range or under a small metal box below the control panel.
CAUTION: Always unplug your range before working on it.
Required Tools for this Project
Have the necessary tools for this DIY project lined up before you start—you’ll save time and frustration.
- 4-in-1 screwdriver
- Nut driver
- Wire stripper/cutter
