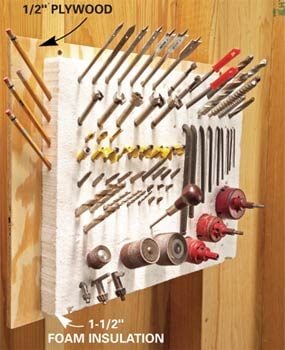
Pointy-tool Pincushion
Here’s one of our favorite tool storage ideas! Store router bits, drill bits, screwdrivers, awls, pencils, Allen wrenches and hole saws in a chunk of 1-1/2-in.-thick rigid foam insulation. To make this pointy-tool pincushion, just glue the foam to 1/2- in. plywood sized an inch wider than the foam. Be sure to use foam-compatible adhesive (PL 500 is one). Then press the foam into place and let it dry for a few hours.
Punch holes for the accessories by rotating a small-diameter Phillips screwdriver or an awl at a slight angle into the foam. The tools will widen the holes to fit as you push them in. Screw the plywood to a shop wall over your workbench and load it up!
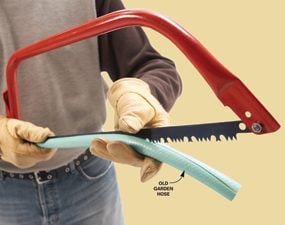
Quick Blade Cover
Recycle an old garden hose by slitting open a length and using it as a blade cover for sharp saws and other bladed tools.
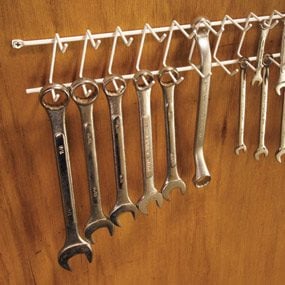
Wrench Rack
Are all your wrenches stuffed in a plastic bucket? Here’s a better idea. Screw a tie/belt rack (available at discount stores) to a bare spot on the wall over your workbench and hang the wrenches—SAE and metric—where you can swiftly nab and put them away in an orderly fashion.
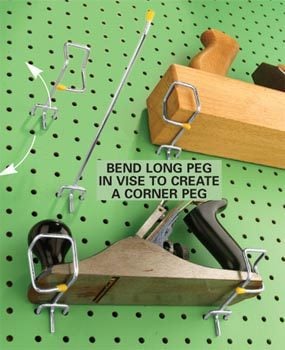
Corner-on Pegboard Hooks
Ever had a plane, level or square get dinged up after falling off the pegboard? Never again. Bend an 8-in.-long pegboard holder into a corner shape by holding it in a vise and pounding it with a hammer to make the series of right angles. Make one corner to hold the left side of the tool and another to hold the right. Now just hold the tool up to the pegboard and insert the corner peg so it clasps the tool’s corner.
PVC Toolholder
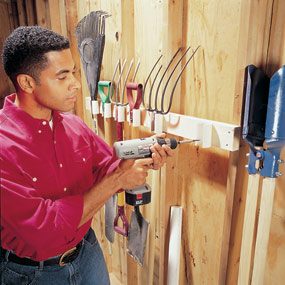
Build this PVC rack to store your tools on the wall. Use a jigsaw to cut a 1-1/4-in.-wide notch down the length of a 2-in.-dia. PVC pipe. Cut several 3-1/2-in.-long sections with a hacksaw or miter saw, and drill two 1/8-in. holes behind the notch. Use 1-1/4-in. drywall screws to attach these pieces to a 2×4 screwed to the wall. Here are a few tips to help you store your power tools.
Handsaw Blade Saver
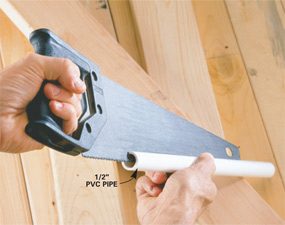
Prolong the life of your saw blades with a short section of 1/2-in. PVC pipe. Hold the pipe tight against slightly opened vise jaws, and saw a slit down the entire pipe (this is a tricky cut, but it only has to be done once). Slide it over the blade to keep the teeth sharp.
Pie Plate Storage Pockets
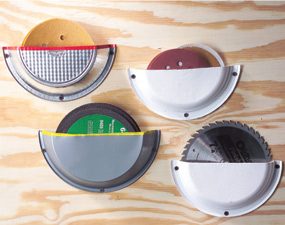
Screw cut-in-half pie tins and heavy-duty paper plates to a shop wall and you’ve got space-saving storage for the sanding discs, circular saw blades and abrasive discs that like to hide in a drawer. Be sure to tape the sharp edges on the cut pie plates to protect your fingers!
Saw Blade Carryall
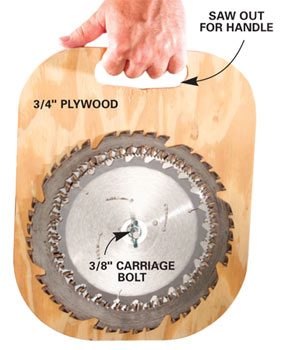
This is an oldie but goodie for storing and toting table and circular saw blades. Cut a 14-in. x 12-in. piece of 3/4-in. plywood and drill a hole for a 2-in. x 3/8-in. carriage bolt. Secure the blades on the bolt with a fender washer and wing nut, being careful to stagger the carbide teeth so they don’t rub together. Saw a slot in the upper end for a handle and for storing it on pegboard.
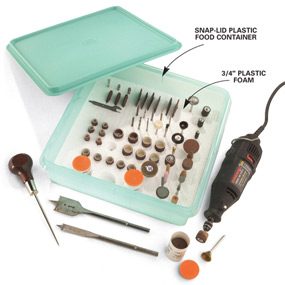
Rotary Bit Organizer
This rotary-bit organizer may just inspire a renaissance of rotary tool use in your shop. Friction-fit a piece of 3/4-in. plastic foam in a snap-lid plastic food container. Then poke holes in the plastic foam with an awl to hold shafted bits, and slice crevices with a utility knife to hold cutoff discs. Using a spade bit at high speed, drill sockets for larger bits and tube-shape containers. Once your bits are in order, you can rediscover how useful they can be.
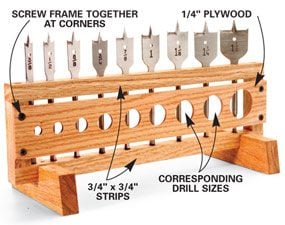
Drill Bit Rack
Here’s the Cadillac of drill bit racks. It comes with a sizing index to check round work pieces and the bits themselves for drilling the exact corresponding hole. The length of the rack is up to you—build it to hold all your bits in order of size. You can either build it freestanding for tabletop use or without the base pieces for wall mounting.
To build one, lay your bits—spade and/or twist bits—on a table with 1/2-in. spacing. Cut two 3/4-in. x 3/4-in. strips of hardwood, then mark, clamp and drill according to the bit spacing you determined. (Drill through both strips for spade bits but only halfway through the second strip for twist bits.) Position two 2-3/4-in. blocks between the strips and screw them together. Use the bits you laid out to drill holes in a piece of 1/4-in.plywood for the sizing index. Screw it to the rectangle and get those bits in order!
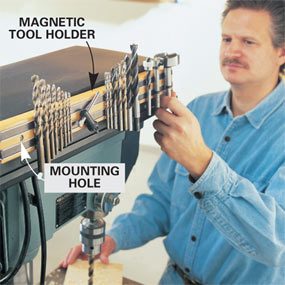
Magnetic Bit Rack
Mount an 18-in. Magnetic Tool Holder (No. 81281) to your drill press’s pulley cowl for quick-change bit storage (available at rockler.com). The tool holder is inlaid with powerful magnetic strips that tightly hold all sizes of bits, plus it’s easy to mount. Mark and drill a couple of 1/4-in. holes through the cowl of your drill press. Then use two 1-1/4 in. x 1/8-in.-diameter bolts with nuts and washers to attach the holder.
While you’re ordering, buy a few extra magnetic tool holders and use them elsewhere in your shop to hold chisels, squares, router bits, metal rulers, wrenches and all those easy-to-misplace accessories.
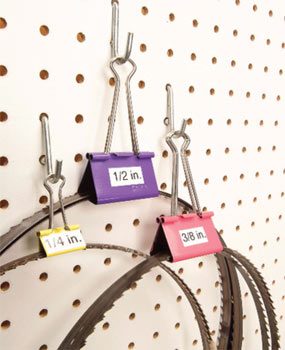
Bandsaw Blade Hangers
If you’ve ever suffered the indignity—and possible danger to eyes and face—of a bandsaw blade uncoiling as you’ve pulled it off the peg you hung it on, you’ll love this tip. Nest the coiled blades into binder clips and store them on your pegboard, and they’ll never spring out at you again. Apply labels to the clip so you can simplify size selection and storage.