
How to Build DIY Pull Out Pantry Shelves
Updated: Jun. 23, 2023Pull out shelves changed my life—and pull out drawers for cabinets will change yours, too!
Pull Out Shelves Overview: Benefits of rollouts
It may sound like hype, but adding rollouts to your kitchen storage cabinets can be life-changing. I speak from personal experience. I recently added pull out pantry shelves to our entire kitchen, and this is what happened:
- The kids have complete access to everything they need—from cereal to the recycling with pull out shelves. Now they can get their own breakfast and take the cans to the curb—no excuses!
- My sore back and my husband’s bum knee are less of an issue pull out shelves since we no longer have to constantly stoop to find things in our base cabinets.
- Dinner prep goes a lot faster now that we’re not hunting for pot lids and baking pans piled on top of one another on our jumbled, dark shelves.
- We’re saving money by not buying things we already have (but that had been lost in the recesses of our cabinets). We can pull our shelves into the light and see everything, including the rancid oil and three boxes of cornstarch we somehow acquired—need some?
- The kitchen feels larger and works better. The rollouts maximize every cubic inch of storage space, so I can store rarely used appliances in my cabinets instead of on my counters.
Are you a convert to pull out shelves yet? This slide out cabinet shelves article will give you tips for planning, buying and building kitchen rollouts so they can change your life too. You can build a simple rollout drawer like the ones shown in a couple of hours for $20. But don’t say I didn’t warn you. Once you see that rollout in action, you’ll want to retrofit all your kitchen storage cabinets. What are you waiting for?
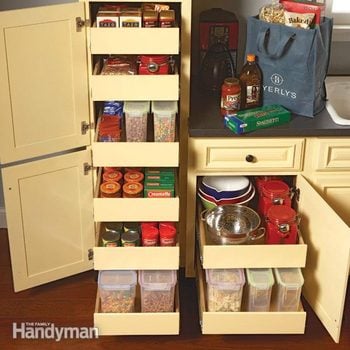
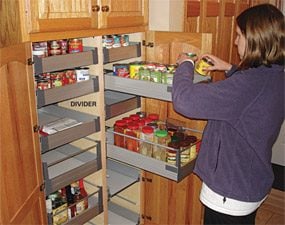
Pull out pantry shelves
Rollouts make this pantry kitchen super-efficient for storage while keeping everything close at hand.
Pull Out Drawers for Cabinets Tip 1: Think inside the box
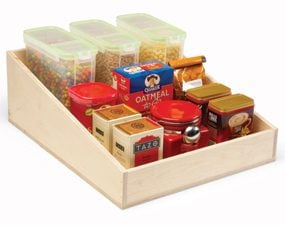
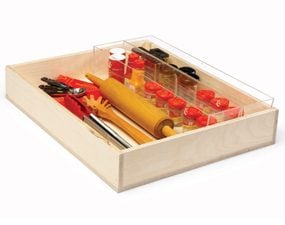
Sloping sides
Rollout drawers with sloping sides keep tall things stable yet still let you see all the way to the back of the shelf. These are good for nesting pots and pans or storing different-size items on the same shelf.

Building a slew of identical drawer boxes is easier, but having a variety gives you more versatility. Think about what you’re going to store and build the boxes to suit your needs.
Pull Out Drawers for Cabinets Tip 2: Use the right slides
There are a dozen kinds of drawer slides out there, but if you want to keep shopping and installation simple, stick to these two types:
Roller slides glide on plastic wheels. They’re inexpensive, a cinch to install (it takes about two minutes) and nearly impossible to screw up. You’ll find them at home centers under various names including side mount, under mount and bottom mount. Most are rated to carry 35 to 100 lbs. For heavy-duty rollouts holding items such as canned goods, use slides rated for at least 100 lbs. The big disadvantage: Most roller slides extend only three-quarters of their length—the back of the drawer stays in the cabinet.
Ball-bearing slides glide on tiny bearings. The big advantage of these slides is that they extend fully, giving you complete access to everything in the drawer. They’re about three times the cost of roller slides, and they’re usually rated to carry 75 to 100 lbs., but you can get 200-lb. versions for about $40 a pair. Home centers carry ball-bearing slides, but you’ll find a wider variety at woodworkershardware.com. The big disadvantage: They’re fussy to install. If your drawer is a hair too big or small, these slides won’t glide.
Tip: Make drawer boxes about 1/32 in. smaller than you need. It’s easy to shim behind a slide with layers of masking tape to make up for a too-small drawer. It’s a lot harder to deal with a drawer that’s too wide.
Slide Out Pantry Slide Types
Ball-bearing slides cost more and are harder to install, but they can extend fully.
Roller slides are inexpensive and easy to install, but they only extend three-quarters.
Pull Out Drawers for Cabinets Tip 3: Make the most of skinny spaces
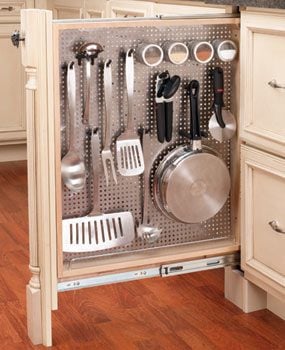
Narrow pull out pantry shelves
In a small kitchen with little storage space, you can make even narrow filler spaces work harder by installing a vertical pegboard rollout. Shown is the 434 Series 6-in. Base Filler with stainless steel panel, about $315, from Rev-A-Shelf.com.
Kitchen designer Mary Jane Pappas typically recommends 18- to 30-in.-wide rollout drawers for cabinets: “Any larger and they’re too clumsy. Any smaller and too much of the space is used by the rollouts themselves.” But there is one type of rollout that makes good use of narrow spaces, even those only 3 to 6 in. wide. Pappas says that pull out pantry shelves—single tall, narrow drawers with long, shelves, drawers, baskets or even pegboard—can be an efficient way to put skinny spaces to work.
Pull Out Drawers for Cabinets Tip 4: Start at the bottom
The most useful rollout shelves and drawers are the ones closest to the floor since these eliminate the most awkward bending and crouching. If want to limit your time and money investment, you’ll get the most bang for your buck by retrofitting these areas first.
Pull Out Drawers for Cabinets Tip 5: Store-bought rollouts—what to look for
Medium-weight
IKEA’s Rationell Variera pullout basket (out $20; ikea.com) works well for medium-weight items. Try these clever IKEA hacks elsewhere in the home, too!
You can spend as little as $10 for a simple wire rollout basket or as much as $100. So what’s the difference?
Look for rollouts with quality hardware. Second-rate slides and rollers can sag or seize up under sacks of flour and pots and pans. Examine the slides to check whether they’re roller slides (which extend only three-quarters of their length) or ball-bearing (which extend fully). Ball-bearing slides tend to support heavier items and roll more smoothly.
Choose sturdy, chrome-plated steel rollouts for heavier items. Steel rollouts come in different gauge metals. Before ordering online, shop around at different retailers so you can physically compare the weight and density of the steel used by different manufacturers.
Epoxy-coated wire rollouts and plastic inserts work fine for light-duty items, but they have a tendency to crack, bend and scratch if packed with heavy loads like canned goods.
Pull Out Drawers for Cabinets Tip 6: Watch for obstacles
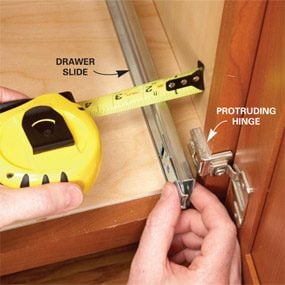
Every cabinetmaker has a story about the rollout that wouldn’t roll out but instead collided with something. When you’re measuring for the spacer width, watch out for protruding hinges and doors that don’t open fully or that protrude into the cabinet opening.
Confessions of a Rollaholic
I’m addicted to rollouts. Last winter I replaced every single cabinet shelf in our kitchen with rollouts, custom-designed for whatever needed storing. I’ve built about 15 more for my shop. I’ve learned that the key to a useful rollout is to decide what you want it to hold and design it around that purpose. These vertical rollouts in my shop are dedicated to jugs, cans and jars of finishes and solvents. Before starting, I carefully laid out exactly what would go on each shelf on the workbench to get the sizes and spacing just right. They work fantastic.
Travis Larson (aka Shop Rat)
Pull Out Drawers for Cabinets Tip 7: Avoid mistakes with a story stick
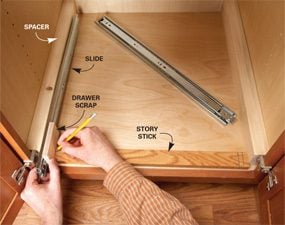
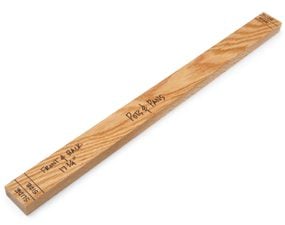
The most obvious way to size rollout parts is to measure the opening of the cabinet and then do the math. But that’s a recipe for mistakes because it’s easy to forget to subtract one of the components (like the width of the slides or the drawers) from the overall measurement. So try this: Forget the math and mark your measurements on a piece of scrap wood. It’s a great visual aid that helps you prevent mistakes and having to walk between your kitchen and your shop constantly to double-check measurements.
Pull Out Drawers for Cabinets Tip 8: Divide up wide spaces
If the cabinet is more than 30 in. wide, consider installing two narrower rollouts side by side rather than a single wide one. This means some extra building work and buying more slides, but the smaller rollouts will operate more smoothly and easily. Wider shelves and drawers tend to bind or rack as you slide them in and out.
Success story:
My daughter called her pantry “the black hole” because she could never find what she needed on the deep shelves. I replaced the five full-width shelves with two six-drawer stacks of sturdy full-extension drawers from IKEA, supported by interior center panels. We spaced the drawers carefully for the types of items she planned to store. Finishing touches include soft-close dampers on the drawers and iron-on edge-banding for the birch plywood panels. [The Rationell 18-in.-deep, fully extending drawers cost about $38 each at ikea.com.]
Jim Wagener, Ashfield, Massachussets
Pull Out Drawers for Cabinets Tip 9: Baltic birch is best
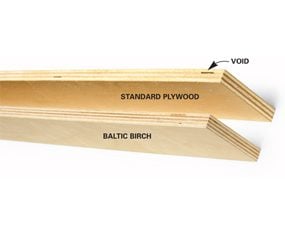
Cabinetmakers love Baltic birch plywood for rollouts because the edges look great. Unlike standard hardwood plywood, Baltic birch never has voids in the inner core. It may not be labeled “Baltic birch” at home centers, but you’ll be able to identify it by comparing it with other hardwood plywood in the racks. It’ll have more and thinner laminations in the plywood core. The biggest disadvantages of using Baltic birch are that it costs more than standard hardwood plywood and can be harder to find. A 4 x 8-ft. sheet will run you $65 compared with $50 for standard hardwood plywood. If your home center doesn’t carry it, try a traditional lumberyard.
Pull Out Drawers for Cabinets Tip 10: Keep drawer boxes simple
All the drawer boxes in my shop are super simple: butt-joint corners and glued-on bottoms. No rabbets, dadoes or dovetails. They don’t look very impressive, but they’ve held up for years. So I built my kitchen rollouts the same way. If simple boxes can carry tools and hardware, I figure they can stand up to kitchen use, too.
Gary Wentz, Senior Editor
Field editor tip:
Consider having drawer boxes made to your exact specs and then install them yourself. The average cost of a solid maple, dovetailed single drawer that we order is about $35. Compared with buying material and finishing it yourself—not to mention the dovetail joints—you can’t beat it. And it looks much nicer.
Steve Zubik, NestWoodworking, Northfield, Minnesota
Rollout Ideas and Plans: Simple Pantry Rollouts
A great way to get more storage space in even the smallest kitchen is by putting those narrow spaces and filler areas to work with pull out pantry shelves. We have two great projects to choose from. One is a handle-free version that lets you line up more than one rollout bin in a single cabinet. The other is a more traditional, three-drawer pantry rollout that reuses your existing cabinet door and hardware. Both versions make it possible for you to use every cubic inch of storage space in your kitchen. Type “kitchen storage” in the Search Box above for more articles on rollouts.
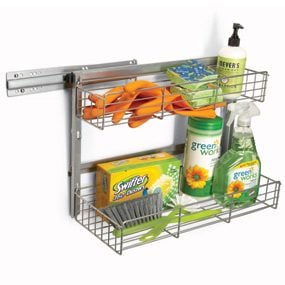
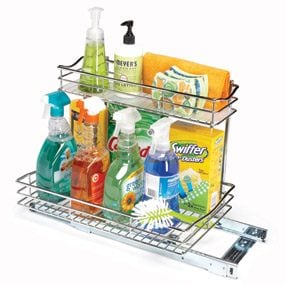
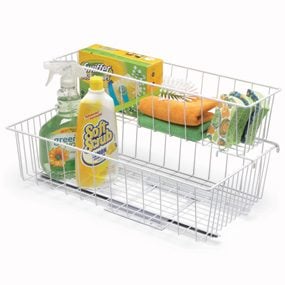
Rollout Ideas and Plans: Rollouts in Underused Locations
The space under sinks is often overlooked, but it’s prime real estate for rollouts. This article gives step-by-step instructions for how to build two types of customizable rollout trays that fit around and below plumbing pipes, garbage disposers and other obstacles beneath your sink. These rollouts transform that “I’m not sure what’s under there” storage space into an organized and efficient location for cleaning supplies that lets you see everything you’ve got in one glance.
Rollout Ideas and Plans: Rollouts at Ankle Level
Turn wasted toe-kick cavities into clever flat storage space for serving trays, cutting boards and baking pans. This article shows you how to construct self-contained rollout shelving units that you assemble in your shop and then just slip into place beneath your existing cabinets. The article steps you through measuring and building the shelf and carrier units, and then installing them in your kitchen. Even if you’ve never built or installed a drawer before, this article will show you how.
