
How to Build a DIY Floating Shelf
Updated: Jun. 29, 2023A floating shelf is strong, quick to build, with no visible supports and made from only two parts

- Time
- Complexity
- Cost
- A full day
- Beginner
- Less than $20
Video: DIY Floating Wall Shelf
Materials, Tools and Design Options
These floating wall shelves are perfect for displaying your collectibles, photos, travel mementos or just about anything. Without the brackets and clunky hardware you’d find with store-bought shelves or kits, they seem to be suspended in midair. These floating shelves are strong, too.
While floating shelves are not designed to hold your old set of Encyclopedia Britannicas, this floating shelf is certainly capable of it. No one would believe that a floating shelf is made from plain, old lightweight and inexpensive hollow-core doors.
In this article, we’ll show you how to install these floating shelves (and shorter ones) securely with basic tools. Even if you think you have no DIY skills, believe me, you can tackle this project.
If this custom floating shelves project still feels too heavy for you. You can buy floating shelves from Amazon.
Each floating shelf is made from half of an 18 in. hollow-core door, lag screws and cleat that hold the shelf to the wall. You can buy new hollow-core interior doors at a home center or lumberyard (just be sure the door doesn’t have predrilled holes for locksets). You may find only 24 in. wide doors, but the door can be any width; just try to minimize the waste. And you might be able to get doors free from yard sales or other sources.
As far as tools go, you can get by with just a circular saw and edge guide (Photo 2) to cut the door. However, I recommend that you use a table saw to cut the cleat because a clean, straight cut is important for a good-looking shelf. (If you don’t own a table saw, use a friend’s or have the cleat cut at a full-service lumberyard.) You’ll also need a stud finder, a chisel, a hammer, a wrench, 1 in. brads, 3-1/2 in. lag screws, carpenter’s glue and a level.
We chose to paint our floating shelves, but if you want the beauty of real wood, you can buy the door in wood veneers like oak or maple (ours was lauan). If you decide on a natural wood finish, you’ll need to cover the exposed edges with a matching wood trim. If you go this route, first shave off 1/8 in. from the front and side edges with a table saw to eliminate the slight bevel on each edge, then apply the matching trim. You can also cover the entire shelf with plastic laminate if you want a tough, hard-surfaced shelf.
You may want to change the depth of your shelves as well. Don’t exceed 9 in. or you’ll start to weaken the cantilever strength of the shelf. Feel free to make narrower or shorter shelves, as shown below.
The whole job will go a lot smoother if you paint the floating shelves before you install them. If you intend to paint the room, also do that before you install the shelves because it’s a drag to cut around each shelf with a paint brush. Just be sure to sand your wood door with 150-grit sandpaper before you paint. If the surface is still rough and porous after sanding, fill the pores by applying a paste wood filler (like Elmer’s wood filler) with a 3 in. drywall knife. Let it dry and sand the surface again.
These cheap floating shelves are permanent—they’re tough to remove! The glue not only makes the shelves strong but also impossible to remove without ruining them. You’ll have to cut them in place 2 in. away from the wall with a circular saw to expose the lag screws and then remove the cleats with a wrench. That’s unfortunate, but you can always make another set cheaply and easily. Regardless, you’ll want to learn how to make cheap floating shelves.
Check out this version of a DIY floating wall shelf. It features a secret drawer!
Step by Step Building Instructions & How to Hang Floating Shelves Without Brackets
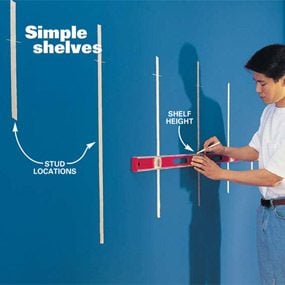
Photo1: Mark the shelf position
Trace the horizontal location for each shelf using a 4 ft. level as your guide. Use a stud finder to mark the locations of the studs and lightly press masking tape over each one. If you don’t have a string line, use a long straightedge and mark the wall with a pencil. Check your marks for long wall shelf with the 4 ft. level.
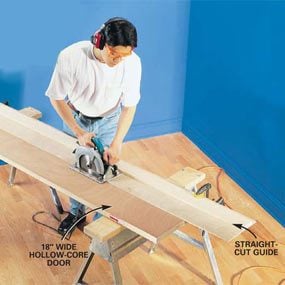
Photo 2: Cut the door
Cut the door blank lengthwise after clamping a straightedge guide to the door. Be sure to use a 40-tooth carbide blade for a smooth cut.
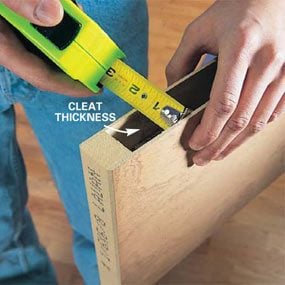
Photo 3: Measure to determine cleat thickness
Measure the space between the outer veneers of the door and cut cleats from a 2×4 to this thickness. Our measurement was 1-3/32 in. Use straight, dry lumber for cleats.

Photo 4: Screw the cleats for the french cleat floating shelf to the wall
Predill 1/4 in. dia. holes at the stud locations after you cut the cleats to length (the measurement between the end blocks of the door half). The cleat acts as a floating shelf mount. Hold the cleat to your line on the wall and drill into the stud with a 1/8 in. bit. Using a wrench, install one lag screw into each stud until it’s tight. Use 1/4 in. x 3-1/2 in. lag screws. Each floating shelf supports cleat must be straight as an arrow.
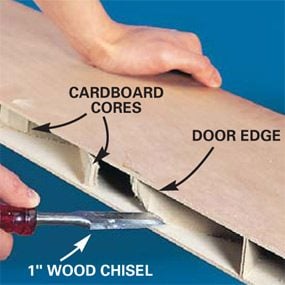
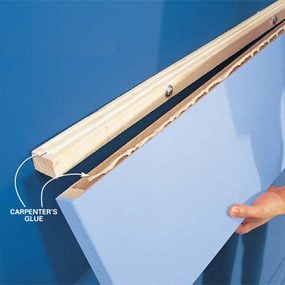
Photo 5: Scrape away the cardboard
Cut away the corrugated cardboard cores at least 1-1/2 in. from the cut edge. Scrape away the glue carefully without gouging the wood surface.
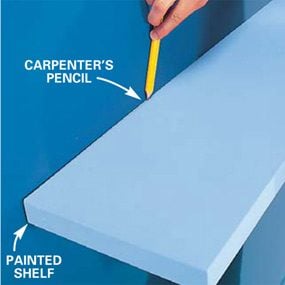
Photo 6: Test fit the shelf
Dry-fit the shelf to make sure the blank fits over the cleat. Check the backside of the shelf and scribe it to the wall if necessary. Use a block plane or sander to remove material from the back edge for a tight fit.
Follow Photos 1-8 for detailed building directions.
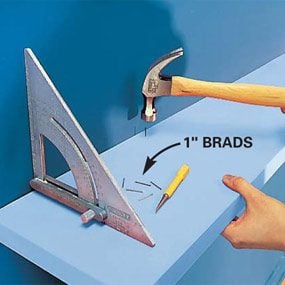
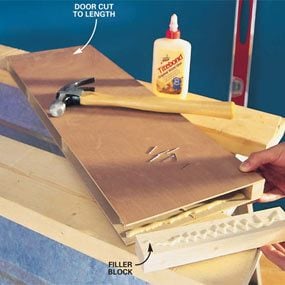
How to Build Shorter Shelves
Build shorter shelves by cutting the shelf to length. Glue a filler block flush with the end and nail each side with small brad nails.
Required Tools for this Project
Have the necessary tools for this DIY floating shelves project lined up before you start—you’ll save time and frustration.
- Circular saw
- Glue
- Hammer
- Level
- Socket/ratchet set
- Straightedge
- Stud finder
- Table saw
- Tape measure
- Wood chisel
Required Materials for this DIY Floating Wall Shelves Project
Avoid last-minute shopping trips by having all your materials ready ahead of time. Here’s a list.
- 1-in. brad nails
- 1/4-in. x 3-1/2-in. lag screws
- 18-in. wide hollow core door
- 2 x 4 x 8 ft.
- Masking tape
