
Build a Wall Niche
Updated: Feb. 22, 2023Beautiful, practical and less than $50
- Time
- Complexity
- Cost
- Multiple Days
- Intermediate
- $51–100
Wall Niche Overview: Cost, tools and materials
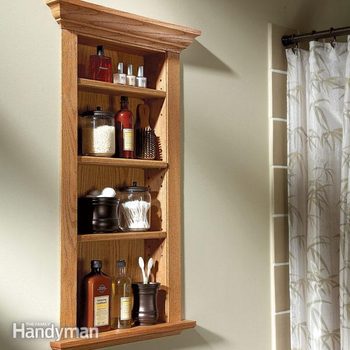
If you need to carve out more storage space in your bathroom, we’ve got the project for you. Bathrooms are notoriously cramped, so we designed this cabinet to fit inside a wall, where it won’t take up valuable space. We kept the width slightly narrower than the 14-1/2-in. stud space, so the cabinet will fit even if the studs are a little off center or bowed. We installed our cabinet in a bathroom, but it will work in any unobstructed wall cavity (more on that later).
In this article, we’ll show you how to build and install the cabinet. You can complete the project in just one weekend: Build and stain (or paint) it on Saturday, then stick it in the wall on Sunday.
Everything you need for this project is available at home centers. We used oak, which kept the cost to about $48. You’d pay $135 to more than $500 to buy a cabinet like this in a store.
To complete the project, you’ll need a miter saw, a circular saw or table saw, and a drywall saw. A brad nailer will make nailing fast and easy, but it’s not absolutely necessary (you can hand-nail instead). You’ll also need a router with a 1/4-in. round-over bit and a 1/4-in. Roman ogee bit to rout the shelves and sill nose.
Figure A: Wall Niche Details
Overall Dimensions: 21“ x 35“
Note: Figure A and a Materials List are available in pdf format in Additional Information below.
Step 1: Plan where to put the cabinet
We installed our cabinet next to the shower. This cabinet often fits nicely behind the bathroom door if there’s no other available space. But in most cases, it won’t work over the toilet because there’s a vent pipe in the wall.
Also avoid exterior walls because they’re filled with insulation. When choosing a location, check both sides of the wall for obstructions. A light switch or showerhead on the other side of the wall means the wall contains electrical cable or plumbing pipes. Some electronic stud finders can identify metal pipes and electrical cable in walls (but they’re not 100 percent reliable).
You could also choose a different room. The cabinet can store—or display—anything you like in the hallway, bedrooms or family room.
Step 2: Cut, rout and drill the parts
Get started by cutting all the pieces to size (refer to Figure A). Then run a router with a Roman ogee bit along the bottom front and both bottom sides of the sill nose. Use a round-over bit to rout the top and bottom front of the shelves.
Apply wood glue along the front edge of the sill, center the sill nose over it, then clamp the pieces together until the glue dries. Use a damp cloth to wipe away any glue that oozes out. If the sill and sill nose surfaces aren’t flush, sand the pieces flat with 80-grit sandpaper.
Lay out the sides for the shelf bracket holes, following Figure A. Drill the holes 3/4 in. from the edges and spaced 1 in. apart. Use a 1/4-in. drill bit (or whatever bit size is required for your brackets). You only need to drill the holes 3/8 in. deep (wrap tape 3/8 in. from the end of the drill bit to mark the depth), although it’s OK to drill all the way through the sides since the other side will be hidden inside the wall.
After drilling the holes, sand off the pencil lines remaining on the sides with 120-grit sandpaper.
Step 3: Assemble the cabinet
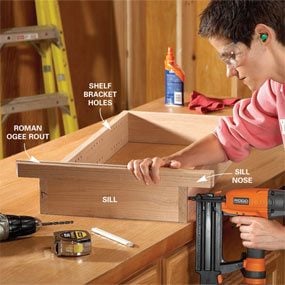
Photo 1: Assemble the box
Tack the cabinet box together quickly with a brad nailer. Then add screws for rock-solid corners. Glue the sill nose to the sill before assembling the cabinet.
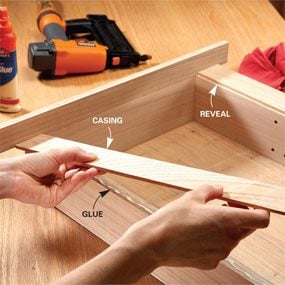
Photo 2: Glue and nail the casing
Add casing to the box using as few nails as possible. Three nails will hold the casing tight while the glue dries.
Use wood glue and 1-1/4-in. brad nails to assemble the cabinet frame (Photo 1), following Figure A. Then drill two 1/8-in. pilot holes in each corner and drive 1-1/2- in. screws to hold the corners together.
Run a thin bead of glue along the back of the entire frame, then set the back panel over it. Use the back panel to square the frame, then tack the panel into place with 5/8-in. brad nails.
Lay the cabinet on its back and fasten the casing (Photo 2). Three 5/8-in. nails will hold the casing until the glue dries.
Precision cuts are required for the molding corners to fit tightly. Measure along the bottom edge of the molding when you make the cuts (the top measurements will vary depending on the type of molding).
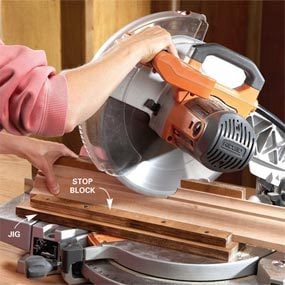
To get accurate cuts, build a simple jig to hold the molding in place during cuts. Screw or nail wood scraps together at a 90-degree angle. Set the crown molding upside down in the jig so the flat part on the back (the part that sits against the cabinet after installation) is flush against the vertical part of the jig. Fasten a stop block to the horizontal part of the jig along the top of the molding. Screw or hot-glue the jig to the fence on your miter saw so it won’t move.
Set the crown molding upside down in the jig and cut it (Photo 3). If the molding moves in the jig even a tiny bit during the cut, recut the molding or the corners won’t fit tightly together. To cut the molding returns (sides), use the jig to make the angle cuts, then cut the 90-degree angles.
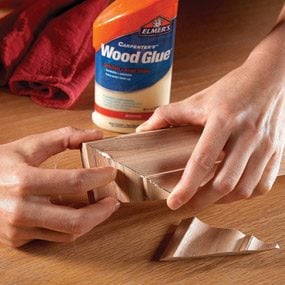
Nailing the mitered corners together won’t work—the molding will crack or move as you nail it. Instead, simply glue the corners (Photo 4). Cut the cove molding for the bottom of the cabinet in the miter saw (without using the jig). Glue the cove molding pieces together.
Glue and tack the assembled crown and cove moldings to the cabinet with 5/8-in. brad nails.
Step 4: Finish and mount the cabinet
Sand the entire cabinet with 120-grit sandpaper and wipe away the dust with a clean cloth. Then brush on a finish. We used Minwax Golden Oak stain followed by two coats of Minwax Fast-Drying Polyurethane.
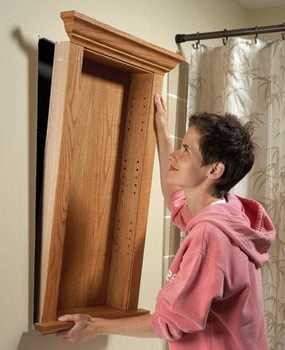
Then get the wall ready. Using a drywall saw, cut a small inspection hole in the wall where the cabinet will go. Shine a light in the opening and use a small mirror to look for obstructions in the wall. If you find electrical cable or plumbing pipe, patch the hole and move over a stud space.
Make an outline on the wall (between two studs) 1/4 in. larger than the cabinet back (so it’ll fit easily) and cut out the drywall with a drywall saw. Be careful not to cut into the drywall on the other side of the wall.
Finally, put the cabinet into the wall, level it, then nail through the stiles into the studs with 2-1/2-in. finish nails.
Additional Information
Required Tools for this Project
Have the necessary tools for this DIY project lined up before you start—you’ll save time and frustration.
- Brad nail gun
- Circular saw
- Drill bit set
- Drill/driver - cordless
- Drywall saw
- Flashlight
- Miter saw
- Router
- Stud finder
- Table saw
- Tape measure
Required Materials for this Project
Avoid last-minute shopping trips by having all your materials ready ahead of time. Here’s a list.
- Polyurethane finish
- Sandpaper
- See Materials List in "Additional Information"
- Stain
- Wood glue
