
Roof Removal: How To Tear Off Roof Shingles
Updated: Apr. 02, 2024
Conquer the toughest, dirtiest part of reroofing
A full day
Intermediate
$101–250
Introduction
Tear off shingle roofing, step-by-step, including safety tips, how to work quickly and efficiently, roofing disposal, and closing up the roof before rain.Tools Required
- Adjustable roof jacks
- Broom magnet
- Cat's paw
- Chalk line
- Extension ladder
- Garden fork or roofing shovel
- Hammer
- Hammer tacker
- Work gloves
- Pry bar
- Push broom
- Roof harness
- Safety glasses
Materials Required
- #30 roofing felt
- Ice and water barrier
Overview: Savings, Planning and Timing
Don’t be intimidated by the toughest part of re-roofing—the tear-off. In this article, we’ll show you how to remove asphalt shingles quickly, so you can move on to the more rewarding part of the job—laying new shingles. We’ll also show you how to “button up” the roof by applying new ice and water barrier and felt paper.
Before you take on this big chore, get a bid from a contractor to make sure the savings are worth the strain. The cost of professional roof tear-off varies widely, depending on where you live, the style of the roof and how many layers of shingles it has. In most situations, you can expect to save at least $1,000 by doing it yourself. In some situations, you’ll save $3,000 or more.
A solid, leak-free roof with good gutters is your home’s best defense against the elements. Arm yourself with 25 hints for fixing roof and gutter issues.
Before starting the tear-off, get a building permit and check local building codes. Keep the time between the tear-off and reshingling to a minimum, and wait until clear weather is forecast. Although the underlayment should protect against water infiltration, the felt paper can easily tear or blow loose, making your home vulnerable to rain damage.
If you’re having a contractor apply the new shingles, coordinate the tear-off so the new shingles will be installed right away. If you’re tackling everything yourself, work in sections. Rip the old shingles off one area, then reshingle before moving on to the next section.
Editor’s Tip: If you’ve got damaged shingles, learn how to replace them effectively.
Project step-by-step (14)
Prep for the Tear-off
Doing a little prep work on the ground will keep nails and other debris out of the grass and flower beds, reduce cleanup time and preserve the landscaping. Place plywood over the air conditioner (make sure the power to it is turned off) and over doors or windows near the spot where you’ll be tossing the debris off the roof. Then cover plants, shrubs, grass and other areas around the house with inexpensive tarps to vastly simplify cleanup.
Rent a trash container (a 20-cu.-yd. size will handle most roofs and costs about $200). If possible, have it dropped next to the house so you can easily throw old shingles directly into it from the roof. And be sure to have the proper roofing tear off tools.
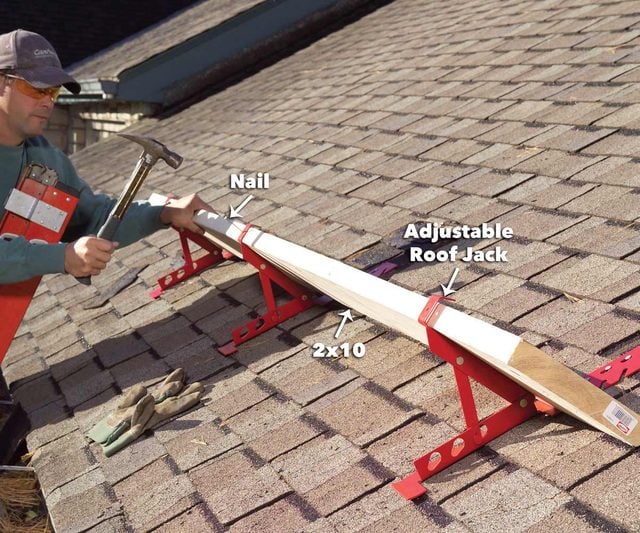
For safety and better footing, nail the roof jacks below the area you intend to strip first. Buy the adjustable type designed to hold a 2×10 board. Space the jacks no more than 4 ft. apart. Nail roof jacks to the rafters with at least three 16d nails through the roof sheathing and then nail on a 2×10 to prevent you—and the shingles—from sliding off the roof.
Wear a Safety Harness
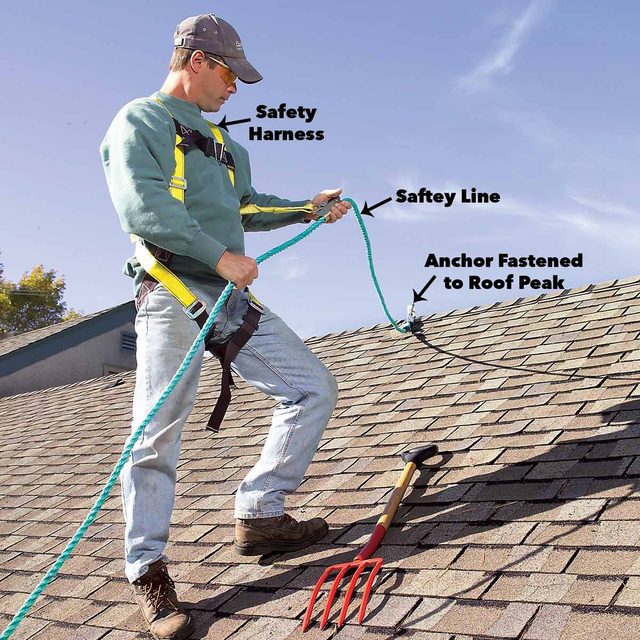
Use a safety harness system to prevent falls. Wear shoes with soft rubber soles for a good grip and long pants to protect against the skin-scraping shingles. Just to reiterate, working on a roof is dangerous, so be sure to take these precautions:
- Set roof jacks (about $6 each) and a 2×10 about 3 ft. up from the roof edge.
- Wear a safety harness (about $150), which you can buy at safety equipment stores and some roofing and home centers.
- Wear soft rubber-soled shoes for traction, long pants to protect your legs, work gloves, safety glasses and have the proper roofing tear off tools.
Strip the Roof, Start at the Peak Using Roofing Tear Off Tools
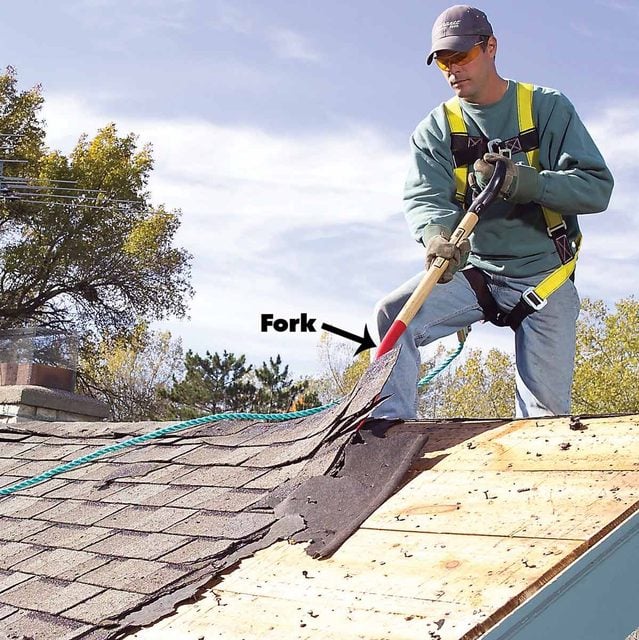
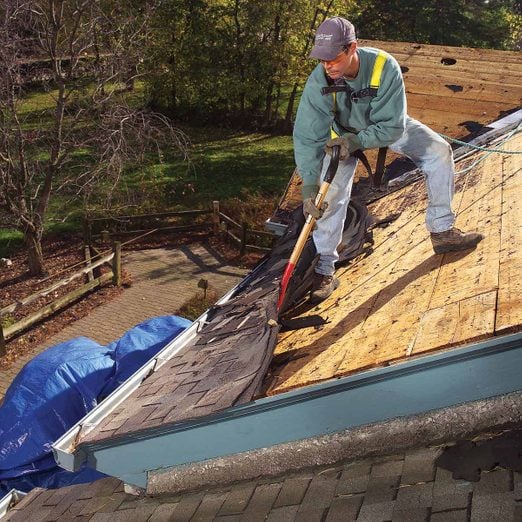
Start the tear-off at the section farthest from the trash container. Standing at the peak, use a garden fork or a specially notched roofing tear off shovel to tear away the ridge caps and the top courses of shingles.
Some roofers prefer forks because they don’t get caught on nails, making it easier and faster to remove the shingles. Others like the tear off shovels because they pull out more nails with the shingles. Work the fork under the ridge caps, prying them loose. As they come loose, allow them to slide down to the roof jacks. Or, if they don’t slide down the roof, carry them to the edge of the roof and throw them into the trash container.
Work Downward
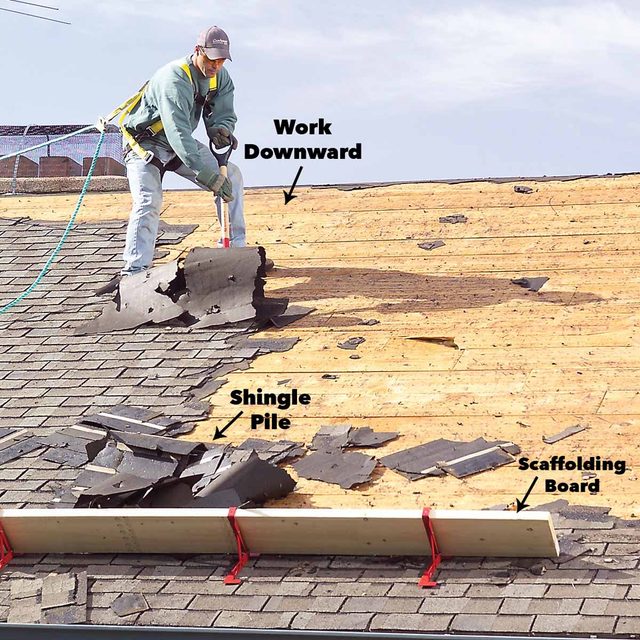
Once the ridge caps are gone, slide the fork under the shingles and felt paper and pry the shingles up. Some nails will come up with the shingles. Others won’t. Ignore them for now.
Remove shingles in a 2- to-3-ft.-wide section as you work down the roof. The shingles will roll up like a ball in front of the fork. Push the shingles down to the roof jacks. Continue tearing off the shingles and underlayment until you reach the roof jacks, then start over at the top of the roof.
Toss From Roof to Trash Container
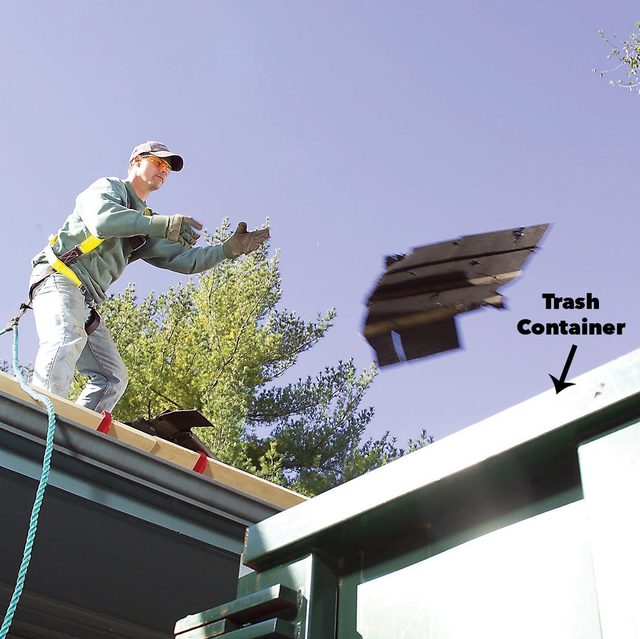
As the old roofing material piles up at the roof jacks, carry it to the edge of the roof and toss it into the trash container below. If you couldn’t get the trash container close to the house, throw the shingles onto a tarp on the ground. Make the pile on a flat area away from flowers and shrubs.
Shingles are heavy. Dispose of the shingles before the pile gets too large and they slide off the roof. They usually come off in clumps. If you’re peeling off two or more layers of shingles, even a small section will be heavy. You may have to pull the shingles apart to make them light enough to carry. Rolling the shingles and felt paper into a ball will also make them easier to handle.
Evaluate Existing Flashing
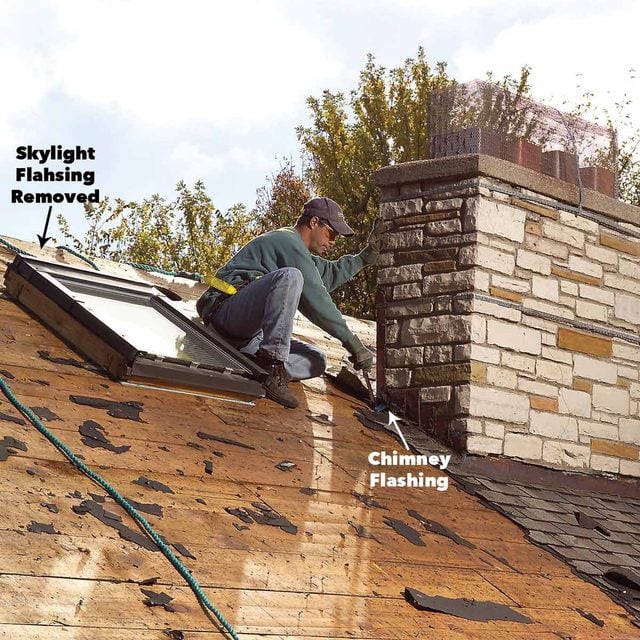
Slow down and work with care when you’re next to chimneys, skylights, dormers or an exterior wall. While it’s usually best to replace metal flashing, sometimes it’s better to preserve and reuse difficult-to-replace types if they’re in good shape. But if you see rust and cracks in the metal, replace it. Metal in that condition won’t last as long as your new roof.
If you’re keeping the old metal flashing, carefully remove nails and bend it upward off the shingles with a pry bar. Be careful not to damage the flashing. Skylight and chimney flashings are often worth saving if they’re in good condition. Once it’s out of the way, pull any nails and remove any shingles and underlayment that are underneath. Before you move ahead, get to know about synthetic underlayment.
Tip: Heavily tarred areas usually signal a Band-Aid fix for bad flashing underneath. Replace all this flashing.
Work Around Step Flashing
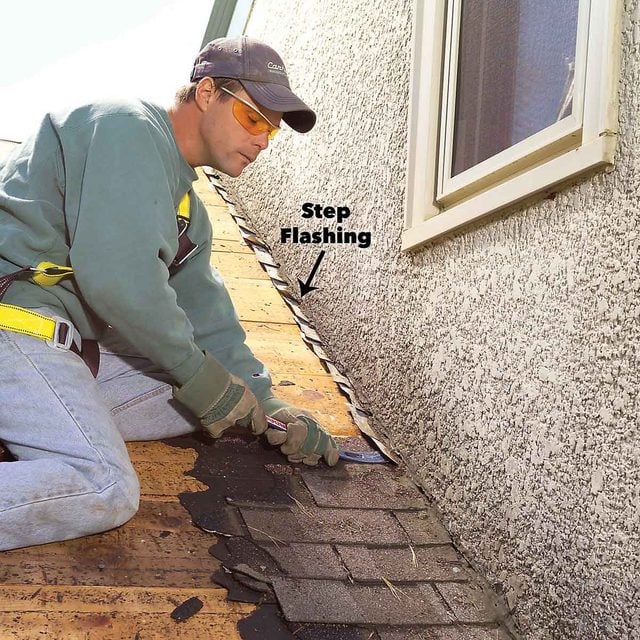
Pull nails from any step flashing (flashing that’s interwoven with the shingles, where the roof abuts a wall) you want to save, bend it up slightly and pull out the shingles from underneath.
Tear-Off Shingles Along the Edge Using Roofing Tear Off Tools

After stripping the shingles down to the roof jacks, remove the jacks. Work the remaining courses loose with a fork or tear off shovel, but don’t pry them completely free or they’ll slide off the roof.
Loosen the shingles all along the eaves. Then pull off the shingles with your hands, carry them across the roof to the trash container location and throw them in.
Some roofs have self-adhering ice and water barrier installed along the roof edge. This asphalt membrane usually pulls up with a fork or shovel, although it may require some scraping. If it refuses to come loose, simply leave it and install your new underlayment over it.
If you don’t have time before dark to clean and apply felt, nail down plastic tarps on your roof for the night.
Trash Old Valley Flashing
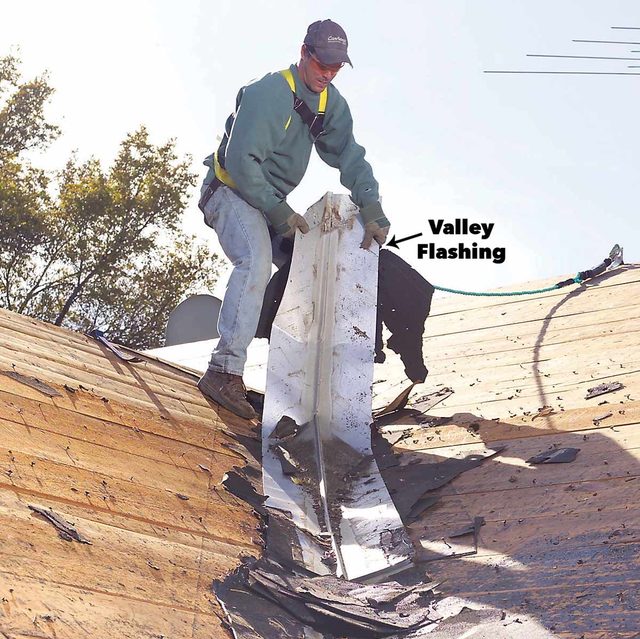
Pry the flashing in valleys and over plumbing vents last using a fork. Valley flashing is never worth reusing. This flashing usually has the same life span as the shingles, so plan to replace it.
Starting at the top of the valley, slip the fork or a flat bar under the flashing and pry the metal edges loose. Continue working down the valley, lifting up the flashing.
Remove Vent Flashing
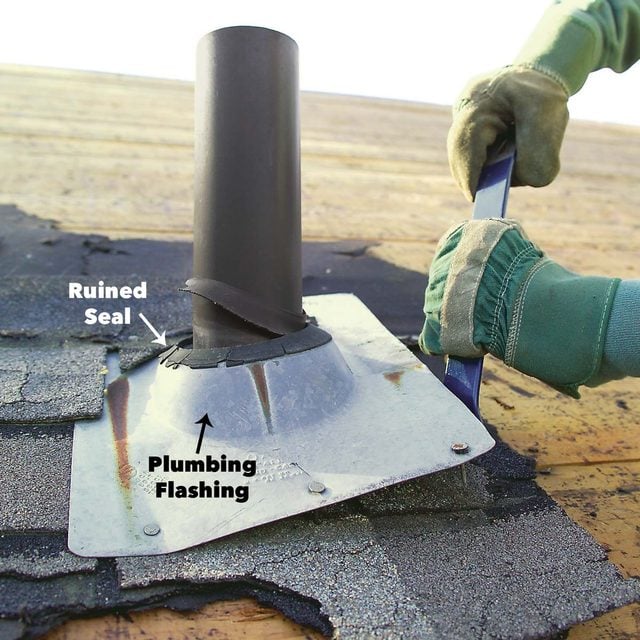
Pry flashing loose around vent pipes. Use a pry bar rather than a fork to avoid damaging the pipes. Never reuse vent flashing.
Clean off the Roof
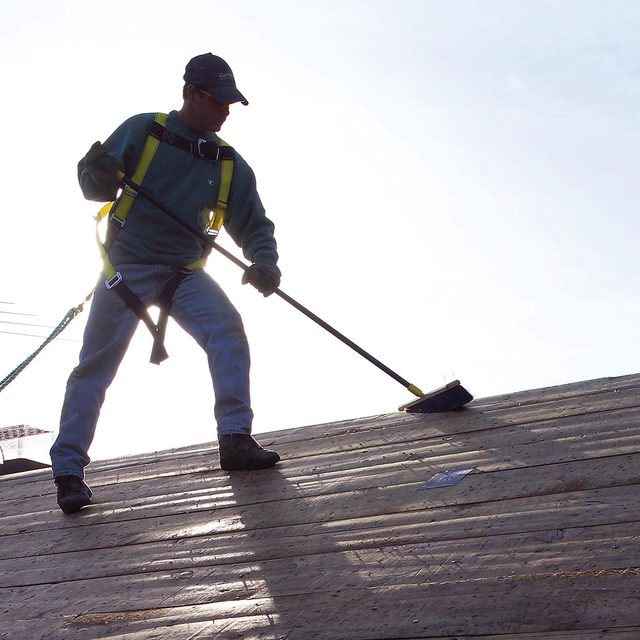
Once a section has been completely stripped, go back and pull out protruding nails. Then use a large broom to sweep the roof deck clean. Walk carefully. The shingle granules make the sheathing slippery. Watch for any nails you missed earlier and pull them.
When the roof is clean and bare, inspect the sheathing for damage. Rotted areas and broken boards are the most common problems. Cut out and replace damaged sections as needed. Be sure to use new sheathing that’s the same thickness as the old. When removing a damaged section, center the cuts over the rafters so you can nail the new sheathing to the rafters. Also, keep an eye out for loose roof sheathing that needs renailing.
Button Up the Roof and Final Clean-Up
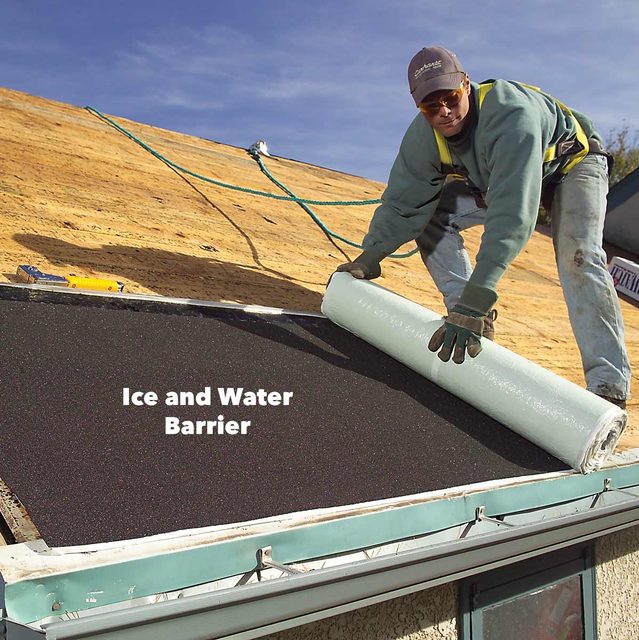
Cover the roof right away to protect against rain. Buttoning up the roof is the final prep step before shingling. It consists of installing ice and water barrier and 30-lb. asphalt-saturated felt. This underlayment acts as a temporary weather barrier to keep rain out. But it won’t stop heavy rain and wind, so once you start a section, always try to flash and shingle it by the end of the day.
Ice and water barrier is used at roof edges and other vulnerable areas. To install it, snap a chalk line 36 in. from the edge of the eaves. If you have gutters, you’ll want the ice and water barrier to cover all of the gutter flashing that’s on the roof.
Starting at the rake edge of the roof, align the ice and water barrier with the chalk line. Tack it at the top with staples every few feet to hold it in place. Once the entire section is tacked along the chalk line, lift up the bottom part, peel off the backing, then let it fall back into place. The ice and water barrier will immediately stick to the roof.
Flip the top part of the ice and water barrier back over the bottom section (the staples will easily pop out), peel off the backing, then set it back into place on the roof. Work carefully to avoid wrinkles. They’re a hassle to get out. Move on to the next section of roof edge, overlapping the vertical seams of the ice and water barrier by 6 in.
Add a second course above the first, if required, overlapping the first by 4 in. Also lay the ice and water barrier in valleys and around chimneys, skylights and other roof penetrations. Then unroll and staple down 30-lb. felt over the rest of the roof. Use plenty of staples (5/16 in.) to make the felt safer to walk on and keep it from blowing off. This is where the hammer-type stapler (about $30) pays off. You can drive a dozen staples in seconds.
Clean Up the Area
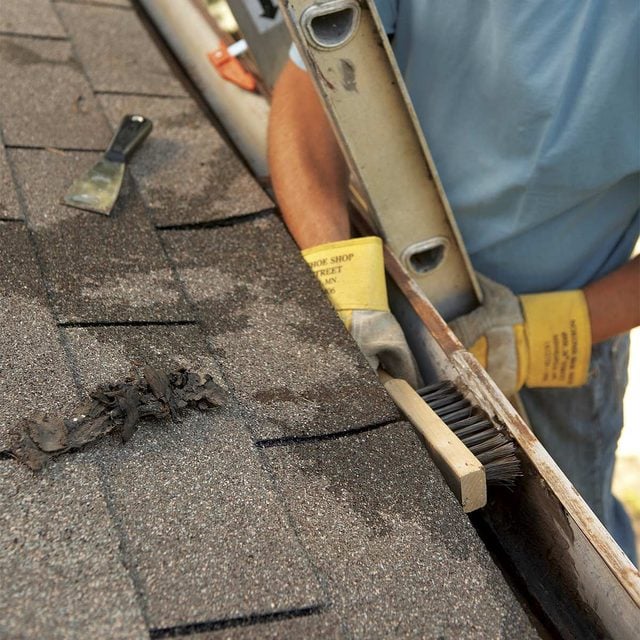
Before climbing off the roof, clean any debris out of the gutters. There will be nails and a lot of granules from the shingles that you don’t want pouring out of your downspouts the next time it rains.
Run a broom magnet over the yard to pick up stray nails. You can rent the magnet at tool rental stores for less than $20. Make several passes in different directions. Regardless of how carefully you worked, nails have a way of ending up in the lawn.
When Are Shingles Worn Out?
The most obvious sign that your roof needs to be replaced is a leak. Since you don’t want to wait until that happens, inspect the shingles every year. Most asphalt shingles have a life span of 20 to 25 years, although they can wear out and need to be replaced in as few as 15 years, especially on the south side of the house.
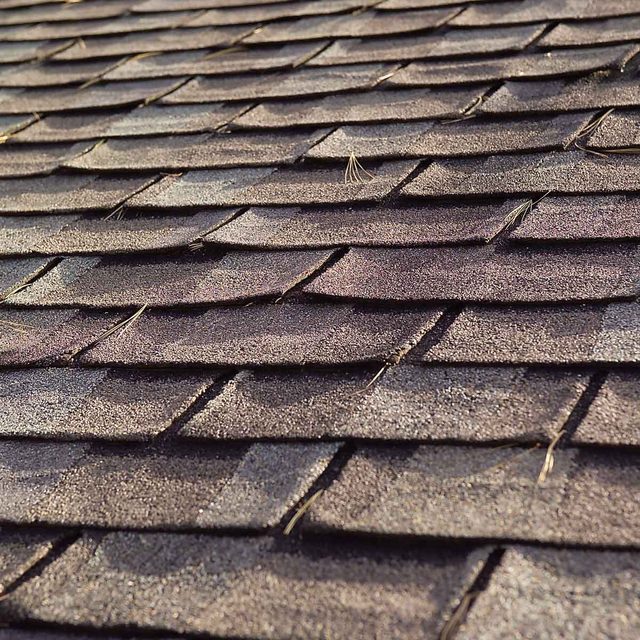
Signs that shingles are failing include cupping along the edges (the edges curl up) and extensive cracking. In severe cases, the shingles will completely deteriorate. Buckling shingles (the shingles develop a bow and lift up from the roof) are an indication that moisture is getting underneath them. If large sections of shingles are coming loose and falling off, it’s time for a new roof.
Shingles typically show signs of wear along the edges first. Rounded or curled corners are early warnings that the roof is ready or nearly ready for new shingles.
You can stop leaks yourself-no experience necessary. We show you how to track down and fix the most common types of roof leaks. Most leaks take only minutes to repair.