
What to Know About Installing a Washable Wallpaper Backsplash
Updated: Jul. 25, 2023
Installing a tough vinyl wall covering is easier than paper.
Install tough, cleanable vinyl wallpaper to create a handsome backsplash in your kitchen. Even expensive material won’t cost much since you’ll need very little.
On This Page
Install a Vinyl Wall Covering on a Backsplash
Cut out windows with scissors. Make “relief cuts” with sharp scissors until the paper lies flat against the wall. Then use a razor to make the final cuts by following the contours of the molding. Glue corners tight as vinyl won’t stick to itself. To keep corner seams secure, overlap the corner by 1/2 in. and brush the overlapped section with vinyl-to-vinyl adhesive before pressing the next piece into place.
A sharp blade is critical for trimming. Vinyl wallpaper dulls razor blades quickly, so each blade is good for only one or two cuts. Wallpaper razor knives give you more control than utility knives.
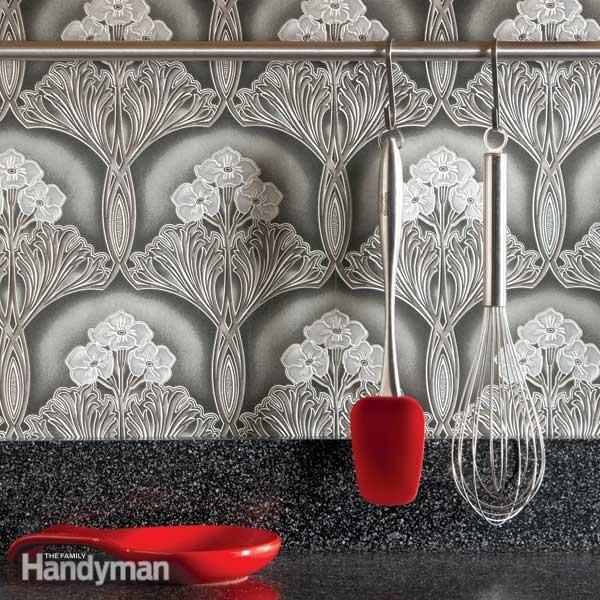
Washable Wallpaper for Kitchen Backsplash
Wallpaper as a durable kitchen backsplash? You bet. We bought “splash-proof” vinyl wallpaper (in the “Wallis” pattern) from grahambrown.com, which offers a variety of wallpapers designed for kitchens and baths. Splash-proof wallpaper resists moisture and humidity and stands up to scrubbing.
Tough Paper is Easy to Hang
We’re not going to show you everything you need to know to hang wallpaper. Instead, we’re going to show you techniques that are unique to hanging vinyl.
The great news is that vinyl wallpaper goes up easier than other wallpapers because it’s not as flimsy. Most vinyl wallpapers require a premixed vinyl paste (read the manufacturer’s instructions). We used a heavy-duty clay-based paste available at any wallpaper store. Before starting, make sure your wall is primed with a primer/sealer for vinyl wallpapers.
Set a plumb line with a level to start your first sheet. On small pieces, you can use a paintbrush to apply the paste to the back of the wallpaper. “Book” each piece for five minutes before hanging it. Booking allows the paper to relax and return to its original width before it goes on the wall.
Required Tools for this Project
Have the necessary tools for this DIY project lined up before you start—you’ll save time and frustration.
- Level
- Paintbrush
- Straightedge
- Wallpaper smoothing brush
- Paste applicator
Scissors
Razor knife - Painting supplies (if the wall requires priming).
Required Materials for this Project
Avoid last-minute shopping trips by having all your materials ready ahead of time. Here’s a list.
- Vinyl paste adhesive
- Vinyl wall covering