
How to Lay Carpet Squares
Updated: Jun. 25, 2019Lay a high-quality carpet floor in less than a day
- Time
- Complexity
- Cost
- A full day
- Beginner
- Varies
About modular carpet
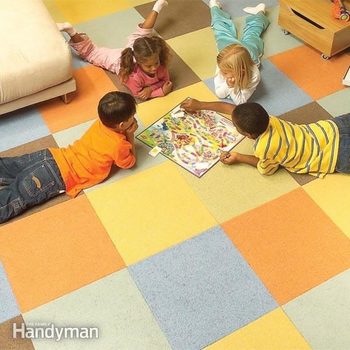
If you think installing carpet is time consuming and complicated, think again. Modular carpet, aka carpet squares, aka peel and stick carpet squares, is one of the easiest floor coverings to install. You simply lay the squares on the floor; adhesive strips and the carpet’s heavy backing hold them in place. You can finish most rooms in a day, if not an afternoon. And you can use it anywhere. You can add whimsy to a kids’ playroom or create an elegant look in a formal dining room.
Or, if you don’t need wall-to-wall carpet, these squares make great area rugs. Cleaning, replacing or swapping squares is easy too. They just pull right up—even after they’re adhered. You can clean off stained squares in the sink or replace them. Is that kid-friendly, or what?
Modular carpet is slightly more expensive than most conventional carpets, but a carpet pad isn’t required and you save by installing it yourself.
In this article, we’ll show you how to install the carpet and cut it to fit around obstacles such as doorjambs. Installation is nearly goof proof— you can easily pull up misaligned squares and reposition them. And you won’t need any specialty tools. A tape measure and chalk line to snap your baselines, and a carpenter’s square and utility knife to cut the squares will get the job done.
Plan your pattern and order the carpet
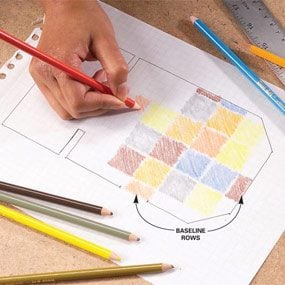
With practically unlimited carpet options, the hardest part may be choosing a design with peel and stick carpet squares. You’ll have to select the brand you want before you start, since the brands have different sizes of squares. Then sketch the room to scale and use colored pencils or markers to draw in the squares (Photo 1).
Arrange your layout to avoid leaving narrow strips along the walls. They call attention to any wall not perfectly square. If possible, allow at least 4-in.-wide sections of carpet along each wall. Your final drawing will tell you how many squares of each color you’ll need.
Determine the room’s square footage by multiplying the length by the width (round up measurements to the nearest foot). For irregular-shaped rooms, divide the floor into individual sections, calculate the square footage of each, then add them together. Order the carpet, adding an extra 10 percent for waste.
Assess your existing floor
You can lay carpet squares directly over concrete, plywood and OSB or particleboard subfloors, as well as over vinyl, tile, laminate and some hardwood finished floors. One caution: The backing may eventually discolor some wood floors. If you later decide to remove the carpet, you’ll have to refinish the wood. Conduct a moisture test (kits available at home centers) before carpeting a concrete floor. If the moisture content is too high, you can always seal the concrete, then install the carpet. Let new concrete cure for at least 90 days first. Any wood subfloor or existing floor has to be solid, dry and securely fastened. Screw down any loose areas of floor and replace any water-damaged sections. This is also an ideal time to find and fix any floor squeaks.
Install the baseline rows for peel and stick carpet squares
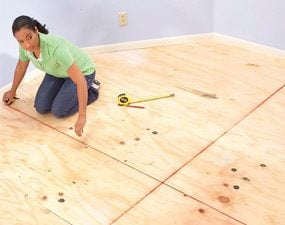
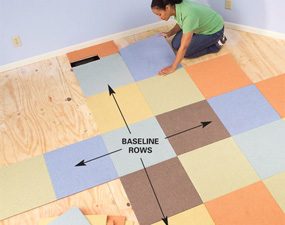
Photo 2: Layout lines
Clean the floor, then snap chalk lines parallel to the walls to create perpendicular baselines.
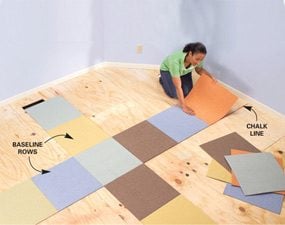
Photo 3: Starting rows
Lay carpet squares along both baselines, starting at the center. Remove the protective film, butt the squares tightly and adhere them to the floor.

Prepare the floor by sweeping or vacuuming up all dust and grit. Then, using your sketch as a guide, pick the spot for the base rows (Photo 2). Keep them as close to the center of the room as possible, since they guide the rest of the installation.
Measure and snap your perpendicular baselines for those rows (Photo 2). Lay carpet squares (without adhesive) along both baselines to test the layout. If you end up with gaps less than 4 in. next to walls, shift the layout and snap new baselines.
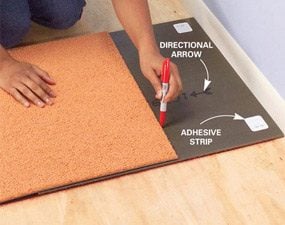
To install the squares, start where the baselines intersect and work outward (Photo 3). Keep the directional arrows (Photo 4) on the back of the squares pointing in the same direction.
Peel the film off the adhesive strips and butt each square tightly against the preceding one. Don’t adhere the last full square until you cut the final square to size (Photo 4). After you cut the square, add two adhesive strips so there’s one in all four corners. Extra strips come in the box. Then adhere the final pieces.
You only have to adhere the baseline rows and the squares on both sides of the baselines and along the perimeter of the room. The others stay put thanks to their heavy backing. (No, they don’t pop out when you’re vacuuming!)
A utility knife works OK for cutting the squares, but we prefer a carpet knife because it’s a bit more accurate. Use a sharp blade and make several shallow passes. The backing allows for a crisp cut that won’t unravel. Cut the squares on a smooth surface, like hardboard. Avoid cutting on a plywood subfloor since the wood grain can pull the blade off line.
Fill in the quadrants
With the base rows in place, start back at the center and fill in the quadrants using a “step” pattern (Photo 5). Simply press each square snugly against adjacent squares, keeping carpet strands out of the joints. You can easily change out squares for a more pleasing design, even if they’re adhered. If the adhesive residue remains, remove it with rubbing alcohol.
Fitting around doorjambs and corners
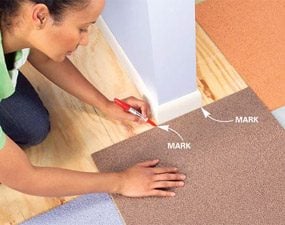
Photo 6: Mark cuts in place
Place a carpet square right side up against an archway wall, aligning it with installed squares. Mark the wall location on the edges of the carpet.
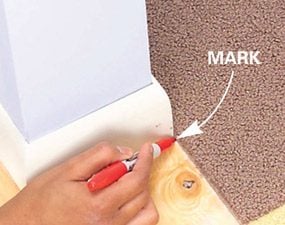
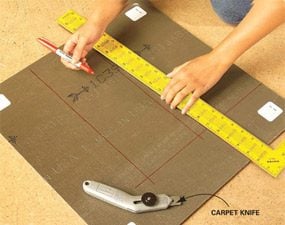
Photo 7: Cut on the back
Flip the square over and use a marker and a carpenter’s square to draw the wall shape from the marks you just made. Cut out the opening.
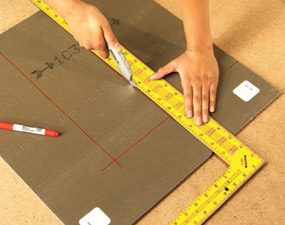

Photo 8: Slide into place
Install the square against the archway wall. Fine-tune the cut, if necessary, so the square fits snug.
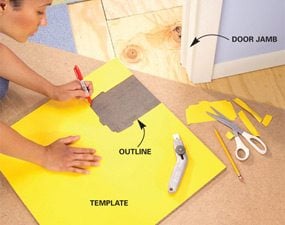
Photo 9: Use templates for tough cuts
Make a full-size template for doorjambs with complicated trim and doorstops. Transfer the outline onto a carpet square, then cut the square.
Cutting carpet to fit around outside corners, archway walls and doorjambs is the most challenging part of the job. Start by setting a square against the face of the archway wall, overlapping and aligned with the previously installed square (Photo 6). Mark the carpet on each side of the wall, then place the same square against the side of the wall and mark it.
Using the marks, outline your cut with your carpenter’s square as a guide (Photo 7). It’s best to slightly undercut the mark, then fine-tune as needed for a tight fit. This same method works for marking and notching squares to fit around corners.
To fit carpet around odd-shaped obstacles, such as doorjambs with angular trim, first make a paper template. You’ll need to make several measurements, transfer them to paper, then cut out the opening. It’ll probably take several tries before you get a good fit. Once the template fits, trace the outline onto the back of a carpet square and cut it (Photo 9).
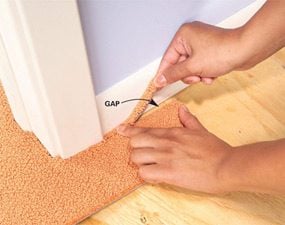
Don’t worry if the cut isn’t perfect and you end up with a gap—carpet squares are very forgiving! Just cut a small sliver of carpet from a scrap piece and tuck it snugly into the gap (Photo 10).
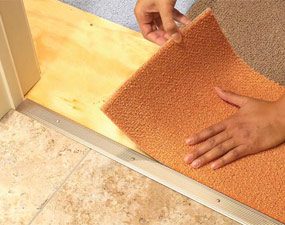
Since the carpet won’t unravel, threshold strips aren’t required. Instead, you can simply butt against the flooring in the next room or the existing threshold (Photo 11).
After all of the squares are installed, vacuum the floor. It’s inevitable that something will eventually spill on the floor, but carpet squares are easy to clean. If the spill doesn’t wipe up, remove the square and rinse it with water in the sink. Let it dry and replace it in the floor. For squares with permanent stains, just replace the old square with a new one.
Required Tools for this How to Lay Carpet Project
Have the necessary tools for this DIY project lined up before you start—you’ll save time and frustration.
- Chalk line
- Framing square
- Tape measure
Required Materials for this How to Lay Carpet Project
Avoid last-minute shopping trips by having all your materials ready ahead of time. Here’s a list.
- Carpet squares
- Graph paper
- Stiff paper for templates
