
How to Strip Wire
Updated: Apr. 21, 2023Tools and tricks to help you master the basics of how to strip wire
How to Strip Wire Overview
Safe, durable electrical connections begin with clean, accurate wire stripping. You have to remove the outer layer of plastic without nicking or slicing the insulation or wires underneath; otherwise, your connection might break or an electrical short might occur.
In a pinch, you can strip almost any wire or cable with nothing more than a sharp pocket knife or utility knife. We’ll show you how to strip wire safely and carefully. But for fast, accurate stripping, we recommend the specialized stripping tools we demonstrate in this article. They’re affordable and easy to use, and they produce high-quality results. Be sure to select the wire stripper labeled for the type of wire you’re working with.
All the tools we show are available at home centers and electrical supply stores. Buy each as you need it, and you’ll soon have exactly what you need for any home wiring task.
How to Strip Wire: Electrical cords
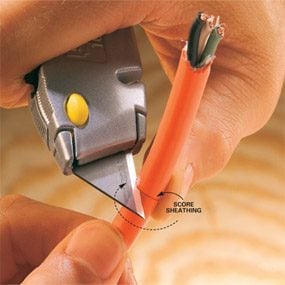
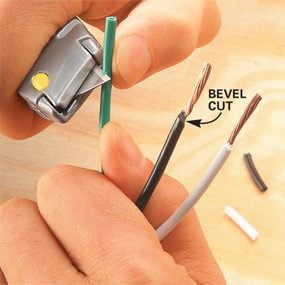
Photo 1: Score the jacket
Score a circle around the cable jacket, but don’t cut all the way through the plastic. This technique may look dangerous, but it’s safe as long as you apply very light pressure with the knife and keep your thumb on the opposite side of the cord. Carefully guide the knife around the cable until you reach your starting point.
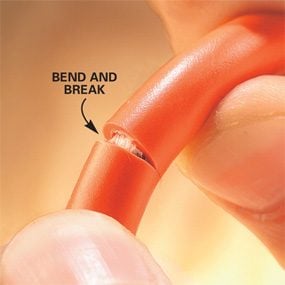
Photo 2: Bend and break
Bend the cable at the scored line to break the plastic covering. Bend it the opposite way to tear the other side and slide it off. Inspect the insulation on the wires underneath to make sure the blade didn’t nick them. If you see slices, cut off the cable and try again.
A knife works best for stripping sheathing from cords. It takes a sharp blade, a steady hand and concentration to control the depth of the cut precisely. But once you master the technique, you’ll be surprised how quickly and accurately you can remove cord sheathing.
We’re showing the technique on a cord, but it also works on plastic-sheathed cable. Practice with the blade extended (Photo 1) or barely visible to see which technique works best for you.
When it comes to stripping individual wires, a wire stripping tool (Photo 3) is faster and more accurate, but in a pinch you can use a knife (Photo 4). With all of these techniques, the key is to control the depth of the cut to avoid cutting or gouging the conductor.
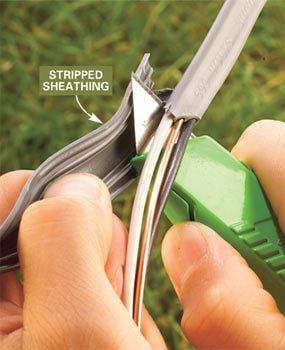
Plastic-sheathed cable
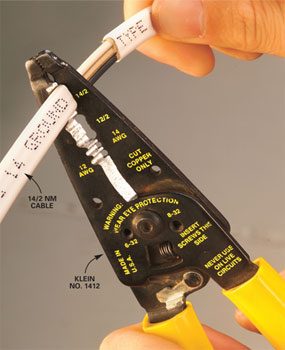
Photo 1: Strip sheathing
Align the plastic-sheathed cable with the notch that matches the wire gauge you’re using—either 14/2 or 12/2—and squeeze down to cut the sheathing. Slide the sheathing off to expose the wires underneath.
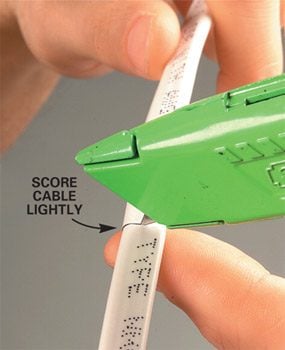
Photo 2: Alternative knife method
Score the plastic sheathing with a sharp knife if you don’t have a special tool. Don’t cut all the way through the plastic. Apply very light pressure with the knife and keep your finger on the opposite side of the cable. Bend and break the sheathing and slide it off.
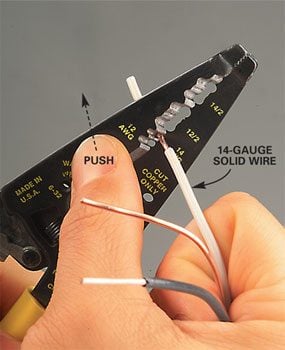
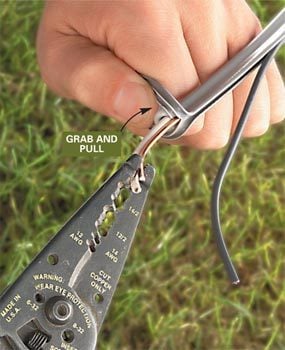
Photo 3: Pull conductors through stripper
Strip individual conductors by lining them up in the correct notch and squeezing the stripper to cut through the plastic. Keep the stripper perpendicular to the wire. Tilting the stripper can cause nicked wires. Push against the stripper with your thumb to slide the insulation from the wire.
Stripping plastic-sheathed (NM, for nonmetallic) type cable is a two-step process. First you remove the outer plastic sheathing. Then you strip the individual conductors. There are many methods to remove the plastic sheath, ranging from a simple knife technique (Photo 2) to special tools. The stripping tool we’re using is unique because it combines both sheathing removal and wiring stripping in one tool (Photo 1) and works perfectly for both tasks. It’s well worth the price if you do any amount of home wiring. Otherwise, buy a less expensive, general purpose stripper, and use a knife (Photo 2) or other method to remove the outer sheathing.
Underground cable
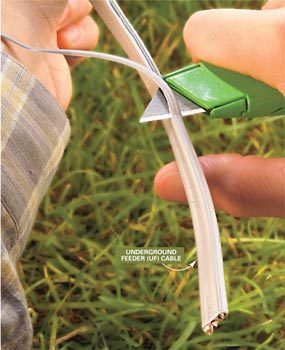
Photo 1: Peel an edge
Peel the plastic sheathing from the wires underneath with a sharp utility knife. Slide your thumb along the underside of the wire while you pull the knife along the top to remove a thin slice of plastic. This technique takes practice. If you cut through the insulation on the wire underneath, cut off that segment of cable and try again.
A special type of plastic-sheathed cable called UF (underground feeder) requires a slightly different technique. Since the sheathing surrounds each conductor, you can’t just score it and slide it off. Photos 1 – 3 show how to strip UF cable.
This technique on how to strip wire requires practice to master. Develop your skill before trying it on a real project. The key to success on how to strip wire is controlling the depth of the cut by keeping the angle of the blade low, almost parallel with the cable. When you get it right, you’ll be able to feel the blade riding along the top of the insulation of the wire underneath. Remember, if you gouge the insulation or nick the wires inside, cut off the cable at that point and try again.
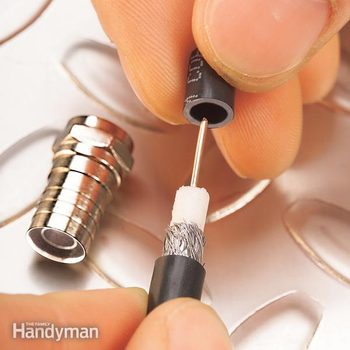
Coaxial cable
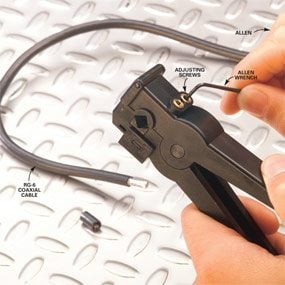
Photo 1: Adjust cutter depth
Test cutter depth on a cable scrap. Adjust the two cutting blades one at a time to fine-tune the depth of the cut. Turn the adjusting screws clockwise with the Allen wrench (included with the tool) to make a deeper cut.
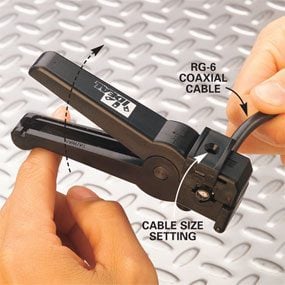
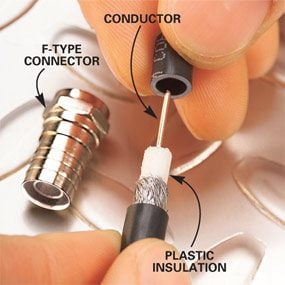
Adding F-type connectors to coaxial cable requires a two- or three-step strip on the end of the cable, depending on the connector. With care, you can make the strip with a utility knife, using the technique shown in Photo 1 and a regular wire stripper. But the dedicated tool we show here makes the job quick and accurate. Read the packaging to match the stripper to the type of coaxial cable you’re using. The strippers you find in home centers work on common household coaxial cables.
Read the lettering on the sheathing to determine whether your coaxial cable is RG-58, RG-59 or RG-6, and adjust the slide on top of the cutter to match your cable type. Make a practice cut and adjust the blades if necessary (Photo 1).
Sheathed communication wires
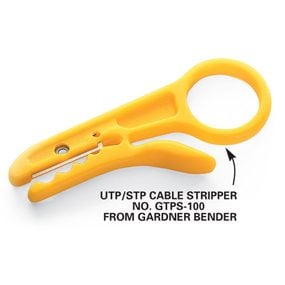
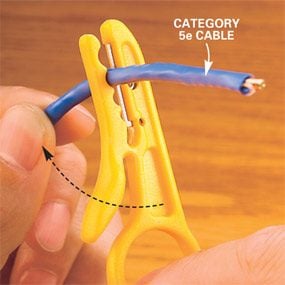
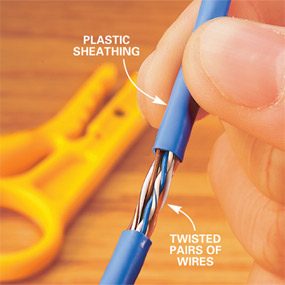
With high-speed Internet lines and household computer networking becoming more common, you may soon find yourself installing new communication cables that can handle the greater bandwidths. Here’s an inexpensive tool that makes short work of removing the outer sheath from these small cables without nicking the conductors inside. The cable size notches aren’t labeled, so you’ll have to experiment to find the one that works.
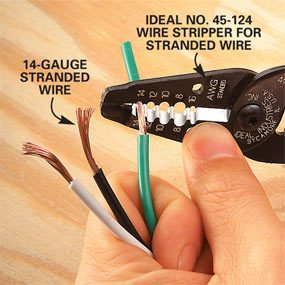
Thin wires
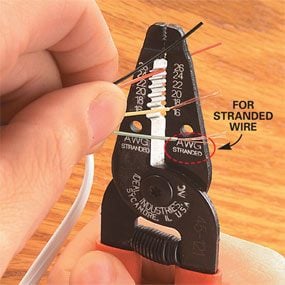
Tiny communication wires are tough to strip without nicking and weakening them. The key is to match the stripper to the wire you’re using. For example, you may be surprised to discover that there’s a special stripper for stranded wire (Photo 1) that’s just slightly larger than the same size solid wire. There are also strippers for those tiny little wires you find on doorbells and telephone lines. Read the packaging before you buy to find the stripper that’s right for your job.
