How to Run an Outdoor Electrical Wire
Updated: Dec. 07, 2023
The easiest way to bring electricity to a shed, garden or lamppost
Our editors and experts handpick every product we feature. We may earn a commission from your purchases.
A full day
Intermediate
$101–250
Introduction
Learn how to run electrical wires outside underground to reach sheds, lights, patios and other locations, following safe wiring practices.Tools Required
- 1-in. drill bit
- 4-in-1 screwdriver
- Drill bit set
- Drill/driver - cordless
- Hacksaw
- Pipe wrench (2)
- Pliers
- Spade
- Tape measure
- Torpedo level
- Wire stripper/cutter
Materials Required
- Duct seal
- Electrical boxes
- Electrical tape
- EMT (electrical metallic tubing)
- Fish tape
- Fittings (connectors and LBs)
- GFCI
- Leather gloves
- Mattock
- Pipe bender
- RMC (rigid metal conduit)
- Stranded electrical wires
- Switch
- Two (white and black) conduit straps
- Wire connectors
Overview: Project Scope, Special Tools, Materials and Costs
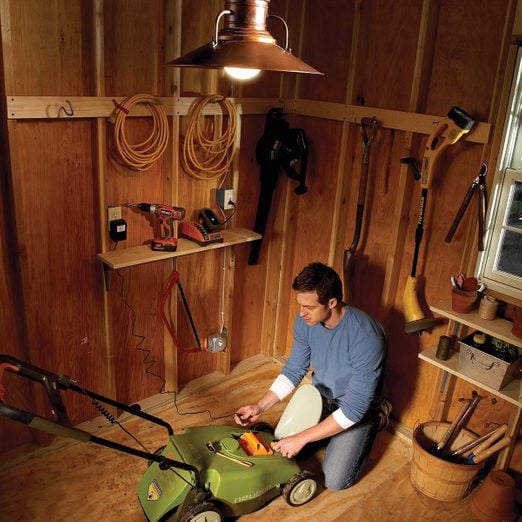
Dragging extension cords across the yard to power the string trimmer, fumbling around in a dark shed…most of us take these hassles for granted. But it doesn’t have to be that way. With a day’s work, you can run electrical lines to any part of your yard.
If you want to wire your garage. Here’s your guide to garage wiring!
This article will show you how to bring power to a shed, but the process is almost identical if you want to add an outdoor electrical box on a post planted in the soil.
A licensed electrician would charge at least several hundred dollars plus materials to run lines from your house to a shed 50 feet away (not including any work inside your house).
Running Power Through RMC
We’ll show you how to run wires through rigid metal conduit (RMC). This method offers the best protection of the wiring and requires the least amount of digging. It also lets you install a GFCI outlet at the end of the line rather than at the house, which means you’ll never have to run back to the house to reset a tripped GFCI.
If you want to provide a dedicated circuit to the shed, hire an electrician to make the final connection in your main electrical panel. Otherwise you can connect to an existing circuit if the circuit has enough capacity and the box you’re connecting to has enough volume for the additional wires.
Running Wires Inside Rigid Conduit
To run the wires inside rigid conduit, you’ll need a hacksaw, a pipe bender capable of bending 1/2-inch rigid conduit with an outside diameter of 3/4-inch, and a fish tape long enough to reach through the buried pipe.
You’ll also need a pair of pipe wrenches to screw the sections of pipe together, a drill and one-inch bit capable of penetrating your siding, and wire cutting and stripping tools.
A few weeks before you start the project, contact your local building department to obtain an electrical permit if one is required. Then a few days before you dig, call 811 to have your underground utility lines marked. Learn more at call811.com.
Project step-by-step (12)
Using Metal Conduit Means Less Digging
- Running wires inside rigid metal electrical conduit (RMC) is a little more expensive than burying underground feeder cable (UF), but it saves labor.
- This is because the top edge of RMC has to be only six inches below the surface of the ground, while UF must be buried 12-inches deep (deeper in some situations).
- That extra six inches of trench depth may not seem like a big deal. But it adds hours of backbreaking work, especially if you have rocky soil, hard clay or lots of tree roots.

Plan the Conduit Route and Dig the Trench
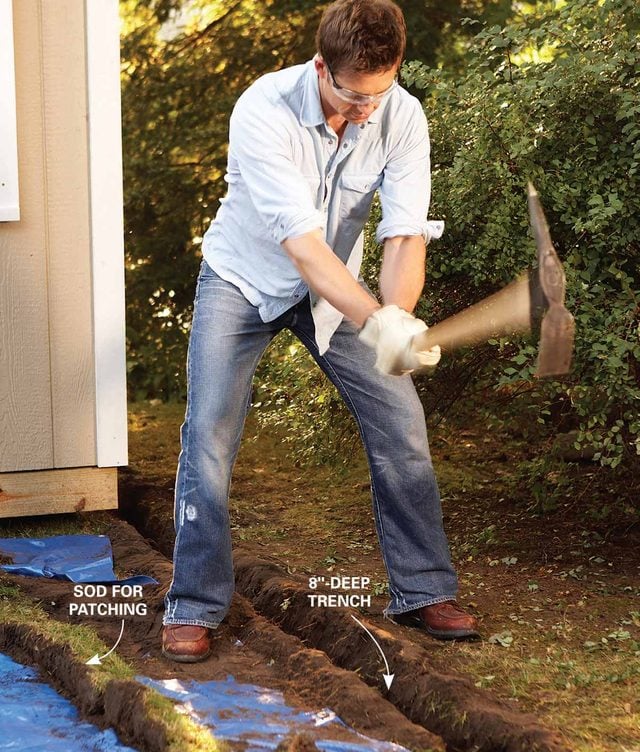
- Use a mattock to dig the trench. The narrow head means less dirt to remove and less to put back.
- Slice out strips of sod with a spade so you can neatly patch the lawn later.
- There are several factors to consider in planning the route from the house to the shed.
- Obviously the shorter the trench, the less digging you’ll have to do. But you also have to determine where you’re going to connect to power inside the house and how easy it will be to get there.
- In some cases, a little more digging could save you from having to tear into a basement ceiling.
- Start by locating a power source, whether it’s your main electrical panel, a ceiling box, outlet or other electrical box.
- Then figure out the best spot for the new conduit to enter the house.
- Pro tip: Since the National Electrical Code (NEC) limits the number of bends you can make in the pipe to a total of 360 degrees, you have to plan the route carefully. The two 90-degree bends from the ground into the house and shed consume 180 degrees, leaving you 180 degrees more for any additional bends.
- With the route planned, you can measure for the amount of wire and conduit you need and head to the hardware store or home center.
- Add 10 feet to the length of wire and pipe to make sure you’ll have enough.
- It’s smart to drill the hole into the house before you start digging just in case you run into an obstacle and have to choose a new location.
- When you’re sure of the exit point, dig a trench from the house to the shed.
- Pro tip: If you’re going across a lawn, remove a slice of sod the width of a spade from the surface and set it aside to reuse after you bury the pipe.
- Then use a mattock or narrow spade to dig the trench.
- Pile the dirt on plastic tarps so you don’t have to rake it out of the grass later.
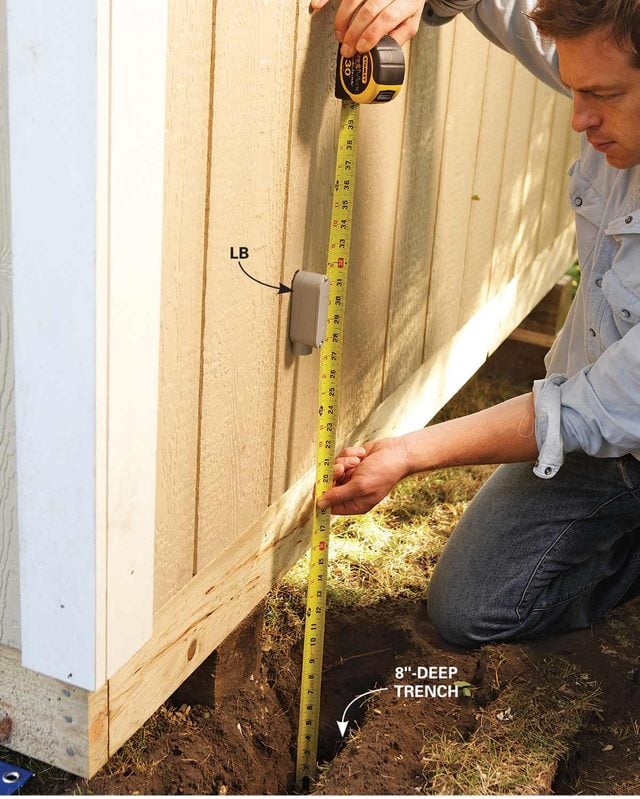
Mount the LBs and Metal Boxes
- The rigid conduit will come out of the ground and into a fitting called an “LB.”
- The LB has a removable cover that simplifies the task of pulling wire by eliminating a sharp right-angle turn.
- The trickiest part of this project is mounting the LBs and connecting them to metal boxes inside the house and shed.
- In general, you’ll have to choose a box location and then calculate the length of electrical metallic tubing (EMT) needed to reach from the back of the LB to the box.
- Pro tip: If you’re going into a basement or crawl space, the length of the conduit usually isn’t critical.
- Start by drilling a small hole with a long bit to make sure you’re in the right spot.
- Then drill a one-inch hole for the LB and conduit.
- Screw a 1/2-inch conduit connector into the back of the LB and then attach a piece of 1/2-inch EMT that’s long enough to reach an easily accessible box in the basement or crawl space.
- After you’ve mounted the LB to the siding, go inside and add a conduit connector and a metal electrical box to the other end of the EMT.
- This box is where you’ll make the connections from your house wiring to the new shed wiring.
- On the inside of the shed, you’ll screw a 4 x 4-inch square metal box to the side of the stud.
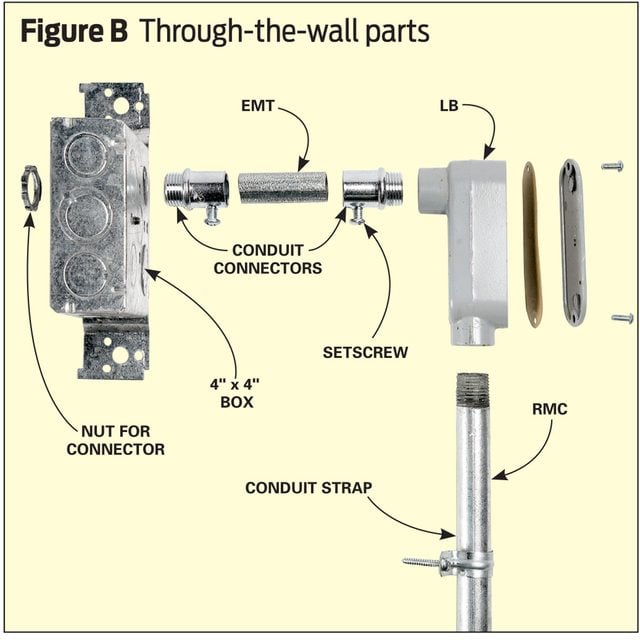
- Then connect the LB to the box using the parts shown in Figure B (below).
Figure B: Through-the-Wall Parts
- Running the conduit through the wall to an inside box is the most difficult step.
- The 10-foot lengths of RMC are threaded on both ends and include a coupling on one end.
- You’ll start by bending the first pipe and threading an LB onto the end.
- Then thread the pipes together one at a time until you reach the other end, where you’ll cut and bend the last piece of conduit to fit and connect it to the LB with a compression connector. The photos below show the process.
Run the Metal Conduit and Plan the Bend
- Temporarily attach the LB to the shed and measure from the bottom of the trench to the bottom of the LB fitting.
- Add 3/4-inch for the threads that’ll go into the LB and subtract the bending allowance listed on your bender (usually six inches) from this measurement for the bend.
- Mark this length on a piece of conduit, measuring from the end with bare threads.
Bend the Conduit
- Pull back on the conduit bender until the end stands straight up.
- A magnetic level lets you know when you’ve got a perfect 90-degree bend.
- Take the bent conduit back to the trench and screw the LB onto the end.
- Align the mark on the conduit with the arrow on the bender.

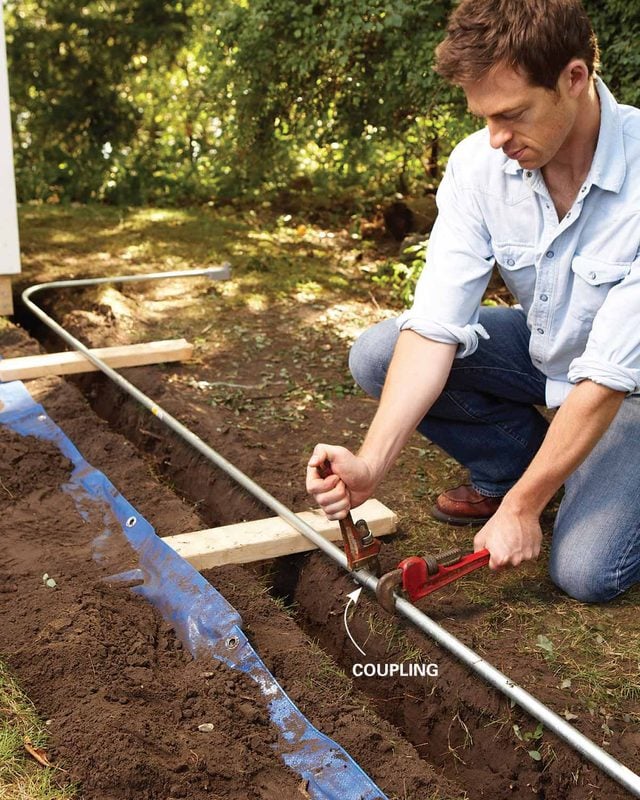
Join the Conduit
- Assemble the conduit run above ground to make tightening the connections easier.
- Support the conduit with 2x4s until you’ve connected all but the last section.
- Connect lengths of conduit until you reach the house.
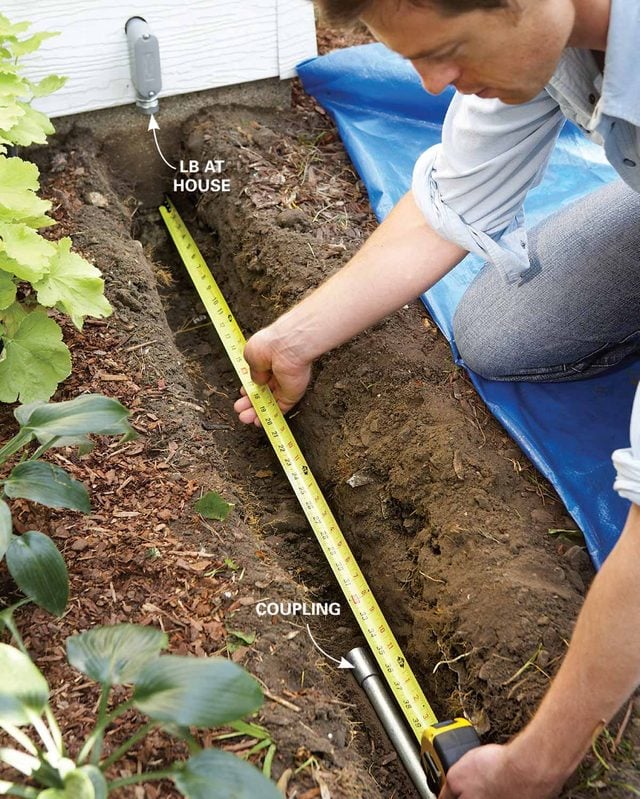
Plan the Last Piece
- Bend the last piece of conduit up and cut it off to fit into the compression connector.
- Start by measuring from the last piece of conduit to the house wall.
- If the LB is held away from the wall by siding, subtract this distance from the measurement.
- Then add 3/4-inch for the threading and subtract for the bend.
- Adjust the measurement for the distance the LB protrudes from the wall.
- Mark the last piece of conduit, starting from the bare threads.
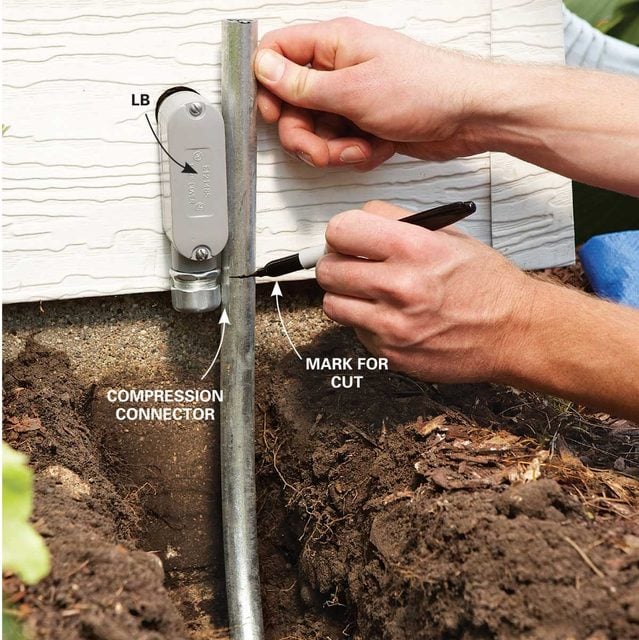
Mark and Cut
- Hold the bent conduit in place to mark it for cutting starting from the bear threads.
- Since there are no threads on the end of the pipe, screw a compression fitting into the LB and connect the conduit to it.
- Face the threaded end of the conduit when you make this bend, not the end with the coupling.
- Mark the conduit and cut it with a hacksaw.
- Remove burrs from the inside of the pipe by smoothing with a file or by inserting the bare metal handles of pliers into the pipe and twisting.
- Complete the conduit run by threading on the last piece of conduit.
- You’ll have to lift the previous piece of conduit to create clearance as you spin the bent pipe around.
- Finally, slip the end of the conduit into the compression connector and tighten the compression nut with a wrench.
- Wrap a conduit strap around the conduit and screw it to the house to secure the conduit.
- Also press a rope of “duct seal” around the top of the LB to keep water out.
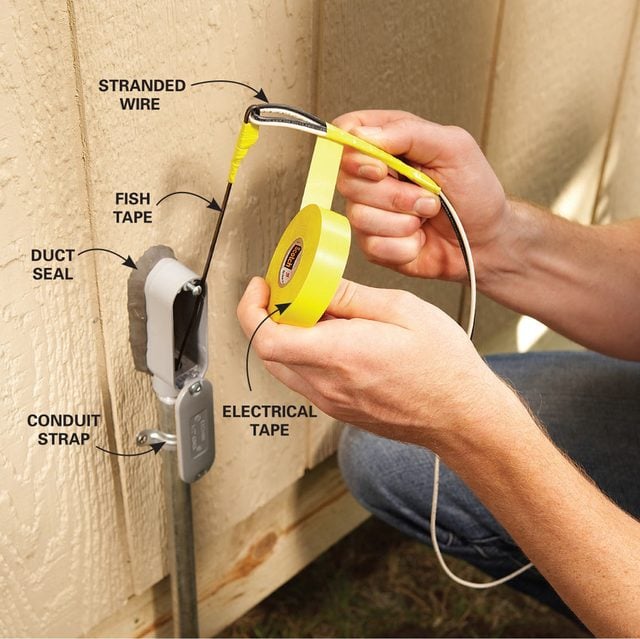
Tie the Wire to Fish Tape
- Remove the covers from the LBs and push a fish tape through the conduit.
- Feed the fish tape through the conduit.
- Loop the wires through the fish tape and wrap them with electrical tape.
- Also wrap the hook on the fish tape so it can’t snag.
- Use stranded electrical wire, not solid wire.
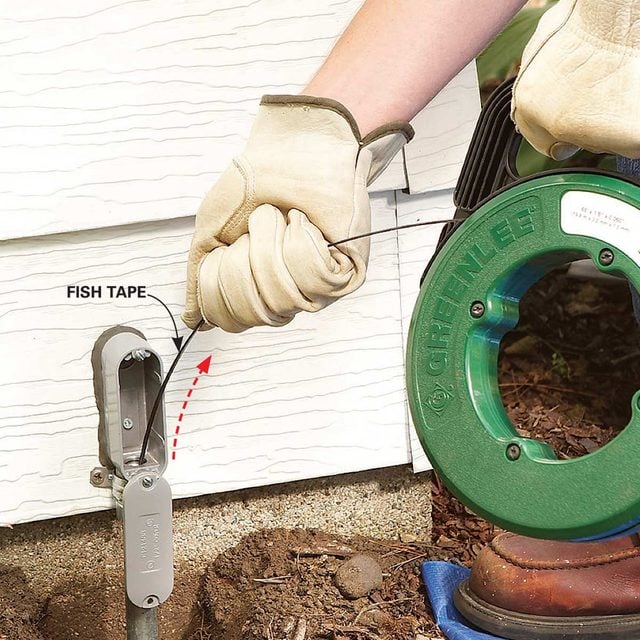
Pull the Wires
- Fish the wires through the conduit.
- Pro tip: This is a two-person job — you need a helper at the other end to feed the wires into the conduit.
- You’ll need two wires, one white and one black, for one circuit, or more if you intend to wire a threeway switch from the house or add more than one circuit.
- Use THWN-2, 14-gauge stranded wire if you get power from a 15-amp circuit, or THWN-2, 12-gauge stranded wire for a 20-amp circuit.
- Leave enough extra wire on each end to reach the inside metal box plus 12 inches.
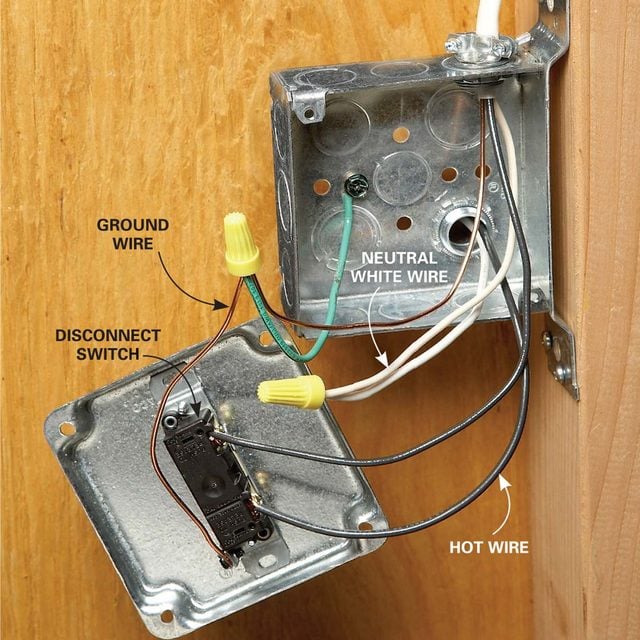
Start with a Switch
- The National Electrical Code (NEC) requires a means, such as a single-pole switch, to disconnect the power where it enters the shed.
- Pro tip: The photo below shows how to connect the switch, ground wire and neutral wires.
- Connect the wires inside the shed to a switch.
- Run wires from the switch to a GFCI receptacle, and from there to the rest of the outlets or lights in your shed.