
Tips for Hanging Doors
Updated: Jan. 30, 2024
These seven pro tips will help you hang doors faster and better.
Introduction
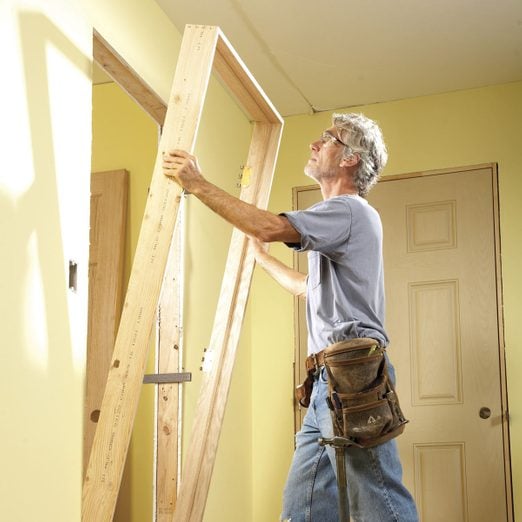
A veteran carpenter shares his secrets about how to hang a door plumb and true even if the rough opening isn't perfect. Even a novice can master his techniques with a little practice.Tools Required
- 4 ft. level
- Drill bit set
- Drill/driver - cordless
- Hammer
- Handsaw
- Jamb level
- Sledgehammer
- Square
- Tape measure
- Utility knife
Materials Required
- 3-in. screws
- Wood shims
Project step-by-step (7)
Shim before the door goes in
Shim the easy way
![]()
Mark the location of the hinges on the drywall alongside the opening so you’ll know where to place the door shims. Place door shims at the top and bottom hinge locations using a long level or a straight board and a short level. Then add the center door shims.
You already know the standard approach to hanging a door: Set it in the rough opening, then level, shim and nail it. This traditional approach works fine in a perfect world where walls are always plumb, floors are level and you have plenty of time to fuss with the fit. But in the real world, some nonstandard tricks can help you finish the job faster and better.
The usual method of holding the door frame in place while you shim behind the hinge side is awkward. It’s a lot easier to shim the hinge side of the rough opening before you put in the door frame. After that, it’s a simple job to set the interior door frame in place, screw or nail it to the shims, and then shim the strike side. Measure the width of the rough opening before you start shimming to see how much shim space is available. Usually the rough opening allows for about 1/2 in. of shimming on each side of the frame. If the rough opening is extra wide, you can use fewer shims by tacking scraps of 1/2-in. plywood at the hinge locations first, and then add shims to plumb the jamb.
Make sure an exterior door clears the rug
Avoid clearance problems
Screw a strip of plywood to the bottom of the rough opening to raise the door and prevent it from rubbing on the floor inside.
Most of the time, you can simply set your new exterior door frame directly on the subfloor and the door will easily clear carpeting or a throw rug. But if you’re replacing an old door with a thick sill, or if the floor will be built up with tile, thick carpet or an extra layer of wood, you could have a problem. And there’s no easy solution after the door is installed. You can’t simply trim the bottom, because then the door won’t seal against the sill. To avoid this problem, add a spacer under the door before you install it. The key is to determine where the top of the tile, carpet or throw rug will be, and then raise the door frame to leave about a 1/2-in. space under the door (photo).
Set interior jambs on spacers
Avoid trimming door bottoms
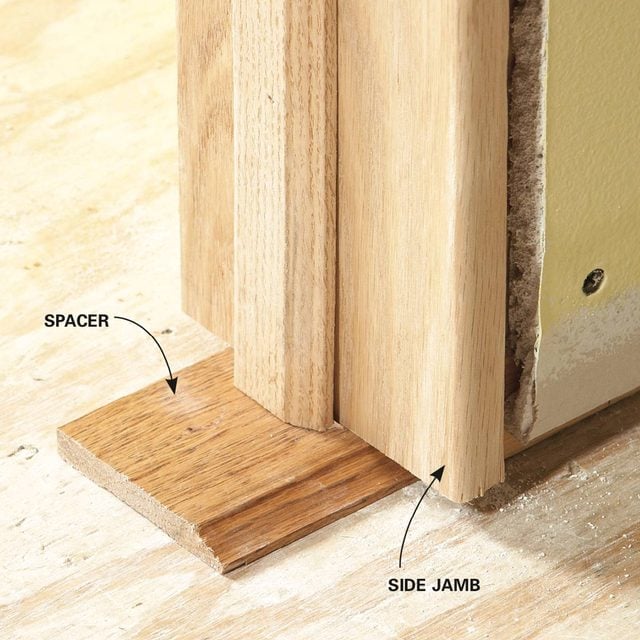
Raise interior door jambs with scraps of trim to make sure the door will clear the carpeting. If you set the interior door jambs directly on the subfloor, there’s a good chance the door will rub against the carpet later. Of course, you can cut off the bottom of the doors, but it’s easy to avoid this extra work by planning ahead. Find out the thickness of the finish floor and then calculate where the bottom of the door will be. Plan the installation so there will be about 1/2 to 3/4 in. of space under the door. Usually setting the doorjambs on scraps of 3/8- to 1/2-in.-thick trim will put the door at the correct height.
Hidden screws make exterior doors stronger
Hide the screws
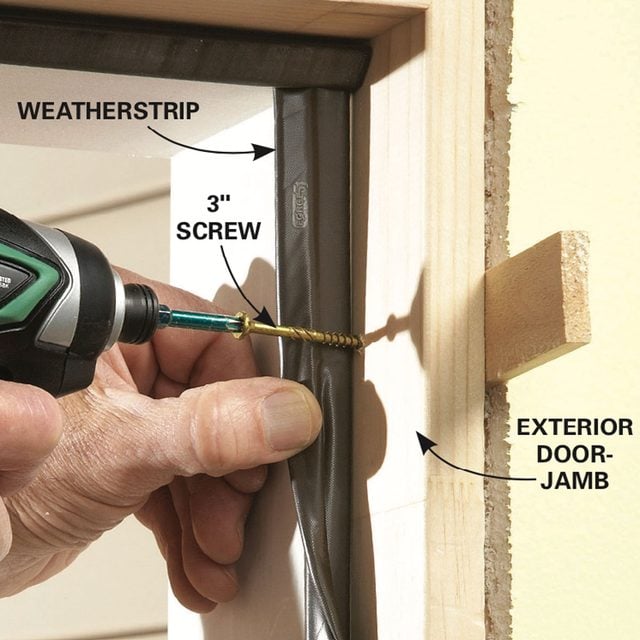
Pull back or remove the weather strip on the latch side of the door frame and drive screws where they’ll be hidden. There are many benefits to using screws rather than nails to install exterior doors. They can be adjusted and won’t easily pull out or loosen. But you don’t want to leave the painter with the task of filling big, ugly screw holes. The trick is to hide the screws under the weather stripping on the latch side. On the hinge side, you can simply replace one screw in each hinge with a matching 3-in.-long screw. Always start by drilling a clearance hole that allows the screw to slide freely in and out of the hole. This ensures the screw will pull the jamb tight to the shims, and allows for adjustment if needed. Don’t let the spinning screw rub against the weather strip—it will slice right through. I know this from bitter experience.
Tune up the rough opening
How to build a door frame right: Check for plumb
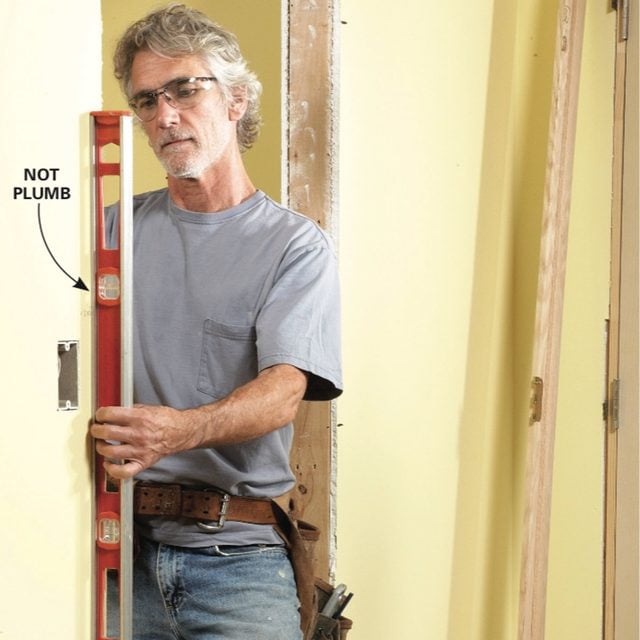
Check both sides of the door opening. If they’re more than 1/4 in. out of plumb, adjust them before you install the door.
Nudge the wall
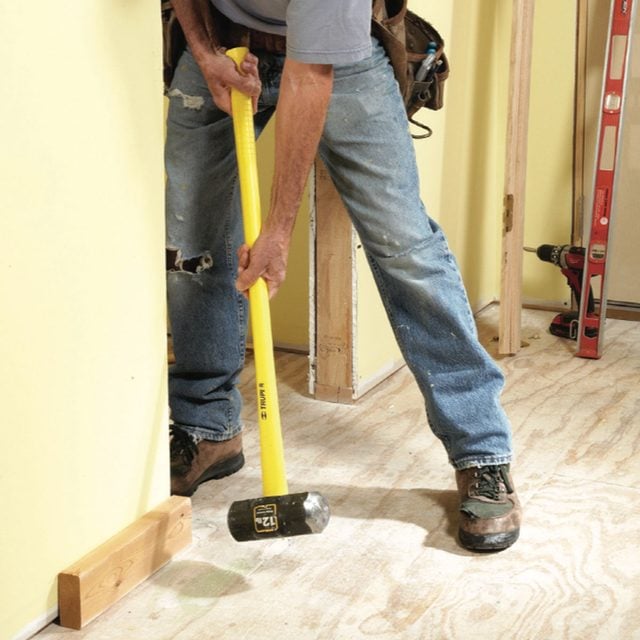
Protect the wall with a 2×4 scrap while you move the bottom of the wall over with a sledgehammer. When the wall is plumb, toe-screw the bottom plate to the floor to hold it in place.
Twisted or out-of-plumb rough openings raise havoc with door installations. If you install the jambs to follow the walls, the door is likely to swing open or shut on its own. On the other hand, if you plumb the jambs against the out-of- plumb rough opening, the trim will be hard to install.
As long as the bottom of the wall isn’t held in place by flooring, there’s a simple solution. Just move the studs on both sides of the opening back to plumb. Don’t think you can do this with your trim hammer, though. You’ll need a maul or a sledgehammer.
How One Pro Installs a Door in Four Easy Steps
John Schumacher, owner of Millwork Specialties Ltd. in Minnesota, has been installing doors and millwork for more than 20 years. He’s learned to avoid callbacks by doing the job right the first time. Here’s his door installation method in a nutshell.
1. Plumb the hinge jamb
The hinge side of the door has to be plumb or the door will swing open or closed on its own. Start by shimming the hinge side of the rough opening. First make marks to indicate the centers of the hinges. Then use a long level or a long, straight board along with a short level to plumb the shims. Tack a pair of tapered shims at the top hinge. Then install the bottom shims and finally fill in the middle.
2. Screw the hinge-side jamb to the stud
Remove the door from the frame and set it aside. Remove the hinge leaves from the jamb. Set the door frame in the opening with the jamb resting on the finished floor (Photo 2) or on a spacer. Drive 3-in. screws through the jamb where they’ll be hidden by the screws.
3. Adjust the gap along the top
Slide shims between the floor and the latch-side jamb until the head jamb is level. Now reinstall the door hinges and the door. Adjust the door shims under the latch-side jamb until the gap between the top of the door and the top jamb is even.
4. Shim and nail the latch-side jamb
Shim behind the latch-side jamb to make an even gap between the door and the jamb. Usually three or four sets of door shims, evenly spaced along the jamb, are plenty. Drive two finish nails into each set of shims to hold the jamb in place. Cut off the protruding door shims with a fine-tooth saw or a utility knife.
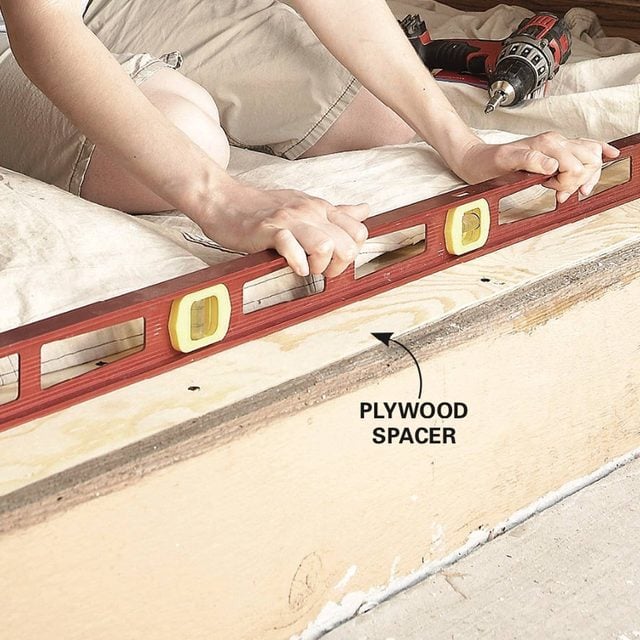
Trim the bottom to level the top
Check with a level
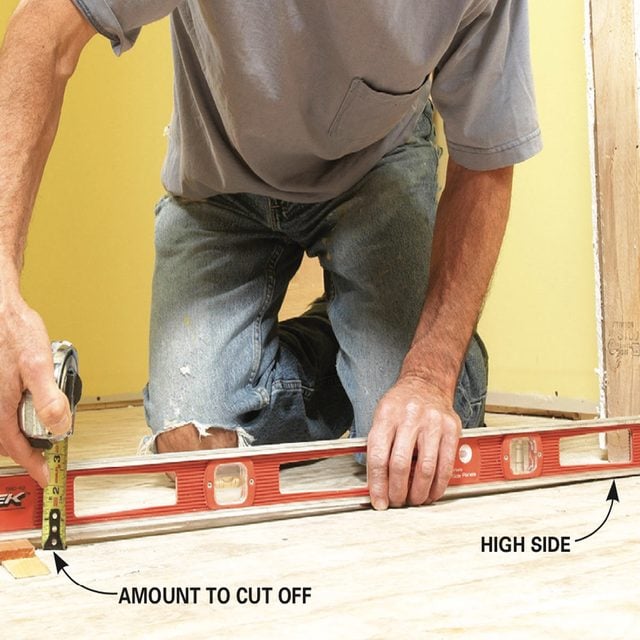
Level across the opening and shim up one side until the bubble is centered. The distance between the level and the floor tells you how much to cut off the jamb.
Cut the high-side jamb
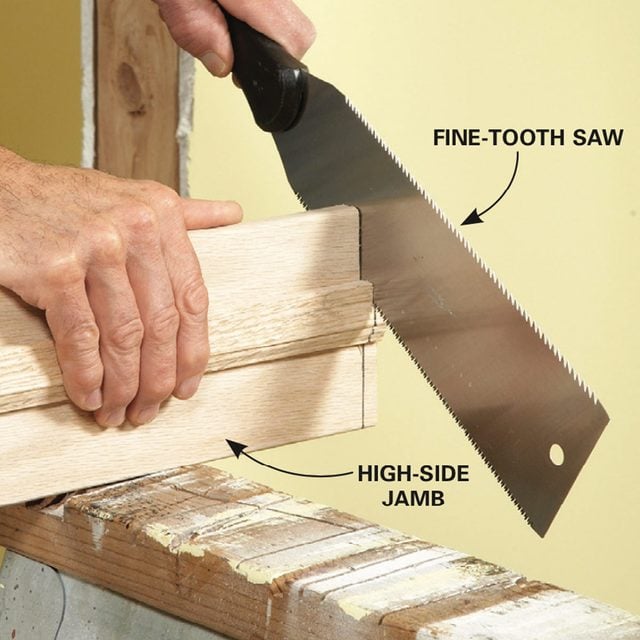
Trim the jamb with a fine-tooth saw. A “Japanese”-style pull saw cuts fast and leaves a clean cut. Old houses are notorious for having sloping floors. Even some newer houses settle in unexpected ways. If you don’t cut the interior door jamb to compensate for the out-of-level floor, you could have a problem getting an even space between the top of the door and the head jamb. This is critical if you’re installing a door over existing flooring where the jambs have to fit tightly to the floor. Photos 1 and 2 show how to trim the jambs to fit a sloping floor.
When installing door hinges: Hide screws behind the hinges
Use screws, not nails
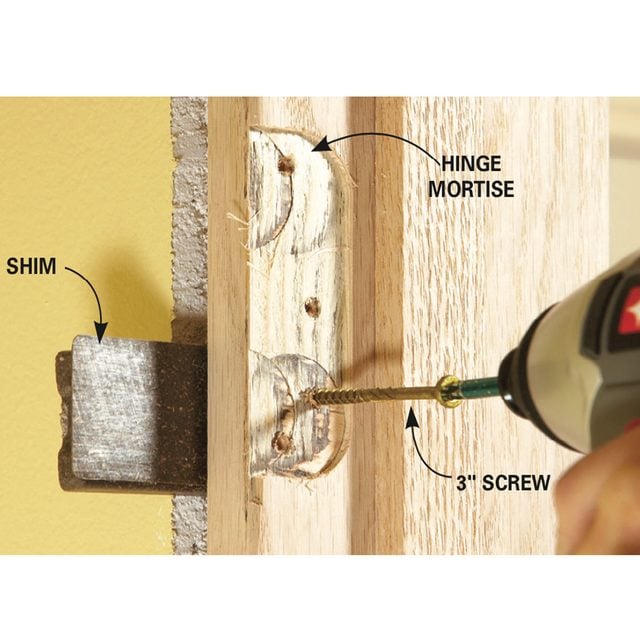
Screw through the jamb in the hinge mortise. The screws will hold better than nails and will be hidden by the hinges. Screws are better for securing the hinge jamb because nails can work loose. You can easily replace one of the short hinge screws with a long screw, but it can be difficult to find a strong screw that matches the other screws. Here’s a trick we learned. Hide the screw behind the hinge. It only takes a minute or two to remove all the hinges and gain access to this area. Then you can drive a self-drilling screw through the jamb with ease. Make sure the jamb is straight and plumb before you reinstall the hinges.
Trouble-Shooting Tips
Door Won’t Latch
Out-of-plumb jambs or a warped door can cause this. If the door won’t latch because it’s hitting the latch-side stop on the top or bottom, the fix is to move the stop. If it only needs a little adjustment, you can just tap it over with a hammer and a block of wood. Otherwise, pry it off carefully, and with the door closed and latched, reinstall it against the door.
Door Binds and Resists Closing
If the door isn’t rubbing against the jamb, but there’s tension when you try to close it, then it’s binding on the hinge jamb. Usually this means you haven’t shimmed correctly and the jamb isn’t at a right angle to the wall. Fix this problem by adjusting the hinge-side door shims to twist the jamb back to a right angle with the wall.
All About Smart Door Locks: Keyless Entry, Bluetooth, and More